The HTML5 JavaScript form validation API
 There is a JavaScript API for form validation. This API will let you use your own validation algorithm (i.e. check that you entered the same password in two different input fields), and customize error messages. Also, together with some HTML/CSS/JavaScript you will be able to make your own message bubbles.
TYPICAL USE
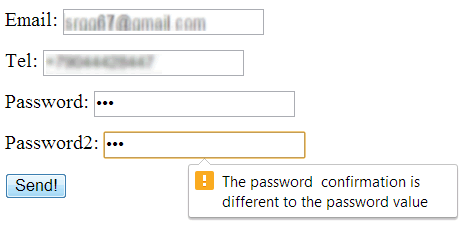
Example of password checking at JS Bin, be careful to try this example in JS Bin standalone mode (click the small black arrow on the top right of the output tab).
Or you may try it here in your browser:
Extract from source code:
- <html>
- <head>
- <title>Example of using the validation API</title>
- <style>
- .myForm input:invalid { background-color: lightPink;}
- .myForm input:valid { background-color:lightGreen; }
- .myForm input:required {border: 2px solid red;}
- .myForm input:optional {border: 2px solid green;}
- .myForm label { display: inline-block; width: 140px; text-align: right; }
- </style>
- </head>
- <body>
- <form class="myForm">
- <fieldset>
- <legend>Example use of the validation API</legend>
- <label for="password1" >Password:</label>
- <input type="password" id="password1" oninput="checkPasswords();"required>
- <p>
- <label for="password2">Repeat password:</label>
- <input type="password" id="password2" oninput="checkPasswords();"required>
- <p>
- <button>Submit</button>
- </fieldset>
- </form>
- <script>
- function checkPasswords() {
- var password1 = document.getElementById('password1');
- var password2 = document.getElementById('password2');
- if (password1.value != password2.value) {
- password2.setCustomValidity('Passwords do not match!');
- } else {
- password2.setCustomValidity('');
- }
- }
- </script>
- </body>
- </html>
Explanations: the validity API proposes a setCustomValidity() method available on input DOM objects. This method allows you to customize error messages. It takes a string parameter. When this string is empty, the element is considered valid, when the string is not empty, the field is invalid and the validation error message displayed in the bubble will be equal to that string.
At lines 17 and 20 we added an input event listener: each time a key is typed, the checkPasswords()function is called.
Lines 28 and 29 get the input fields' values, and lines 31-35 check if the passwords are the same and set the validity of the field using the validation API's method setCustomValidity(error_message).
The validity property of input fields
The validity property of input fields helps to get error details when the field is invalid. This property tests the different validation types errors.
Here is how to get the validity property of an input field:
- var input = document.getElementById('IdOfField');
- var validityState_object = input.validity;
The different possible values for the validity property are:
- valueMissing
- typeMismatch
- patternMismatch
- tooLong
- rangeUnderflow
- rangeOverflow
- stepMismatch
- valid
- customError
Here is an example at JS Bin that shows how to test the different types of validation errors, or you may try it here in your browser (enter bad values, too big, too small, enter invalid characters, etc.):
Note that testing it in Chrome/Opera/Firefox does not produce the same results. So far Opera has the most advanced implementations, however, entering "21" for example in the <input type="number" max="20"/>input field may yield some unexpected results depending on the browser. Test it yourself.
Source code:
- <!DOCTYPE html>
- <html>
- ...
- <body>
- <script>
- function validate() {
- var input = document.getElementById('b');
- var validityState_object = input.validity;
- if(validityState_object.valueMissing) {
- input.setCustomValidity('Please set an age (required)');
- } else if (validityState_object.rangeUnderflow) {
- input.setCustomValidity('Your value is too low');
- } else if (validityState_object.rangeOverflow) {
- input.setCustomValidity('Your value is too high');
- } else if (validityState_object.typeMismatch) {
- input.setCustomValidity('Type mismatch');
- } else if (validityState_object.tooLong) {
- input.setCustomValidity('Too long');
- } else if (validityState_object.stepMismatch) {
- input.setCustomValidity('stepMismatch');
- } else if (validityState_object.patternMismatch) {
- input.setCustomValidity('patternMismatch');
- } else {
- input.setCustomValidity('');
- }
- }
- </script>
- <form class="myForm">
- <label for="b">Enter a value between 10 and 20: </label>
- <input type="number" name="text" id="b" min="10" max="20"
- required oninput='validate();'/>
- <button>Submit</button>
- </form>
- </body>
- </html>
THE VALIDATIONMESSAGE PROPERTY
It is also possible to get the validation error message, using the validationMessage property of input fields.
- var input = document.getElementById('b');
- console.log("Validation message = " + input.validationMessage);
This will be useful for making custom error messages. More about this topic in the next section of the course.
Custom validation: changing the default behavior, aggregating error messages, removing bubbles, etc.
CRITICISM OF THE DEFAULT BEHAVIOR OF HTML5 BUILT-IN VALIDATION
The techniques we saw up to now for enhancing HTML forms are powerful and bring interesting features, but are also criticized by Web developers:
- Browser support is still not 100% complete (Safari and Internet Explorer still lack several important features),
- Aggregating error messages is not possible. On submission, browsers show an error bubble next to the first invalid field, and there is no built-in way to display all error messages for all invalid fields at the same time,
- You cannot style the bubbles.
However, the validation API gives enough power to make your own validation behavior, overriding the default when necessary.
We will give here an adaptation of work presented at the developer.telerik.com Web site. This link is really worth reading, as it presents different approaches and gives external references for those who would like to go further.
EXAMPLE THAT SHOWS AGGREGATION OF ERROR MESSAGES + OVERRIDING DEFAULT BEHAVIOR
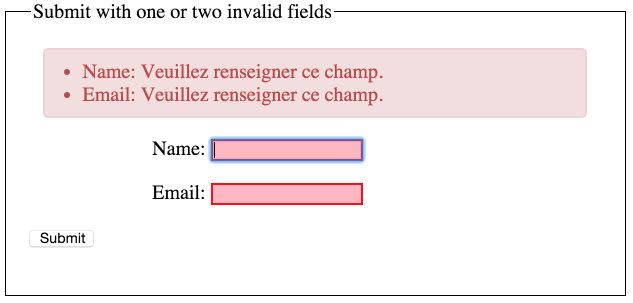
Try the online example at JS Bin, or try it here in your browser: enter invalid values and submit with one or two invalid fields.
Complete source code:
- <!DOCTYPE html>
- <html>
- <head>
- <meta charset="utf-8">
- <title>Aggregating error messages</title>
- <style>
- input:invalid { background-color: lightPink;}
- input:valid { background-color:lightGreen; }
- input:required {border: 2px solid red;}
- input:optional {border: 2px solid green;}
- .error-messages {
- display: none;
- margin: 0 10px 15px 10px;
- padding: 8px 35px 8px 30px;
- color: #B94A48;
- background-color: #F2DEDE;
- border: 2px solid #EED3D7;
- border-radius: 4px;
- }
- fieldset {
- border:1px solid;
- padding:20px;
- }
- </style>
- </head>
- <body>
- <form>
- <fieldset>
- <legend>Submit with one or two invalid fields</legend>
- <ul class="error-messages"></ul>
- <label for="name">Name:</label>
- <input id="name" name="name" required>
- <p>
- <label for="email">Email:</label>
- <input id="email" name="email" type="email" required>
- <p>
- <button>Submit</button>
- </fieldset>
- </form>
- <script>
- function replaceValidationUI(form) {
- // Suppress the default bubbles
- form.addEventListener("invalid", function (event) {
- event.preventDefault();
- }, true);
- // Support Safari, iOS Safari, and the Android browser—each of which
- // do not prevent form submissions by default
- form.addEventListener("submit", function (event) {
- if (!this.checkValidity()) {
- event.preventDefault();
- }
- });
- // Container that holds error messages. By default it has a CSS
- // display:none property
- var errorMessages = form.querySelector(".error-messages");
- var submitButton = form.querySelector("button:not([type=button]),
- input[type=submit]");
- submitButton.addEventListener("click", function (event) {
- var invalidFields = form.querySelectorAll("input:invalid");
- var listHtml = "";
- var errorMessagesContainer = form.querySelector(".error-messages");
- var label;
- // Get the labels' values of their name attributes + the validation error
- // message of the corresponding input field using the validationMessage
- // property of input fields
- // We build a list of <li>...</li> that we add to the error message container
- for (var i = 0; i < invalidFields.length; i++) {
- label = form.querySelector("label[for=" + invalidFields[ i ].id+ "]");
- listHtml += "<li>" +
- label.innerHTML +
- " " +
- invalidFields[ i ].validationMessage +
- "</li>";
- }
- // Update the list with the new error messages
- errorMessagesContainer.innerHTML = listHtml;
- // If there are errors, give focus to the first invalid field and show
- // the error messages container by setting its CSS property display=block
- if (invalidFields.length > 0) {
- invalidFields[ 0 ].focus();
- errorMessagesContainer.style.display = "block";
- }
- });
- }
- // Replace the validation UI for all forms
- var forms = document.querySelectorAll("form");
- for (var i = 0; i < forms.length; i++) {
- replaceValidationUI(forms[ i ]);
- }
- </script>
- </body>
- </html>
Explanations:
- Line 32: we added an empty unnumbered list (<ul>..</ul>) to the form, with the CSS class="error-messages". We will use this class attribute for styling and hiding by default the error messages using CSS (see lines 12-20, line 13 hides the messages by default).
- Lines 97-102 look at all forms in the document and call a function that will replace the default validation behavior for all of them: the replaceValidationUI(form) function.
- This function first disables all default behavior (no more display of bubbles in case of form submission), this is done at lines 45-57.
- Line 66: we add a click listener to the submit button of the current form.
- Line 67 gets all invalid input fields for that form,
- Lines 76-83: For each invalid field, we get the value of the name attribute of the corresponding label, we also get the validation error message, and we build a list item(<li>...</li>).
- Line 86: Then we add this list element (a formatted error message corresponding to an invalid input field) to the error message container.
- Lines 90-93: The focus is given to the first invalid field that shows the error messages.
- In order to stop the webcam and make the hardware "unlock it", you need to call the stop() method of the video stream.Modified version of the previous example:
- <html>
- <head>
- <meta charset="utf-8">
- <title>JS Bin</title>
- <script>
- navigator.getUserMedia = ( navigator.getUserMedia ||
- navigator.webkitGetUserMedia ||
- navigator.mozGetUserMedia ||
- navigator.msGetUserMedia);
- var webcamStream;
- function startWebCam() {
- if (navigator.getUserMedia) {
- navigator.getUserMedia (
- // constraints
- {
- video: true,
- audio: false
- },
- // successCallback
- function(localMediaStream) {
- var video = document.querySelector('video');
- video.src = window.URL.createObjectURL(localMediaStream);
- webcamStream = localmediaStream;
- },
- // errorCallback
- function(err) {
- console.log("The following error occurred: " + err);
- }
- );
- } else {
- console.log("getUserMedia not supported");
- }
- }
- function stopWebcam() {
- webcamStream.stop();
- }
- </script>
- </head>
- <body >
- <video width=200 height=200 id="video" controls autoplay></video>
- <button onclick="startWebcam();">Start Webcam</button>
- <button onclick="stopWebcam();">Stop Webcam</button>
- </body>
- </html>
Explanation:
Lines 6-9: set the navigator.getUserMedia method with the name that works on the current browser. As some browsers only have experimental implementations, this method needs to be prefixed by -webkit or -moz etc. Like that, in the rest of the code, we can just use navigator.getUserMedia without worrying about prefixes. In case the browser does not support this API at all, it will receive null.Line 13: we test if navigator.getUserMedia is not null (aka supported by the current browser).Lines 14-32: we call navigator.getUserMedia. We defined here (line 21 and 28) the callback functions directly between the parenthesis of the method call. This is possible with JavaScript, and might confuse beginners:- Lines 15-19 define the first parameter of the call: a JavaScript object that defines the "constraints", here we only want to capture the video.
- Lines 21-26 define the function called in case of success, instead of having just the function name here like in previous examples, we directly put the code of the function. Lines 23-25 are executed when the webcam stream could be opened. Line 25 we store the stream in a global variable so that we can use from another function (for stopping/starting the webcam...)
- Lines 28-31 define a function called in case of error (the webcam cannot be accessed).
Line 32: closing parenthesis of the navigator.getUserMedia(...) method call.Lines 37-39: a function for stopping the webcam. We use the global variable webcamStream here, that has been initialized when we started using the webcam, line 25.OTHER EXAMPLES THAT MIX IN WHAT WE'VE SEEN IN PREVIOUS CHAPTERS, BUT THIS TIME WITH A LIVE VIDEO STREAM
Applying CSS effects on a video element with a live webcam
Try this example that shows how to use the getUserMedia API - note the CSS effects (click on the video to cycle from one effect to another). Works in Chrome/Firefox/Opera: Online version at JS Bin
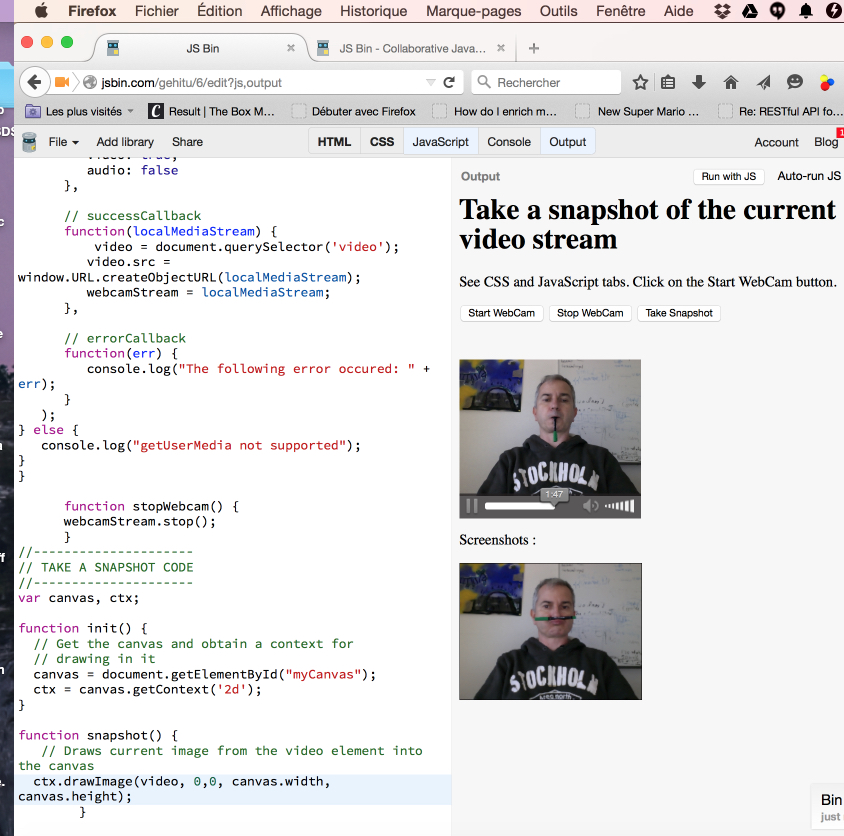
Taking a snapshot from the live webcam stream
The trick is to copy and paste the current image from the video stream into a <canvas> element:
Online version at JS Bin
We will get into more details about this example next week when we will look at the <canvas> element. For the time being, just play with the example.
Online version at JS Bin
We will get into more details about this example next week when we will look at the <canvas> element. For the time being, just play with the example.
IMPRESSIVE DEMONSTRATIONS AVAILABLE ON THE WEB
- Exploding video: look at yourself and click on the video to make it explode! Working demonstration andexplanations here.
- Live CSS filter Photo booth
- A MUST TRY: Paul Neave's WebGL Camera Effects
- Paint in real time with webcam output, choose webcam in the right menu, then click and drag rectangles.
Working with the microphone
Instead of using the getUserMedia API with: navigator.getUserMedia({video:true}, onSuccess, onError), it is also possible to use {audio:true} for the first parameter. In that case, only the microphone input will be captured. Notice that {video:true, audio:true} is also accepted, if you write a video conferencing system and need to capture both the audio and the video (this is often the case when writing WebRTC applications). The W3C WebRTC is another W3C specification, under development, for P2P audio/video/data Real Time Communication.
Apart from videoconferencing, microphone input will be used for music Web apps, from the WebAudio API. This API focuses on real time sound processing and music synthesis. This API will be covered in the advanced W3Cx HTML5 course.
Do try some nice WebRTC applications like Appear.in audio and video conferencing tool. Also check out theWebAudio demonstrations written by Chris Wilson, in particular the one called "Input effects".
Below is an example of real time audio processing of the microphone input using getUserMedia and WebAudio APIs
appear.in: a free WebRTC video conferencing tool. It uses the getUserMedia API for video and audio.
How to set the webcam resolution
Note that as of June 2015, this only works with Google Chrome, but should come soon
on the other browsers that support the getUserMedia API.
on the other browsers that support the getUserMedia API.
It is possible to set "hints" for the preferred resolution during video capture. This is done by using a "constraint" object that is passed as a parameter to the getUserMedia(...) method. It's just the same object we passed in the basic example: navigator.getUserMedia({video:true}, success, error) except that this time this object is a little more complex.
For more information, this article on HTML5rocks.com about the getUserMedia API gives extra examples on how to set the camera resolution. Check also this good article that tested systematically a set of "preferred resolutions" and compared them to the actual resolutions returned by the browser. Remember that the requested resolution is a hint, and there is no real guarantee that your configuration will allow it.
Typical use:
- var constraint = {
- video: {
- mandatory: {
- maxWidth: 320,
- maxHeight: 200
- }
- }
- };
- navigator.getUserMedia(constraint, success, error);
- function sucess(stream) {
- video.src = window.URL.createObjectURL(stream);
- }
- function error(error) {
- console.log('navigator.getUserMedia error: ', error);
- }
COMPLETE EXAMPLE: CHOOSE BETWEEN 3 DIFFERENT RESOLUTIONS
HTML code:
- <!DOCTYPE html>
- <html>
- <head>
- <title>getUserMedia constraints for choosing resolution</title>
- </head>
- <body onload="init();">
- <h1>Set the camera resolution</h1>
- Example adapted from:
- <a href="http://www.simpl.info/getusermedia/constraints/">
- http://www.simpl.info/getusermedia/constraints/
- </a>
- <br>
- <p>Click a button to call <code>getUserMedia()</code> with appropriate
- resolution.</p>
- <div id="buttons">
- <button id="qvga">QVGA</button>
- <button id="vga">VGA</button>
- <button id="hd">HD</button>
- </div>
- <p id="dimensions"></p>
- <video autoplay></video>
- </body>
- </html>
JavaScript code:
- var vgaButton, qvgaButton, hdButton, dimensions, video, stream;
- function init() {
- vgaButton = document.querySelector('button#vga');
- qvgaButton = document.querySelector('button#qvga');
- hdButton = document.querySelector('button#hd');
- dimensions = document.querySelector('p#dimensions');
- video = document.querySelector('video');
- navigator.getUserMedia = navigator.getUserMedia ||
- navigator.webkitGetUserMedia ||navigator.mozGetUserMedia;
- // Defines event listeners for the buttons that set the resolution
- qvgaButton.onclick = function() {
- getMedia(qvgaConstraints);
- };
- vgaButton.onclick = function() {
- getMedia(vgaConstraints);
- };
- hdButton.onclick = function() {
- getMedia(hdConstraints);
- };
- // Trick: check regularly the size of the video element and display it
- // When getUserMedia is called the video element changes it sizes but for
- // a while its size is zero pixels... o we check every half a second
- video.addEventListener('play', function() {
- setTimeout(function() {
- displayVideoDimensions();
- }, 500);
- });
- }
- // The different values for the constraints on resolution
- var qvgaConstraints = {
- video: {
- mandatory: {
- maxWidth: 320,
- maxHeight: 180
- }
- }
- };
- var vgaConstraints = {
- video: {
- mandatory: {
- maxWidth: 640,
- maxHeight: 360
- }
- }
- };
- var hdConstraints = {
- video: {
- mandatory: {
- minWidth: 1280,
- minHeight: 720
- }
- }
- };
- // The function that is called when a button has been clicked: starts the video
- // with the preferred resolution
- function getMedia(constraints) {
- if (!!stream) {
- video.src = null;
- stream.stop();
- }
- navigator.getUserMedia(constraints, successCallback, errorCallback);
- }
- // callback if the capture is a sucess or an error
- function successCallback(stream) {
- window.stream = stream; // For resetting it later if we change the resolution
- video.src = window.URL.createObjectURL(stream);
- }
- function errorCallback(error) {
- console.log('navigator.getUserMedia error: ', error);
- }
- // util function that is called by the setInterval(...) every 0.5s, for
- // displaying the video dimensions
- function displayVideoDimensions() {
- dimensions.innerHTML = 'Actual video dimensions: ' + video.videoWidth +
- 'x' + video.videoHeight + 'px.';
- }
Hi, Great.. Tutorial is just awesome..It is really helpful for a newbie like me.. I am a regular follower of your blog. Really very informative post you shared here. Kindly keep blogging. If anyone wants to become a Front end developer learn from Javascript Online Training from India . or learn thru ES6 Training in Chennai. Nowadays JavaScript has tons of job opportunities on various vertical industry. HTML5 CSS3 Javascript Online Training from India
ReplyDeleteWonderful blog you have shared over here, i like the way you presented it. Thanks and keep it up.
ReplyDeleteWebRTC application developer in India
I am happy to find this post Very useful for me, as it contains lot of information. I Always prefer to read The Quality and glad I found this thing in you post. Thanks uv04 form
ReplyDelete