Example 1: a video player with clickable transcript - reading WebVTT file content at once
A few words about the set of five examples presented in this chapter: the code of the examples is larger than usual, but each example integrates blocks of code already presented and detailed in the previous lessons.
CREATING AN ACCESSIBLE PLAYER WITH A CLICKABLE TRANSCRIPT OF THE VIDEO PRESENTATION
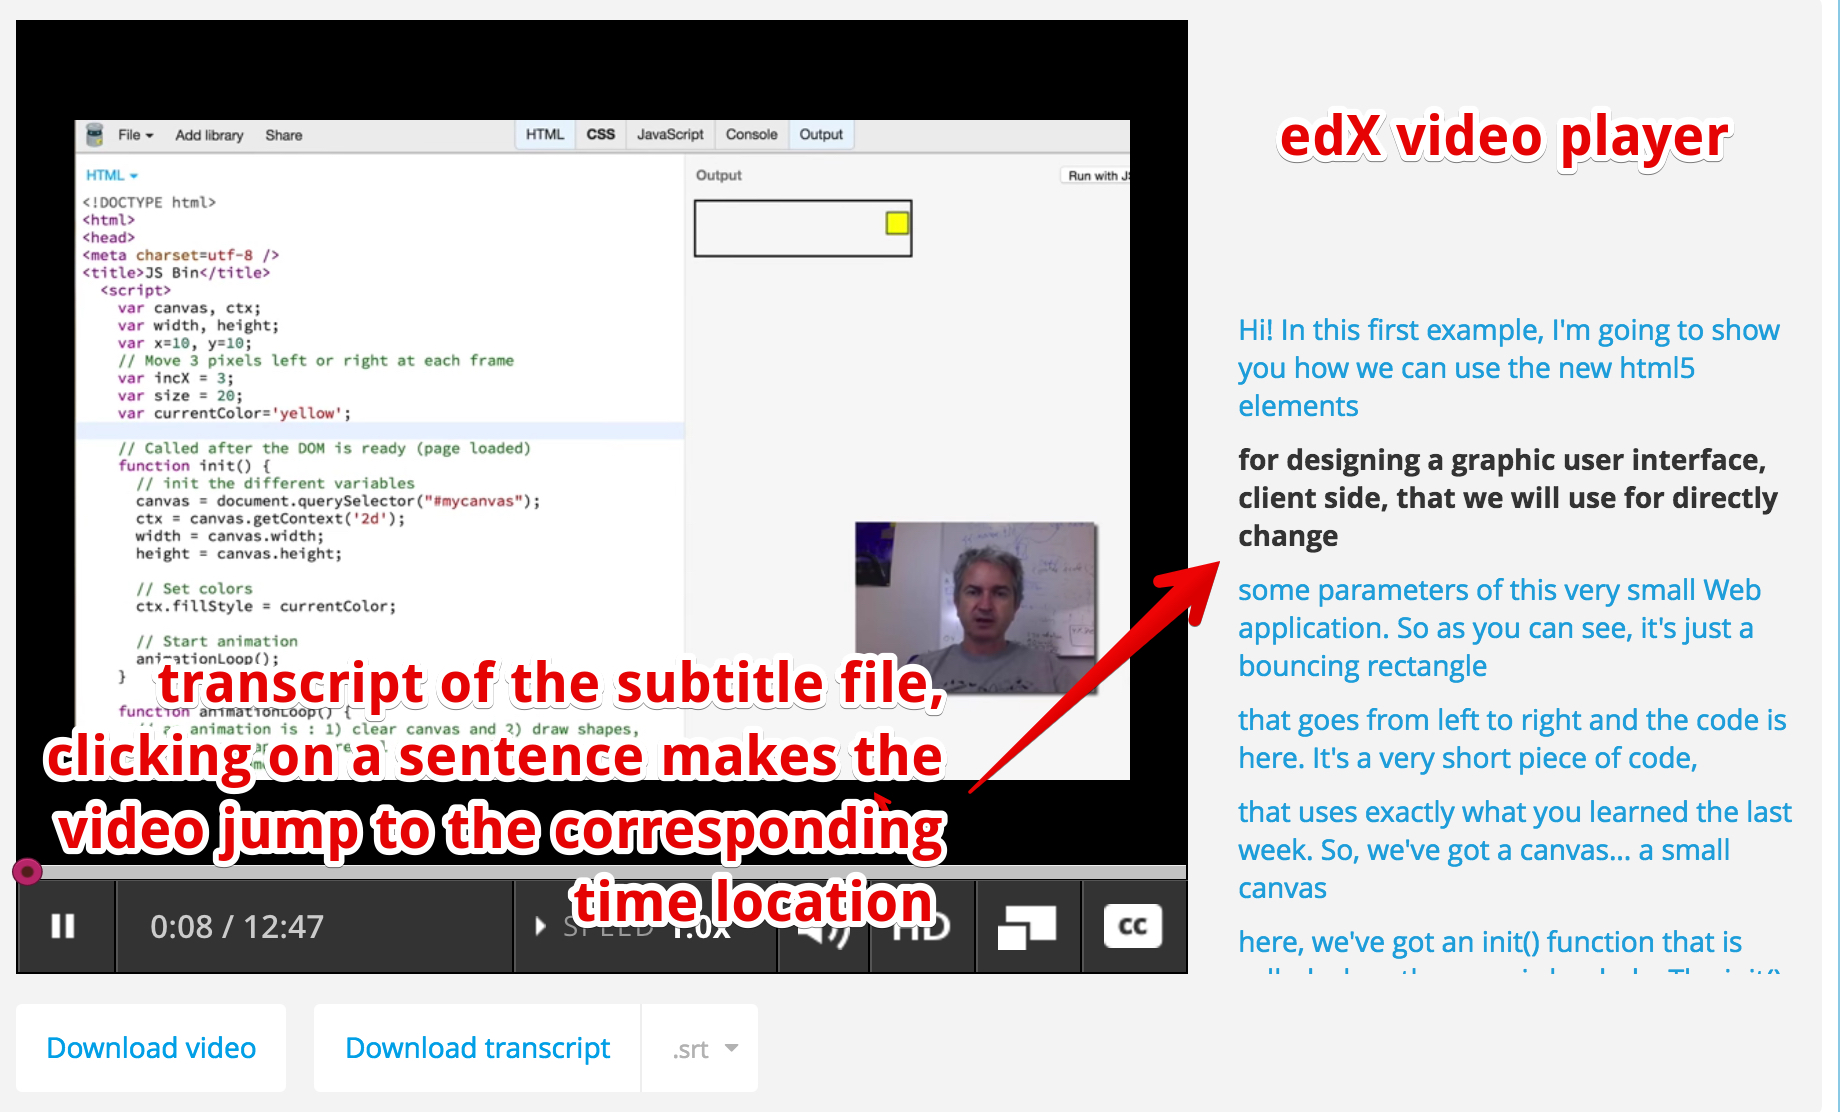
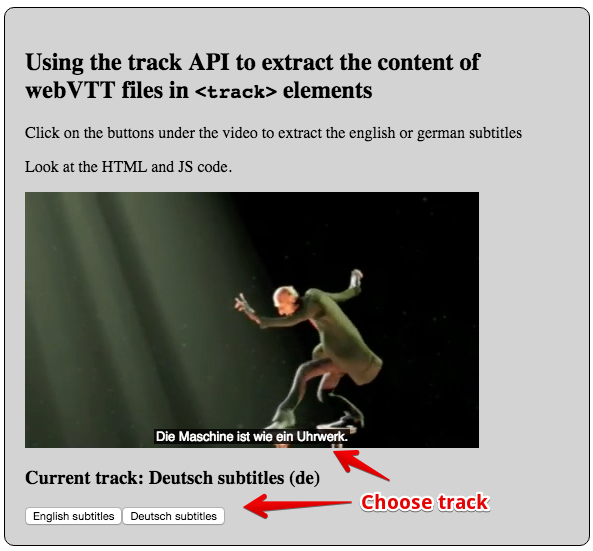
It might be interesting to read the content of a track before playing the video. This is what the edX video player does: it reads a single subtitle file and displays it as a transcript on the right. In the transcript you can click on a sentence to make the video jump to the corresponding location. We will see how we can do this using the track API.
EXAMPLE 1: READ THE WEBVTT FILE AT ONCE USING THE TRACK API AND MAKE A CLICKABLE TRANSCRIPT
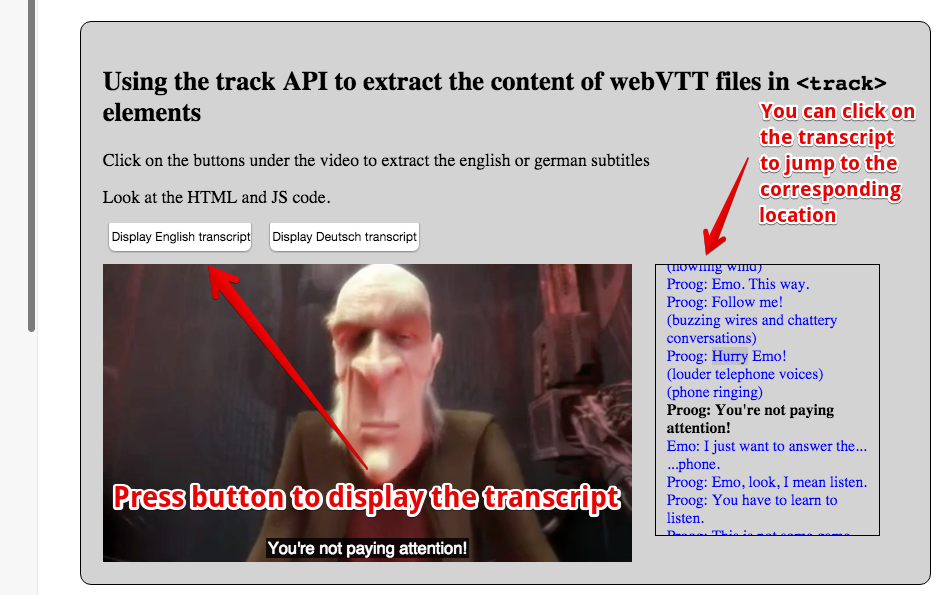
Here we decided to code something similar, except that this time we can choose the track. In the example we have English and German subtitles, and also another track that contains the chapter descriptions (more on that later). By clicking on a button we display the transcript on the right. Like the edX player, we can click on any sentence in order to force the video to jump to the corresponding location. While the video is playing, the current text is highlighted.
Some important things here:
- Browsers do not load all the tracks at the same time, and the way they decide when and which track to load differs from one browser to another. So, when we click on a button to choose the track to display, we need to enforce the loading of the track if it has not been loaded yet.
- When a track file is loaded, then we iterate on the different cues and generate the transcript as a set of<li>...</li> elements. One <li> per cue/sentence.
- We set the id attribute of the <li> with the cue.id value. In this way, when we click on a <li> we can get its id and find the corresponding cue start time, and make the video jump to this time location.
- We add to each cue an enter and an exit listener. These will be useful for highlighting the current cue. Note that these listeners are not yet supported by FireFox (you can use a cuechange event listener on aTextTrack instead - the source code for FireFox is commented in the example).
HTML code:
- <section id="all">
- <button disabled id="buttonEnglish"
- onclick="loadTranscript('en');">
- Display English transcript
- </button>
- <button disabled id="buttonDeutsch"
- onclick="loadTranscript('de');">
- Display Deutsch transcript
- </button>
- </p>
- <video id="myVideo" preload="metadata" controls crossOrigin="anonymous">
- <source src="http://...../elephants-dream-medium.mp4"
- type="video/mp4">
- <source src="http://...../elephants-dream-medium.webm"
- type="video/webm">
- <track label="English subtitles"
- kind="subtitles"
- srclang="en"
- src="http://...../elephants-dream-subtitles-en.vtt" >
- <track label="Deutsch subtitles"
- kind="subtitles"
- srclang="de"
- src="http://...../elephants-dream-subtitles-de.vtt"
- default>
- <track label="English chapters"
- kind="chapters"
- srclang="en"
- src="http://...../elephants-dream-chapters-en.vtt">
- </video>
- <div id="transcript"></div>
- </section>
CSS code:
- #all {
- background-color: lightgrey;
- border-radius:10px;
- padding: 20px;
- border:1px solid;
- display:inline-block;
- margin:30px;
- width:90%;
- }
- .cues {
- color:blue;
- }
- .cues:hover {
- text-decoration: underline;
- }
- .cues.current {
- color:black;
- font-weight: bold;
- }
- #myVideo {
- display: block;
- float : left;
- margin-right: 3%;
- width: 66%;
- background-color: black;
- position: relative;
- }
- #transcript {
- padding: 10px;
- border:1px solid;
- float: left;
- max-height: 225px;
- overflow: auto;
- width: 25%;
- margin: 0;
- font-size: 14px;
- list-style: none;
- }
JavaScript code:
- var video, transcriptDiv;
- // TextTracks, html tracks, urls of tracks
- var tracks, trackElems, tracksURLs = [];
- var buttonEnglish, buttonDeutsch;
- window.onload = function() {
- console.log("init");
- // when the page is loaded, get the different DOM nodes
- // we're going to work with
- video = document.querySelector("#myVideo");
- transcriptDiv = document.querySelector("#transcript");
- // The tracks as HTML elements
- trackElems = document.querySelectorAll("track");
- // Get the URLs of the vtt files
- for(var i = 0; i < trackElems.length; i++) {
- var currentTrackElem = trackElems[i];
- tracksURLs[i] = currentTrackElem.src;
- }
- buttonEnglish = document.querySelector("#buttonEnglish");
- buttonDeutsch = document.querySelector("#buttonDeutsch");
- // we enable the buttons only in this load callback,
- // we cannot click before the video is in the DOM
- buttonEnglish.disabled = false;
- buttonDeutsch.disabled = false;
- // The tracks as TextTrack JS objects
- tracks = video.textTracks;
- };
- function loadTranscript(lang) {
- // Called when a button is clicked
- // clear current transcript
- clearTranscriptDiv();
- // set all track modes to disabled. We will only activate the
- // one whose content will be displayed as transcript
- disableAllTracks();
- // Locate the track with language = lang
- for(var i = 0; i < tracks.length; i++) {
- // current track
- var track = tracks[i];
- var trackAsHtmlElem = trackElems[i];
- // Only subtitles/captions are ok for this example...
- if((track.language === lang) && (track.kind !== "chapters")) {
- track.mode="showing";
- if(trackAsHtmlElem.readyState === 2) {
- // the track has already been loaded
- displayCues(track);
- } else {
- displayCuesAfterTrackLoaded(trackAsHtmlElem, track);
- }
- /* Fallback for FireFox that still does not implement cue enter and exit events
- track.addEventListener("cuechange", function(e) {
- var cue = this.activeCues[0];
- console.log("cue change");
- var transcriptText = document.getElementById(cue.id);
- transcriptText.classList.add("current");
- });
- */
- }
- }
- }
- function displayCuesAfterTrackLoaded(trackElem, track) {
- // Create a listener that will only be called once the track has
- // been loaded. We cannot display the transcript before
- // the track is loaded
- trackElem.addEventListener('load', function(e) {
- console.log("track loaded");
- displayCues(track);
- });
- }
- function disableAllTracks() {
- for(var i = 0; i < tracks.length; i++)
- // the track mode is important: disabled tracks do not fire events
- tracks[i].mode = "disabled";
- }
- function displayCues(track) {
- // displays the transcript of a TextTrack
- var cues = track.cues;
- // iterate on all cues of the current track
- for(var i=0, len = cues.length; i < len; i++) {
- // current cue, also add enter and exit listeners to it
- var cue = cues[i];
- addCueListeners(cue);
- // Test if the cue content is a voice <v speaker>....</v>
- var voices = getVoices(cue.text);
- var transText="";
- if (voices.length > 0) {
- for (var j = 0; j < voices.length; j++) { // how many voices?
- transText += voices[j].voice + ': ' + removeHTML(voices[j].text);
- }
- } else
- transText = cue.text; // not a voice text
- var clickableTransText = "<li class='cues' id=" + cue.id
- + " onclick='jumpTo("
- + cue.startTime + ");'" + ">"
- + transText + "</li>";
- addToTranscriptDiv(clickableTransText);
- }
- }
- function getVoices(speech) {
- // takes a text content and check if there are voices
- var voices = []; // inside
- var pos = speech.indexOf('<v'); // voices are like <v Michel> ....
- while (pos != -1) {
- endVoice = speech.indexOf('>');
- var voice = speech.substring(pos + 2, endVoice).trim();
- var endSpeech = speech.indexOf('</v>');
- var text = speech.substring(endVoice + 1, endSpeech);
- voices.push({
- 'voice': voice,
- 'text': text
- });
- speech = speech.substring(endSpeech + 4);
- pos = speech.indexOf('<v');
- }
- return voices;
- }
- function removeHTML(text) {
- var div = document.createElement('div');
- div.innerHTML = text;
- return div.textContent || div.innerText || '';
- }
- function jumpTo(time) {
- // Make the video jump at the time position + force play
- // if it was not playing
- video.currentTime = time;
- video.play();
- }
- function clearTranscriptDiv() {
- transcriptDiv.innerHTML = "";
- }
- function addToTranscriptDiv(htmlText) {
- transcriptDiv.innerHTML += htmlText;
- }
- function addCueListeners(cue) {
- cue.onenter = function(){
- // Highlight current cue transcript by adding the
- // cue.current CSS class
- console.log('enter id=' + this.id);
- var transcriptText = document.getElementById(this.id);
- transcriptText.classList.add("current");
- };
- cue.onexit = function(){
- console.log('exit id=' + cue.id);
- var transcriptText = document.getElementById(this.id);
- transcriptText.classList.remove("current");
- };
- } // end of addCueListeners...
EXAMPLE 2: GETTING A WEBVTT FILE USING AJAX/XHR2 AND PARSE IT MANUALLY
This is an old example written in 2012 at a time when the track API was not supported by browsers. It downloads WebVTT files using Ajax and parses it "by hand". Notice the complexity of the code, compared to example 1 that uses the track API instead. We give this example as is. Sometimes, bypassing all APIs can be a valuable solution, especially when support for the track API was very sporadic, as was the case in 2012...
Here is an example at JSBin that displays the values of the cues in the different tracks:
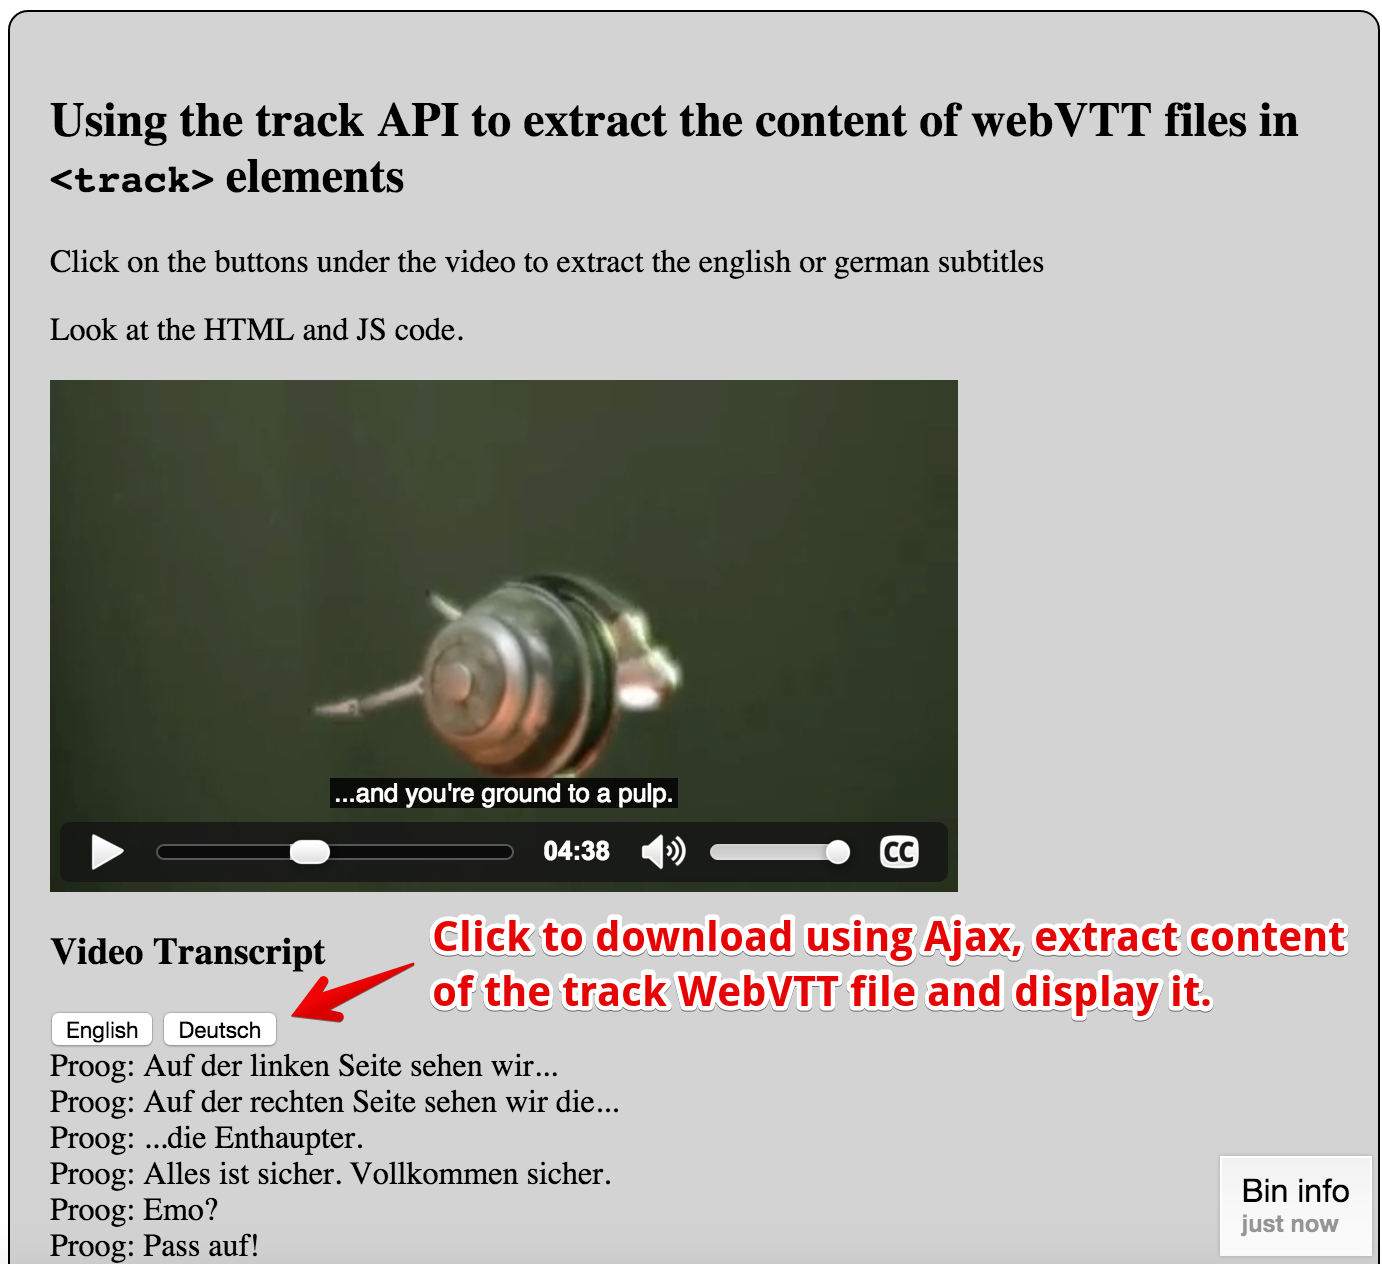
This example, adapted from an example from (now offline) dev.opera.com, uses some JavaScript code that takes a WebVTT subtitle (or caption) file as an argument, parses it, and displays the text on screen, in an element with an id of transcript.
Extract from HTML code:
- ...
- <video preload="metadata" controls >
- <source src="https://..../elephants-dream-medium.mp4" type="video/mp4">
- <source src="https://..../elephants-dream-medium.webm" type="video/webm">
- <track label="English subtitles" kind="subtitles" srclang="en"
- src="https://..../elephants-dream-subtitles-en.vtt" default>
- <track label="Deutsch subtitles" kind="subtitles" srclang="de"
- src="https://..../elephants-dream-subtitles-de.vtt">
- <track label="English chapters" kind="chapters" srclang="en"
- src="https://..../elephants-dream-chapters-en.vtt">
- </video>
- ...
- <h3>Video Transcript</h3>
- <button onclick="loadTranscript('en');">English</button>
- <button onclick="loadTranscript('de');">Deutsch</button>
- </div>
- <div id="transcript"></div>
- ...
JavaScript code:
- // Transcript.js, by dev.opera.com
- function loadTranscript(lang) {
- var url = "http://mainline.i3s.unice.fr/mooc/" +
- 'elephants-dream-subtitles-' + lang + '.vtt';
- // Will download using Ajax + extract subtitles/captions
- loadTranscriptFile(url);
- }
- function loadTranscriptFile(webvttFileUrl) {
- // Using Ajax/XHR2 (explained in detail in Week 3)
- var reqTrans = new XMLHttpRequest();
- reqTrans.open('GET', webvttFileUrl);
- // callback, called only once the response is ready
- reqTrans.onload = function(e) {
- var pattern = /^([0-9]+)$/;
- var patternTimecode = /^([0-9]{2}:[0-9]{2}:[0-9]{2}[,.]{1}[0-9]{3}) --\> ([0-9]
- {2}:[0-9]{2}:[0-9]{2}[,.]{1}[0-9]{3})(.*)$/;
- var content = this.response; // content of the webVTT file
- var lines = content.split(/\r?\n/); // Get an array of text lines
- var transcript = '';
- for (i = 0; i < lines.length; i++) {
- var identifier = pattern.exec(lines[i]);
- // is there an id for this line, if it is, go to next line
- if (identifier) {
- i++;
- var timecode = patternTimecode.exec(lines[i]);
- // is the current line a timecode?
- if (timecode && i < lines.length) {
- // if it is go to next line
- i++;
- // it can only be a text line now
- var text = lines[i];
- // is the text multiline?
- while (lines[i] !== '' && i < lines.length) {
- text = text + '\n' + lines[i];
- i++;
- }
- var transText = '';
- var voices = getVoices(text);
- // is the extracted text multi voices ?
- if (voices.length > 0) {
- // how many voices ?
- for (var j = 0; j < voices.length; j++) {
- transText += voices[j].voice + ': '
- + removeHTML(voices[j].text)
- + '<br />';
- }
- } else
- // not a voice text
- transText = removeHTML(text) + '<br />';
- transcript += transText;
- }
- }
- var oTrans = document.getElementById('transcript');
- oTrans.innerHTML = transcript;
- }
- };
- reqTrans.send(); // send the Ajax request
- }
- function getVoices(speech) { // takes a text content and check if there are voices
- var voices = []; // inside
- var pos = speech.indexOf('<v'); // voices are like <v Michel> ....
- while (pos != -1) {
- endVoice = speech.indexOf('>');
- var voice = speech.substring(pos + 2, endVoice).trim();
- var endSpeech = speech.indexOf('</v>');
- var text = speech.substring(endVoice + 1, endSpeech);
- voices.push({
- 'voice': voice,
- 'text': text
- });
- speech = speech.substring(endSpeech + 4);
- pos = speech.indexOf('<v');
- }
- return voices;
- }
- function removeHTML(text) {
- var div = document.createElement('div');
- div.innerHTML = text;
- return div.textContent || div.innerText || '';
- }
Example 2: showing video description while playing, listening to events, changing the mode of a track
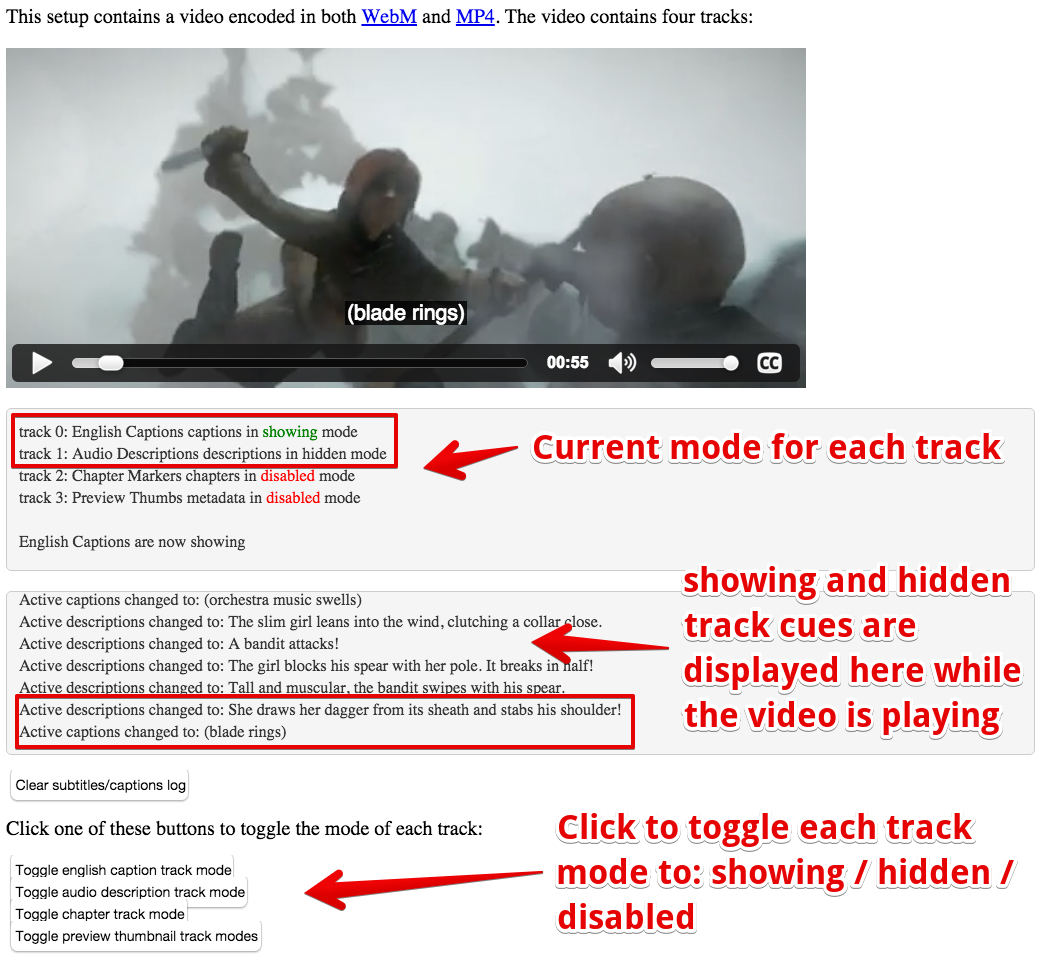
Each track has a mode property (and a mode attribute) that can be: "disabled", "hidden" or "showing". More than one track at a time can be in any of these states. The difference between "hidden" and "disabled" is that hidden tracks can fire events (more on that at the end of the first example) whereas disabled tracks do not fire events.
Here is an example at JSBin that shows the use of the mode property, and basic usage of the cue events in order to capture the current subtitle/caption from JavaScript. You can change the mode of each track in the video element by clicking on buttons, to toggle the mode of each track. All tracks with mode="showing" or mode="hidden" will have the content of their cues displayed in real time in a small area below the video.
In the example below we have a WebVTT file containing the descriptions of a scene being played.
Extract from HTML code:
- <html lang="en">
- ...
- <body onload="init();">
- ...
- <p>
- <video id="myVideo" preload="metadata"
- poster ="https://...../sintel.jpg"
- crossorigin="anonymous"
- controls="controls"
- width="640" height="272">
- <source src="https://...../sintel.mp4"
- type="video/mp4" />
- <source src="https://...../sintel.webm"
- type="video/webm" />
- <track src="https://...../sintel-captions.vtt"
- kind="captions"
- label="English Captions"
- default/>
- <track src="https://...../sintel-descriptions.vtt"
- kind="descriptions"
- label="Audio Descriptions" />
- <track src="https://...../sintel-chapters.vtt"
- kind="chapters"
- label="Chapter Markers" />
- <track src="https://...../sintel-thumbs.vtt"
- kind="metadata"
- label="Preview Thumbs" />
- </video>
- </p>
- <p>
- <div id="currentTrackStatuses"></div>
- <p>
- <p>
- <div id="subtitlesCaptions"></div>
- </p>
- <p>
- <button onclick="clearSubtitlesCaptions();">
- Clear subtitles/captions log
- </button>
- </p>
- <p>Click one of these buttons to toggle the mode of each track:</p>
- <button onclick="toggleTrack(0);">
- Toggle english caption track mode
- </button>
- <br>
- <button onclick="toggleTrack(1);">
- Toggle audio description track mode
- </button>
- <br>
- <button onclick="toggleTrack(2);">
- Toggle chapter track mode
- </button>
- <br>
- <button onclick="toggleTrack(3);">
- Toggle preview thumbnail track modes
- </button>
- </body>
- </html>
JavaScript code:
- var tracks, video, statusDiv, subtitlesCaptionsDiv;
- function init() {
- video = document.querySelector("#myVideo");
- statusDiv = document.querySelector("#currentTrackStatuses");
- subtitlesCaptionsDiv = document.querySelector("#subtitlesCaptions");
- tracks = document.querySelectorAll("track");
- video.addEventListener('loadedmetadata', function() {
- console.log("metadata loaded");
- // defines cue listeners for the active track; we can do this only after the video metadata have been loaded
- for(var i=0; i<tracks.length; i++) {
- var t = tracks[i].track;
- if(t.mode === "showing") {
- t.addEventListener('cuechange', logCue, false);
- }
- }
- // display in a div the list of tracks and their status/mode value
- displayTrackStatus();
- });
- }
- function displayTrackStatus() {
- // display the status / mode value of each track.
- // In red if disabled, in green if showing
- for(var i=0; i<tracks.length; i++) {
- var t = tracks[i].track;
- var mode = t.mode;
- if(mode === "disabled") {
- mode = "<span style='color:red'>" + t.mode + "</span>";
- } else if(mode === "showing") {
- mode = "<span style='color:green'>" + t.mode + "</span>";
- }
- appendToScrollableDiv(statusDiv, "track " + i + ": " + t.label
- + " " + t.kind+" in "
- + mode + " mode");
- }
- }
- function appendToScrollableDiv(div, text) {
- // we've got two scrollable divs. This function
- // appends text to the div passed as a parameter
- // The div is scrollable (thanks to CSS overflow:auto)
- var inner = div.innerHTML;
- div.innerHTML = inner + text + "<br/>";
- // Make it display the last line appended
- div.scrollTop = div.scrollHeight;
- }
- function clearDiv(div) {
- div.innerHTML = '';
- }
- function clearSubtitlesCaptions() {
- clearDiv(subtitlesCaptionsDiv);
- }
- function toggleTrack(i) {
- // toggles the mode of track i, removes the cue listener
- // if its mode becomes "disabled"
- // adds a cue listener if its mode was "disabled"
- // and becomes "hidden"
- var t = tracks[i].track;
- switch (t.mode) {
- case "disabled":
- t.addEventListener('cuechange', logCue, false);
- t.mode = "hidden";
- break;
- case "hidden":
- t.mode = "showing";
- break;
- case "showing":
- t.removeEventListener('cuechange', logCue, false);
- t.mode = "disabled";
- break;
- }
- // updates the status
- clearDiv(statusDiv);
- displayTrackStatus();
- appendToScrollableDiv(statusDiv,"<br>" + t.label+" are now " +t.mode);
- }
- function logCue() {
- // callback for the cue event
- if(this.activeCues && this.activeCues.length) {
- var t = this.activeCues[0].text; // text of current cue
- appendToScrollableDiv(subtitlesCaptionsDiv, "Active "
- + this.kind + " changed to: " + t);
- }
- }
Example 3: adding buttons for choosing the subtitle/caption track
You may have noticed that with many browsers, the standard implementation of the video element does not let the user choose the subtitle language...
Read this article by Ian Devlin about the current status of multiple WebVTT track supports by the different browsers, as at April 2015. Note that currently (in October 2015), neither Chrome nor FireFox offers a menu to choose the track to display.
However, it's rather easy to implement this feature using the Track API.
Here is a simple example at JSBin: we added two buttons below the video that will enable/disable subtitles/captions and let you choose which track you like.
HTML code:
- ...
- <body onload="init()">
- ...
- <video id="myVideo" preload="metadata" controls crossOrigin="anonymous" >
- <source src="http://...../elephants-dream-medium.mp4"
- type="video/mp4">
- <source src="http://...../elephants-dream-medium.webm"
- type="video/webm">
- <track label="English subtitles"
- kind="subtitles"
- srclang="en"
- src="http://...../elephants-dream-subtitles-en.vtt"
- default>
- <track label="Deutsch subtitles"
- kind="subtitles"
- srclang="de"
- src="http://...../elephants-dream-subtitles-de.vtt">
- <track label="English chapters"
- kind="chapters"
- srclang="en"
- src="http://...../elephants-dream-chapters-en.vtt">
- </video>
- <h3>Current track: <span id="currentLang"></span></h3>
- <div id="langButtonDiv"></div>
- </section>
- ...
JavaScript code:
- var langButtonDiv, currentLangSpan, video;
- function init() {
- langButtonDiv = document.querySelector("#langButtonDiv");
- currentLangSpan = document.querySelector("#currentLang");
- video = document.querySelector("#myVideo");
- console.log("Number of tracks = "
- + video.textTracks.length);
- // Updates the display of the current track activated
- currentLangSpan.innerHTML = activeTrack();
- // Build the buttons for choosing a track
- buildButtons();
- }
- function activeTrack() {
- for (var i = 0; i < video.textTracks.length; i++) {
- if(video.textTracks[i].mode === 'showing') {
- return video.textTracks[i].label + " ("
- + video.textTracks[i].language + ")";
- }
- }
- return "no subtitles/caption selected";
- }
- function buildButtons() {
- if (video.textTracks) { // if the video contains track elements
- // For each track, create a button
- for (var i = 0; i < video.textTracks.length; i++) {
- // We create buttons only for the caption and subtitle tracks
- var track = video.textTracks[i];
- if((track.kind !== "subtitles") && (track.kind !== "captions"))
- continue;
- // create a button for track number i
- createButton(video.textTracks[i]);
- }
- }
- }
- function createButton(track) {
- // Create a button
- var b = document.createElement("button");
- b.value=track.label;
- // use the lang attribute of the button to keep trace of the
- // associated track language. Will be useful in the click listener
- b.setAttribute("lang", track.language);
- b.addEventListener('click', function(e) {
- // Check which track is the track with the language we're looking for
- // Get the value of the lang attribute of the clicked button
- var lang = this.getAttribute('lang');
- for (var i = 0; i < video.textTracks.length; i++) {
- if (video.textTracks[i].language == lang) {
- video.textTracks[i].mode = 'showing';
- } else {
- video.textTracks[i].mode = 'hidden';
- }
- }
- // Updates the span so that it displays the new active track
- currentLangSpan.innerHTML = activeTrack();
- });
- // Creates a label inside the button
- b.appendChild(document.createTextNode(track.label));
- // Add the button to a div at the end of the HTML document
- langButtonDiv.appendChild(b);
- }
External resource: There is an online tutorial at MDN that goes much further in terms of styling and integrating a "CC" button. If you are interested in building a complete custom video player, you might take a look.
Example 4: making a simple chapter navigation menu
INTRODUCTION
You can use WebVTT files in order to define chapters. The syntax is exactly the same as for subtitles/caption .vtt files. The only difference is in the declaration of the track. Here is how we declared a chapter track in one of the previous examples (in bold in the example below):
HTML code:
- <video id="myVideo" preload="metadata" controls crossOrigin="anonymous">
- <source src="http://...../elephants-dream-medium.mp4"
- type="video/mp4">
- <source src="http://...../elephants-dream-medium.webm"
- type="video/webm">
- <track label="English subtitles"
- kind="subtitles"
- srclang="en"
- src="http://...../elephants-dream-subtitles-en.vtt" >
- <track label="Deutsch subtitles"
- kind="subtitles"
- srclang="de"
- src="http://...../elephants-dream-subtitles-de.vtt"
- default>
- <track label="English chapters"
- kind="chapters"
- srclang="en"
- src="http://...../elephants-dream-chapters-en.vtt">
- </video>
If we try this code in an HTML document, nothing special happens. No magic menu, no extra button!
Currently (as at November 2015), no browser takes chapter tracks into account. You can use one of the enhanced video players presented during the HTML5 Part 1 course, but as you will see in this lesson: making your own chapter navigation menu is not complicated.
FIRST, LET'S HAVE A LOOK AT THE .VTT FILES FROM THIS EXAMPLE:
- WEBVTT
- chapter-1
- 00:00:00.000 --> 00:00:26.000
- Introduction
- chapter-2
- 00:00:28.206 --> 00:01:02.000
- Watch out!
- chapter-3
- 00:01:02.034 --> 00:03:10.000
- Let's go
- chapter-4
- 00:03:10.014 --> 00:05:40.000
- The machine
- chapter-5
- 00:05:41.208 --> 00:07:26.000
- Close your eyes
- chapter-6
- 00:07:27.125 --> 00:08:12.000
- There's nothing there
- chapter-7
- 00:08:13.000 --> 00:09:07.500
- The Colossus of Rhodes
We've got 7 cues (one for each chapter). Each cue id is chapter- followed by the chapter number, then we have the start and end time of the cue/chapter, and the cue content. In this case: the description of the chapter ("Introduction", "Watch out!", "Let's go", etc...).
Hmm... let's try to open this chapter track with the example we wrote in a previous lesson - the one that displayed the clickable transcript for subtitles/captions on the right of the video. We need to modify it a little bit:
- We add a "show English chapters" button with a click event listener similar to this :
- <button disabled id="buttonEnglishChapters" onclick="loadTranscript('en','chapters');">
- Display English chapter markers
- </button>
- We modify the loadTranscript function from the previous example, so that it matches both thesrclang and the kind attribute of the track.
Here is a new version: in bold are the source code lines we modified.- function loadTranscript(lang, kind) {
- ...
- // Locate the track with lang and kind that match the parameters
- for(var i = 0; i < tracks.length; i++) {
- ...
- if((track.language === lang) && (track.kind === kind)) {
- // display it contents...
- }
- }
- }
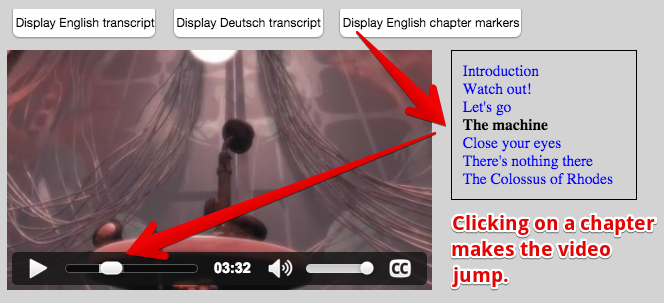
FIRST VERSION : CHAPTERS AS CLICKABLE TEXT ON THE RIGHT OF THE VIDEO
Try it on JSBin; this version includes the modifications we presented earlier - nothing more. Notice that we kept the existing buttons to display a clickable transcript:
Look at the JavaScript and HTML tab of the JSBin example to see the source code. It's the same as in the clickable transcript example, except for the small changes we explained earlier.
This sort of navigation, illustrated in the video player below, is fairly popular.
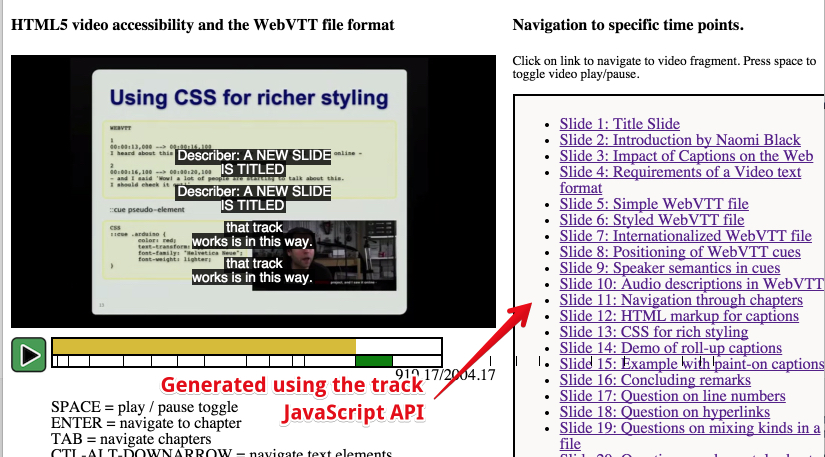
In addition to the clickable chapter list, this one displays an enhanced progress bar created using a canvas. The small squares are drawn depending on the chapter cues start and end time, etc. You can try to modify the provided example in order to add such an enhanced progress indicator.
However, we will see how we can do better by using JSON objects as cue contents. This is the topic of the two next lessons!
Awesome! I would like to thank you for sharing that with us. So I am trying to use Example 1 in my projecrt, but I need to run the function 'loadTranscript()' from js file, not from Html. I need it runs as soon the page is loaded. I tryed to do some changes, but it only works with the button 'buttonEnglish' or the other.
ReplyDeleteCould give some clue about solving that issue?
Thanks a lot.
How to auto scroll transcript?
ReplyDeleteThanks for sharing this informative content crackphilia
ReplyDeletei am unable to load transcript on my windows chrome. Mac it was working
ReplyDelete