The Orientation API
INTRODUCTION
This section covers the HTML5 orientation API: a way to use angle measures provided by accelerometers from mobile devices or laptops such as MacBooks.
Beware: all examples must be run on a device with an orientation sensor and/or with an accelerometer. Furthermore, Chrome/Safari and Mozilla support these API, but Opera mobile doesn't yet at the time of writing.
You can "fake the orientation values" using the devtools of a desktop browser, if it provides a "mobile device emulation mode" (see the support table below, the columns for desktop versions of browsers are about the support for this emulation mode).
Here is a table that shows support for this API as of December 2015:
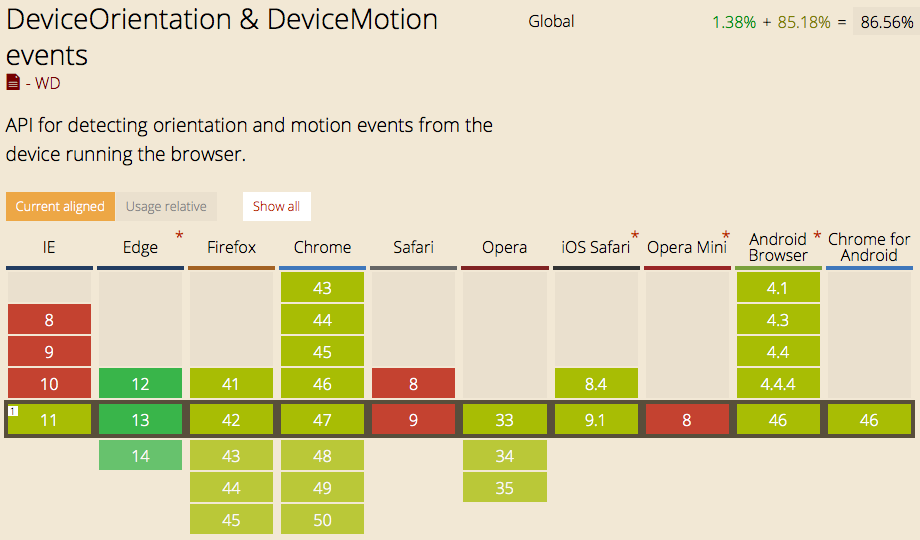
For an up to date version of this table: http://caniuse.com/#feat=deviceorientation
Notice that all major browsers support the API in their mobile version.
EXTERNAL RESOURCES:
- Article on html5Rocks.com about device orientation
The coordinate system and Euler angles
The transformation from the Earth coordinate frame to the device coordinate frame uses the following system of rotations.Rotations use the right-hand convention, such that positive rotation around an axis is clockwise when viewed along the positive direction of the axis. Starting with the two frames aligned, the rotations are applied in the following order:FIRST EXAMPLE: ROTATE THE DEVICE FRAME AROUND ITS Z AXIS BY
ALPHADEGREES, WITHALPHAIN [0, 360]Device in the initial position, with Earth (XYZ) and
body (xyz) frames aligned. Device rotated through angle alpha about z axis,
with previous locations of x and y axes shown as x0and y0.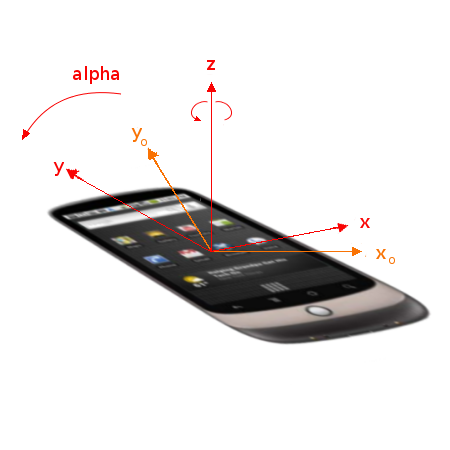
SECOND EXAMPLE: ROTATE THE DEVICE FRAME AROUND ITS X AXIS BYBETADEGREES, WITHBETAIN [-180, 180]Device in the initial position, with Earth (XYZ) and
body (xyz) frames aligned.Device rotated through angle beta about new x axis,
with previous locations of y and z axes shown as y0and z0.
THIRD EXAMPLE: ROTATE THE DEVICE FRAME AROUND ITS Y AXIS BY
GAMMADEGREES, WITHGAMMAIN [-90, 90]Device in the initial position, with Earth (XYZ) and
body (xyz) frames aligned.Device rotated through angle gamma about new y axis,
with previous locations of x and z axes shown as x0 and z0.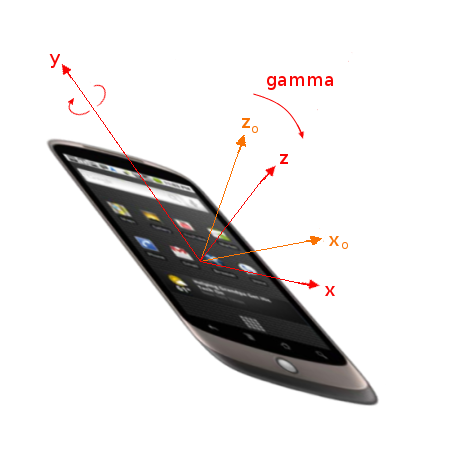
Get the different angles using the JavaScript HTML5 orientation API
TYPICAL USE
The use of this API is very straightforward:- Test if your browser supports the orientation API (test if window.DeviceOrientationEvent is not null),
- Define a listener for the 'deviceorientation' event as follows:window.addEventListener('deviceorientation', callback); with the callback function accepting the event as a single input parameter,
- Get the angles from the event (use its properties alpha, beta, gamma).
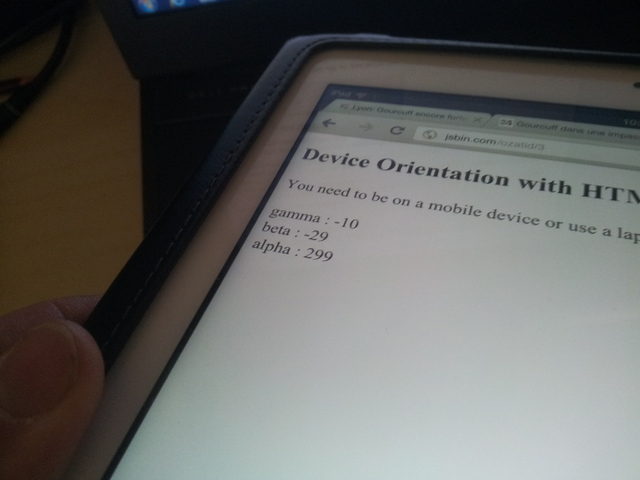
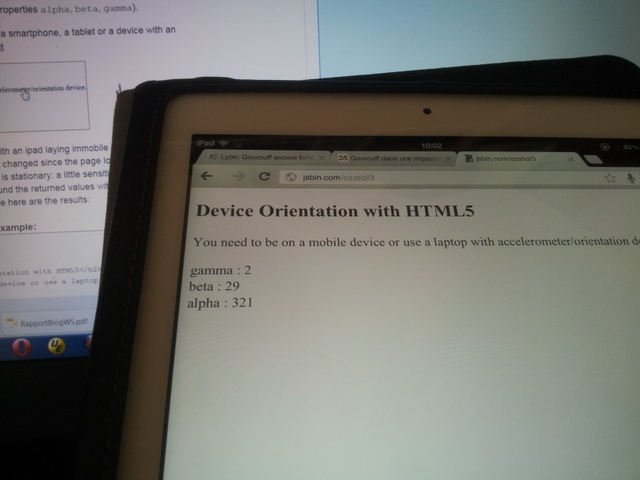
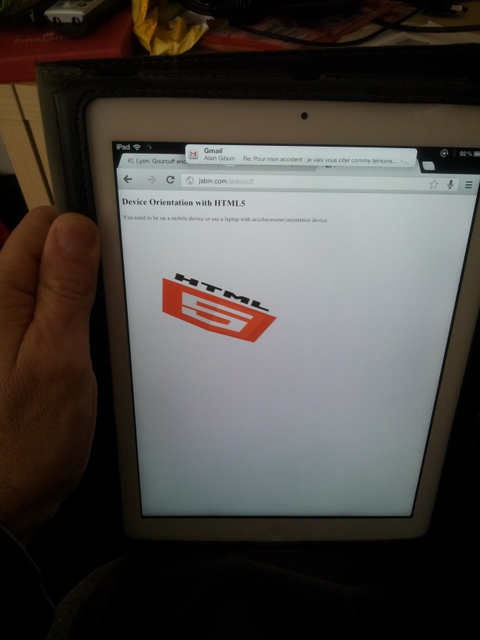
Let's see this with an example on JsBin. Try it with a smartphone, a tablet or a device with an accelerometer:(If using a mobile device, it's better to open this URL in standalone mode, without the JsBin editor. Try this URL instead!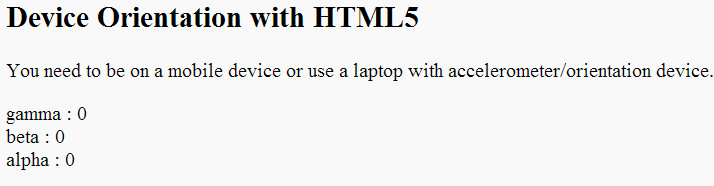 The above screenshot was taken with an ipad lying immobile on a desk. All the angle values are theoretically 0 when the device is laid flat, and it has not changed since the page loaded. Depending on the hardware, however, these values may change even if the device is stationary: a little sensitive sensor can report constantly changing values. This is why in the example we round the returned values with Math.round() at display time (see code).If we change the orientation of the device here are the results:
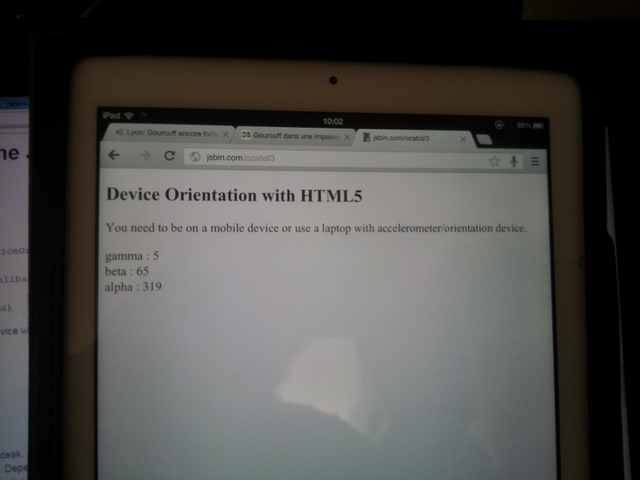
 Typical use / code from the above example:
- ...
- <h2>Device Orientation with HTML5</h2>
- You need to be on a mobile device or use a laptop with accelerometer/orientation
- device.
- <p>
- <div id="LR"></div>
- <div id="FB"></div>
- <div id="DIR"></div>
- <script type="text/javascript">
- if (window.DeviceOrientationEvent) {
- console.log("DeviceOrientation is supported");
- window.addEventListener('deviceorientation', function(eventData) {
- // gamme is for left/right inclination
- var LR = eventData.gamma;
- // beta is for front/back inclination
- var FB = eventData.beta;
- // alpha is for orientation
- var DIR = eventData.alpha;
- // display values on screen
- deviceOrientationHandler(LR, FB, DIR);
- }, false);
- } else {
- alert("Device orientation not supported on your device or browser. Sorry.");
- }
- function deviceOrientationHandler(LR, FB, DIR) {
- document.querySelector("#LR").innerHTML = "gamma : " + Math.round(LR);
- document.querySelector("#FB").innerHTML = "beta : " + Math.round(FB);
- document.querySelector("#DIR").innerHTML = "alpha : " + Math.round(DIR);
- }
- </script>
- ...
ANOTHER EXAMPLE THAT SHOWS HOW TO ORIENT THE HTML5 LOGO USING THE ORIENTATION API + CSS3 3D ROTATIONS
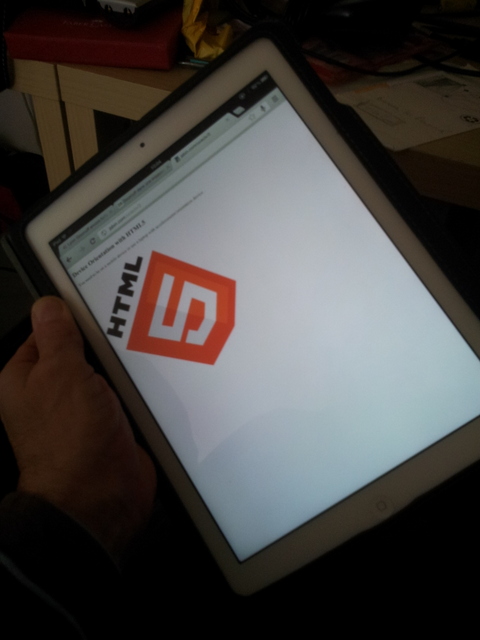
This is just a variation of the previous example, try it at JsBin: if using a mobile device it's better to open it in standalone mode, use this URL instead: Results on the ipad: the logo rotates when we change the ipad's orientation. This is a good "visual feedback" for an orientation controlled game...
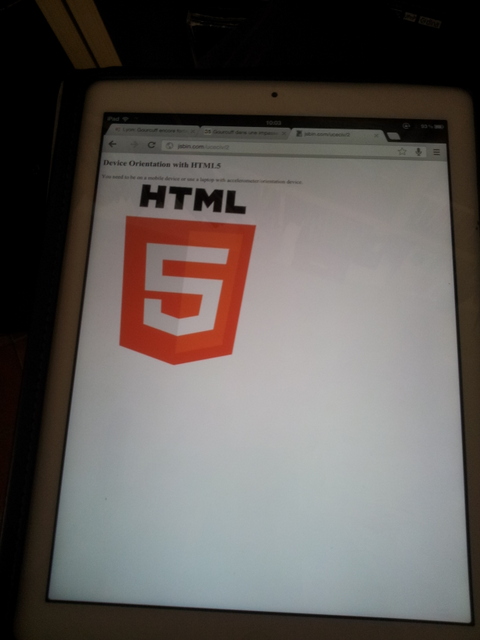
 This example as a Youtube video: http://www.youtube.com/watch?v=OrNLhOAGSdECode from the example:
- ...
- <h2>Device Orientation with HTML5</h2>
- You need to be on a mobile device or use a laptop with accelerometer/orientation
- device.
- <p>
- <div id="LR"></div>
- <div id="FB"></div>
- <div id="DIR"></div>
- <img src="http://www.html5
- rocks.com/en/tutorials/device/orientation/html5_logo.png" id="imgLogo"
- class="logo">
- <script type="text/javascript">
- if (window.DeviceOrientationEvent) {
- console.log("DeviceOrientation is supported");
- window.addEventListener('deviceorientation', function(eventData) {
- var LR = eventData.gamma;
- var FB = eventData.beta;
- var DIR = eventData.alpha;
- deviceOrientationHandler(LR, FB, DIR);
- }, false);
- } else {
- alert("Not supported on your device or browser. Sorry.");
- }
- function deviceOrientationHandler(LR, FB, DIR) {
- // USE CSS3 rotations for rotating the HTML5 logo
- //for webkit browser
- document.getElementById("imgLogo").style.webkitTransform =
- "rotate(" + LR + "deg) rotate3d(1,0,0, " + (FB * -1) + "deg)";
- //for HTML5 standard-compliance
- document.getElementById("imgLogo").style.transform =
- "rotate(" + LR + "deg) rotate3d(1,0,0, " + (FB * -1) + "deg)";
- document.querySelector("#LR").innerHTML = "gamma : " + Math.round(LR);
- document.querySelector("#FB").innerHTML = "beta : " + Math.round(FB);
- document.querySelector("#DIR").innerHTML = "alpha : " + Math.round(DIR);
- }
- </script>
- ...
A SIMPLE LEVEL TOOL USING DEVICE ORIENTATION
This example works in FF, Chrome and IOS Safari. Created by Derek Anderson @ Media Upstream. Original source code available GitHub.We adapted the source code so that you can tweak it in JsBin: for testing it using a mobile device, open it in standalone mode at this URL instead.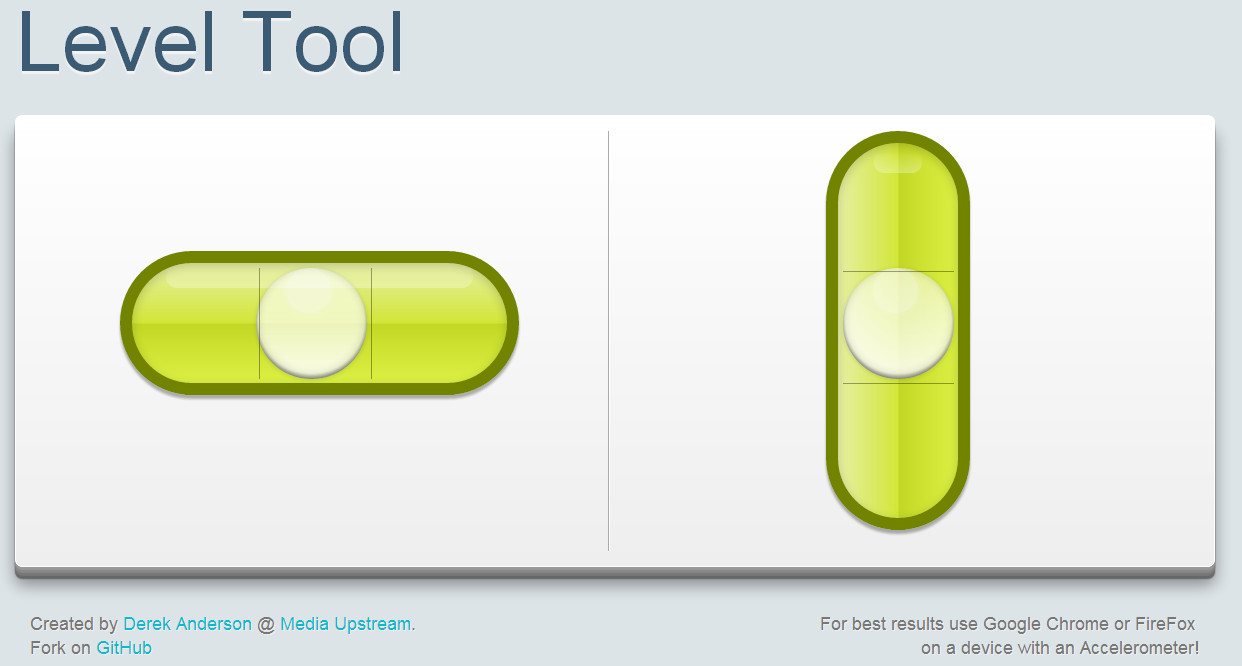
OTHER INTERESTING USES: MIX ORIENTATION API AND WEBSOCKETS
You can imagine the above example that sends the current orientation of the device to a server using WebSockets. The server in turn updates the logo and position on a PC screen. If multiple devices connect, they can chat together and take control of the 3D Logo.This video shows one of the above examples slightly modified: the JavaScript code running in the Web page on the iPad sends in real time the device orientation using the Web Sockets API to a server that in turns sends the orientation to a client running on a desktop browser. In this way the tablet "controls" the HTML5 logo that is shown on the desktop browser:Click on the image to see the YouTube video: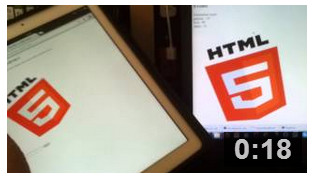
The Device Motion API
INTRODUCTION
This section presents an API rather similar in its use to the device orientation API from the previous chapters.The deviceMotion API deals with accelerations instead of just orientations.Use cases proposed by the specification are:- Controlling a game: a gaming Web application monitors the device's orientation and interprets tilting in a certain direction as a means to control an on-screen sprite.
- Gesture recognition: a Web application monitors the device's acceleration and applies signal processing in order to recognize certain specific gestures. For example, using a shaking gesture to clear a web form.
- Mapping: a mapping Web application uses the device's orientation to correctly align the map with reality.
BASIC USAGE
- function handleMotionEvent(event) {
- var x = event.accelerationIncludingGravity.x;
- var y = event.accelerationIncludingGravity.y;
- var z = event.accelerationIncludingGravity.z;
- // Process ...
- }
- window.addEventListener("devicemotion", handleMotionEvent, true);
The deviceMotion API is rather straightforward and is very similar to the orientation API except that it returns more than just the rotation information, it also returns acceleration information about the device current motion. The acceleration is in three parts: acceleration along the X axis, the Y axis and the Z axis. Each value is in meters per second squared (m/s^2). The acceleration is returned as an "acceleration event" that has two properties:accelerationIncludingGravityandacceleration, which excludes the effects of gravity. There are two different values because some devices might be able to exclude the effect of gravity if equipped with a gyroscope. Indeed there is acceleration due implicitly to gravity, see also this: Acceleration of Gravity on Earth...So if the device doesn't have a gyroscope, the acceleration property will be null. In this case you have no choice but to use the accelerationIncludingGravity property. Note that all IOS devices so far have a gyroscope.BASICS ABOUT ACCELERATION
The device motion event is a superset of the device orientation event; it returns data about the rotation information and also acceleration information about the device. The acceleration data is returned in three axes: x, y and z. These are measured in meters per second squared (m/s^2). Because some devices might not have the hardware to exclude the effect of gravity, the event returns two properties,accelerationIncludingGravityandacceleration.The latter excludes the effects of gravity (when this is the case, the acceleration data will be null).Example of acceleration values
If a laptop is in its normal position with the screen facing up, the data returned would be (info taken from:http://www.html5rocks.com/en/tutorials/device/orientation): A mobile phone rotated along the x-axis so the screen is perpendicular to its normal position would return:
 Remember the coordinate system for a mobile phone:
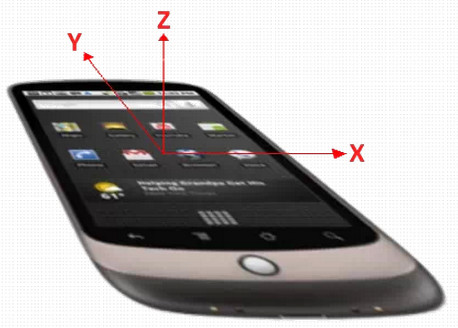
Common steps
The principle of use is the same as for the orientation API:- Test if the API is supported by the browser,
- Add a listener for 'devicemotion' events,
- Get the acceleration values from the DOM event that has been passed to the listener,
- Process the data.
Common processing with acceleration values
Test the value of the acceleration.z property: If > 0 then the device is facing up, otherwise it is facing down. This can be useful if you want to play heads or tails with your phone ;-)- // For example, if acceleration.z is > 0 then the phone is facing up
- var facingUp = -1;
- if (acceleration.z > 0) {
- facingUp = +1;
- }
Compute the angle corresponding to the Left / Right and Front / Back tilts. This example comes from:http://www.html5rocks.com/en/tutorials/device/orientation and uses the accelerationIncludingGravityproperty of the event.- function deviceMotionHandler(eventData) {
- // Grab the acceleration including gravity from the results
- var acceleration = eventData.accelerationIncludingGravity;
- // Convert the value from acceleration to degrees
- // acceleration.x|y is the acceleration according
- // to gravity, we'll assume we're on Earth and divide
- // by 9.81 (earth gravity) to get a percentage value,
- // and then multiply that by 90 to convert to degrees.
- var tiltLR = Math.round(((acceleration.x) / 9.81) * -90);
- var tiltFB = Math.round(((acceleration.y + 9.81) / 9.81) * 90 * facingUp);
- // ... do something
- }
Compute the vertical (direction of the sky) (this extract comes from a complete example further down this page)...- ...
- var angle = Math.atan2(accel.y,accel.x);
- var canvas = document.getElementById('myCanvas');
- var ctx = canvas.getContext('2d');
- ctx.moveTo(50,50);
- // Draw sky direction in the canvas
- ctx.lineTo(50-50*Math.cos(angle),50+50*Math.sin(angle));
- ctx.stroke();
Use acceleration values to move a ball on the screen of a tablet when the tablet is tilted front / back or left / right (complete example later on)...- ...
- ball.x += acceleration.x;
- ball.y += acceleration.y;
- ...
COMPLETE EXAMPLES
Move the HTML5 logo
Online example at JsBin, if using a mobile device, use this URL.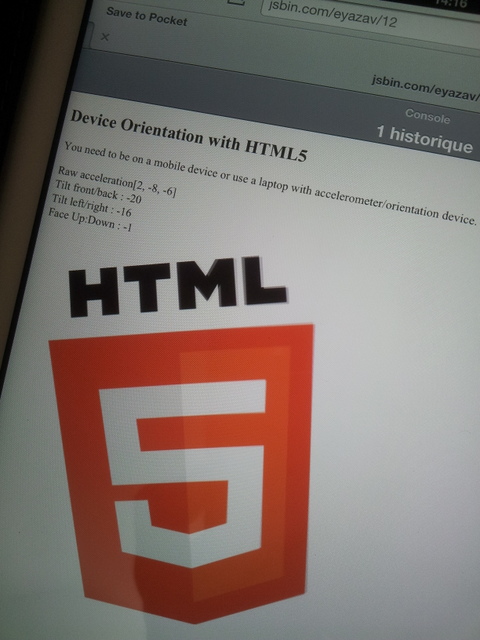 Code from this example:
- <!doctype html>
- <html>
- <head></head>
- <body>
- <h2>Device Orientation with HTML5</h2>
- You need to be on a mobile device or use a laptop with accelerometer/orientation
- device.
- <p>
- <div id="rawAccel"></div>
- <div id="tiltFB"></div>
- <div id="tiltLR"></div>
- <div id="upDown"></div>
- <imgsrc="http://www.html5rocks.com/en/tutorials/device/orientation/html5_logo.png"id="imgLogo" class="logo">
- <script type="text/javascript">
- if (window.DeviceMotionEvent != undefined) {
- console.log("DeviceMotion is supported");
- window.addEventListener('devicemotion', function(eventData) {
- // Grab the acceleration including gravity from the results
- var acceleration = eventData.accelerationIncludingGravity;
- // Display the raw acceleration data
- var rawAcceleration = "[" + Math.round(acceleration.x) + ", " +Math.round(acceleration.y)
- + ", " + Math.round(acceleration.z) + "]";
- // Z is the acceleration in the Z axis, and if the device
- // is facing up or down
- var facingUp = -1;
- if (acceleration.z > 0) {
- facingUp = +1;
- }
- // Convert the value from acceleration to degrees
- // acceleration.x|y is the acceleration according to gravity,
- // we'll assume we're on Earth and divide
- // by 9.81 (earth gravity) to get a percentage value,
- // and then multiply that by 90 to convert to degrees.
- var tiltLR = Math.round(((acceleration.x) / 9.81) * -90);
- var tiltFB = Math.round(((acceleration.y + 9.81) / 9.81) * 90 *facingUp);
- document.querySelector("#rawAccel").innerHTML =
- "Raw acceleration" + rawAcceleration;
- document.querySelector("#tiltFB").innerHTML =
- "Tilt front/back : " + tiltFB;
- document.querySelector("#tiltLR").innerHTML =
- "Tilt left/right : " + tiltLR;
- document.querySelector("#upDown").innerHTML =
- "Face Up:Down : " + facingUp;
- updateLogoOrientation(tiltLR, tiltFB);
- }, false);
- } else {
- alert("Not supported on your device or browser. Sorry.");
- }
- function updateLogoOrientation(tiltLR, tiltFB) {
- // USE CSS3 rotations for rotating the HTML5 logo
- //for webkit browser
- document.getElementById("imgLogo").style.webkitTransform =
- "rotate(" + tiltLR + "deg) rotate3d(1,0,0, " + (tiltFB * -1) +"deg)";
- //for HTML5 standard-compliance
- document.getElementById("imgLogo").style.transform =
- "rotate(" + tiltLR + "deg) rotate3d(1,0,0, " + (tiltFB * -1) +"deg)";
- }
- </script>
- </body>
- </html>
Interesting example that uses jQuery mobile
This example comes from: http://www.emanueleferonato.com/2011/09/05/playing-with-javascript-iphone-and-devicemotion-event-listener/It shows how the X and Y acceleration values can be used for indicating the sky's direction (vertical), and how the Z acceleration is in fact an indicator for the face up / face down orientation of the device.This example has been adapted and put on jsbin.com so that you can tweak it: http://jsbin.com/uyuqek/4/edit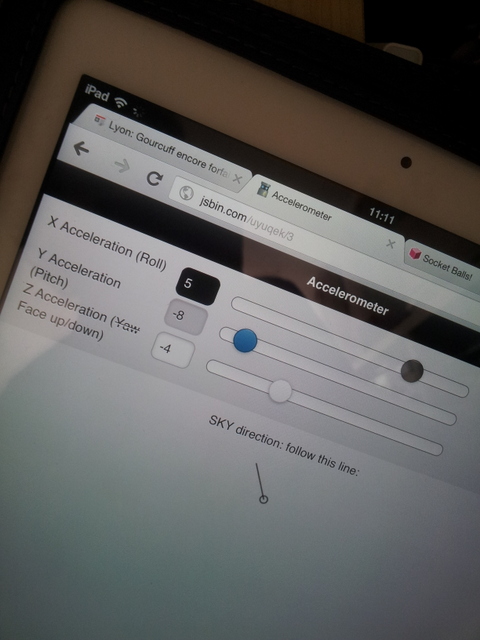
- <html>
- <head>
- <meta http-equiv="content-type" content="text/html; charset=utf-8">
- <meta name="viewport" content="user-scalable=no, width=device-width" />
- <link rel="stylesheet"
- href="http://code.jquery.com/mobile/1.0b2/jquery.mobile-1.0b2.min.css" />
- <script type="text/javascript"
- src = "http://code.jquery.com/jquery-1.6.2.min.js">
- </script>
- <script type="text/javascript"
- src = "http://code.jquery.com/mobile/1.0b2/jquery.mobile-1.0b2.min.js">
- </script>
- <script type="text/javascript">
- $(document).ready(function(){
- window.addEventListener("devicemotion",onDeviceMotion,false);
- });
- function onDeviceMotion(event){
- var ctx = document.getElementById("c").getContext("2d");
- var accel = event.accelerationIncludingGravity;
- $("#sliderX").val(Math.round(accel.x)).slider("refresh");
- $("#sliderY").val(Math.round(accel.y)).slider("refresh");
- $("#sliderZ").val(Math.round(accel.z)).slider("refresh");
- // sky direction
- var angle = Math.atan2(accel.y,accel.x)
- ctx.clearRect(0,0,100,100);
- ctx.beginPath();
- ctx.arc(50,50,5,0,2*Math.PI,false);
- ctx.moveTo(50,50);
- // Draw sky direction
- ctx.lineTo(50-50*Math.cos(angle),50+50*Math.sin(angle));
- ctx.stroke();
- }
- </script>
- </head>
- <body>
- <div data-role="page" id = "intropage">
- <div data-role="header">
- <h1>Accelerometer</h1>
- </div>
- <div data-role="content">
- <label for="sliderX">X Acceleration (Roll)</label>
- <input type="range" name="sliderX" id="sliderX"
- value="0" min="-10" max="10" data-theme="a" />
- <label for="sliderY">Y Acceleration (Pitch)</label>
- <input type="range" name="sliderY" id="sliderY"
- value="0" min="-10" max="10" data-theme="b" />
- <label for="sliderZ">Z Acceleration (<strike>Yaw</strike>
- Face up/down)
- </label>
- <input type="range" name="sliderZ" id="sliderZ"
- value="0" min="-10" max="10" data-theme="c" />
- </div>
- <p style = "text-align:center">SKY direction:
- follow this line:</p>
- <div style = "text-align:center;margin-top:10px;">
- <canvas id="c" width="100" height="100"></canvas>
- </div>
- </div>
- </body>
- </html>
MOVE A BALL ON THE SCREEN
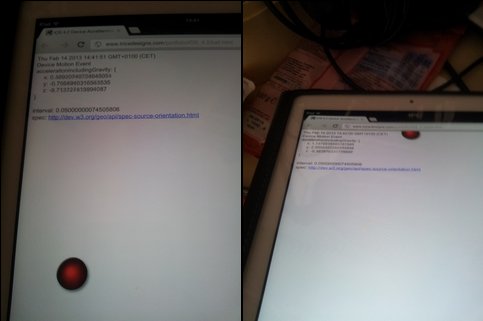 Code from this example:
- <!DOCTYPE html PUBLIC "-//W3C//DTD XHTML 1.0 Transitional//EN" "http://www.w3.org/TR/xhtml1/DTD/xhtml1-transitional.dtd">
- <html xmlns="http://www.w3.org/1999/xhtml">
- <head>
- <meta http-equiv="Content-Type" content="text/html; charset=UTF-8" />
- <meta name="viewport" content="width=device-width,
- target-densityDpi=device-dpi,
- initial-scale=1.0,
- user-scalable=no,
- maximum-scale=1.0">
- <title>iOS 4.2 Device Accellerometer</title>
- <style>
- body {
- font-family:Arial, Helvetica, sans-serif;
- font-size: 14px;
- }
- #board {
- position:absolute;
- left:0px;
- right:0px;
- top:0px;
- bottom:0px;
- }
- #ball {
- position:absolute;
- width: 60px;
- height: 60px;
- border-radius: 30px;
- background-image: -webkit-gradient(radial, 45% 45%, 5, 60% 60%,
- 40, from(red), color-stop(75%, black), to(rgba(255, 255,255, 0)));
- -webkit-box-shadow: 3px 3px 5px #888;
- }
- </style>
- <scriptsrc="http://ajax.googleapis.com/ajax/libs/jquery/1.4.2/jquery.min.js">
- </script>
- <script>
- !window.jQuery && document.write('<script src="./js/jquery.min.js"><\/script>')
- </script>
- <script>
- var offset;
- var velocity;
- var board;
- var ball;
- var interval;
- $(document).ready(function() {
- window.addEventListener("devicemotion", onDeviceMotion, false);
- $('#timestamp').html(new Date().toString());
- $('#status').html("Ready!");
- velocity = {};
- velocity.x = 0;
- velocity.y = 0;
- offset = {};
- board = $('#board');
- ball = $('#ball');
- offset.left = (board.width() - ball.width()) / 2;
- offset.top = (board.height() - ball.height()) / 2;
- $('#ball').offset(offset);
- interval = setInterval(updateBall, 25);
- });
- function onDeviceMotion(event) {
- $('#timestamp').html(new Date().toString());
- $('#status').html("Device Motion Event");
- var eventDetails;
- try {
- var accel = event.accelerationIncludingGravity;
- eventDetails = "accelerationIncludingGravity: {" +
- "<br> x: " + accel.x +
- "<br> y: " + accel.y +
- "<br> z: " + accel.z +
- "<br/>} <br/><br/>" +
- "interval: " + event.interval;
- updateVelocity(event);
- } catch (e) {
- eventDetails = e.toString();
- }
- $('#details').html(eventDetails);
- }
- var decay = .9;
- var bounceDecay = .95;
- var maxVelocity = 100;
- function updateVelocity(event) {
- velocity.x += event.accelerationIncludingGravity.x;
- if (Math.abs(velocity.x) > maxVelocity) {
- if (velocity.x > 0) velocity.x = maxVelocity;
- else velocity.x = -maxVelocity;
- }
- velocity.y += event.accelerationIncludingGravity.y;
- if (Math.abs(velocity.y) > maxVelocity) {
- if (velocity.y > 0) velocity.y = maxVelocity;
- else velocity.y = -maxVelocity;
- }
- }
- function updateBall() {
- if (offset.left <= -(ball.width() / 2)) {
- velocity.x = Math.abs(velocity.x * bounceDecay);
- } else if (offset.left >= (board.width() - (ball.width() / 2))) {
- velocity.x = -Math.abs(velocity.x * bounceDecay);
- } else {
- velocity.x = parseInt(velocity.x);
- velocity.x *= decay;
- }
- if (offset.top <= -(ball.height() / 2)) {
- velocity.y = -Math.abs(velocity.y * bounceDecay);
- } else if (offset.top >= (board.height() - (ball.height() / 2))) {
- velocity.y = Math.abs(velocity.y * bounceDecay);
- } else {
- velocity.y = parseInt(velocity.y);
- velocity.y *= decay;
- }
- offset.left += velocity.x;
- offset.top -= velocity.y;
- $('#ball').offset(offset);
- }
- </script>
- </head>
- <body>
- <div id="timestamp"></div>
- <div id="status"></div>
- <div id="details"></div>
- <div id="board">
- <div id="ball"></div>
- </div>spec: <a href="http://dev.w3.org/geo/api/spec-source-orientation.html" target="http://dev.w3.org/geo/api/spec-source-orientation.html">http://dev.w3.org/geo/api/spec-source-orientation.html</a>
- </body>
- </html>
No comments:
Post a Comment