Add closed captions, subtitles, etc. to your videos
INTRODUCTION
This section introduces the new HTML5 <track> element, useful for adding closed captions, subtitles, descriptions, and metadata to your videos. It comes with a new JavaScript API.
The WebVTT format used for describing a track file is also presented in this chapter.
Most of the major desktop browsers now support HTML5 captioning
- See this compatibility table for the up-to-date status of the different browsers. Also, please check on caniuse.com for information about the <track> element support by browsers.
Some definitions
- closed captions describe all relevant audio present in the video (fire, rain, birds, gun fights, etc.).
- subtitles are only for spoken words.
The accessibility features of TV programs often propose both options for people with hearing deficiencies.
TYPICAL USE: ADD A SUBTITLE/CAPTION TRACK TO A <VIDEO> ELEMENT
Important warning!!
The <track> element cannot be used with a file:// URL. Please use http:// and a Web server. Your server must use a special MIME format for the .vtt files: text/vtt;charset=utf-8 (set by default on most servers now).
Examples of the lines to add to an Apache Web server:
- <Files mysubtitle.vtt>
- ForceType text/vtt;charset=utf-8
- </Files>
Here is an example of a video element that includes a <track> element in the .vtt (WebVTT) format (line 7), original version at http://www.jwplayer.com/html5/track/, and we also cooked a version easier to study on jsbin: http://jsbin.com/luyazi/2/edit.

As seen in this screenshot, the example uses a <track> element to insert basic captions to the video: sounds and music are described, in addition to standard subtitles that correspond to what the different movie characters say.
- <video height="272" width="640"
- poster="http://content.bitsontherun.com/thumbs/q1fx20VZ-640.jpg"
- crossorigin="anonymous"
- controls>
- <source src="http://demo.jwplayer.com/html5-report/sintel.mp4"
- type="video/mp4">
- <source src="http://demo.jwplayer.com/html5-report/sintel.webm"
- type="video/webm">
- <track src="http://demo.jwplayer.com/html5-report/sintel-captions.vtt"
- kind="captions" label="Closed Captions" default>
- </video>
Notice that the <track> element at line 9 has an attribute named kind that indicates the type of the track that is included. Possible values are: subtitles, captions, descriptions, chapters or metadata.
The <track> element also has an attribute default that indicates that we want this track to be displayed by default when reading the video.
We also used an attribute named crossorigin that is necessary just to run this demo, as the server that hosts the video from this example requires it.
MULTIPLE TRACKS MAY BE INCLUDED IN A VIDEO ELEMENT
Multiple tracks are needed to support different langages, video captions for the hearing-impaired, subtitles, etc.
Find below an example (from the specification) that includes multiple <track> elements (subtitles for three languages and captions only for English):
- <video src="brave.webm">
- <track kind=subtitles src=brave.en.vtt
- srclang=en
- label="English">
- <track kind=captions src=brave.en.hoh.vtt
- srclang=en
- label="English for the Hard of Hearing">
- <track kind=subtitles src=brave.fr.vtt
- srclang=fr
- lang=fr
- label="Français">
- <track kind=subtitles src=brave.de.vtt
- srclang=de
- lang=de
- label="Deutsch">
- </video>
Notice the use of some new attributes in the <track> element:
- label: the label value will be displayed in the GUI control that is included in the default HTML5 video player,
- srclang: gives the language for the text track data. The value must be a valid BCP 47 language tag. This attribute must be present if the element's kind attribute is in the subtitles state.
The WebVTT format
The W3C Web Media Text Tracks Community Group is working on the "WebVTT: The Web Video Text Tracks Format" specification, a format used for defining files that will contain text for captions and subtitles, and much more... The WebVTT files are used with the src attribute of the <track> element, that can be used inside a<video>...</video>.In the example presented in the previous section (located at http://jsbin.com/luyazi/2/edit), we used a file calledsintel-captions.vtt:- <video height="272" width="640"
- poster="http://content.bitsontherun.com/thumbs/q1fx20VZ-640.jpg"
- crossorigin="anonymous"
- controls>
- ...
- <track src="http://demo.jwplayer.com/html5-report/sintel-captions.vtt"
- kind="captions" label="Closed Captions" default>
- </video>
And here is an extract of the corresponding sintel-captions.vtt file:- WEBVTT
- 00:00:01.000 --> 00:00:02.042
- (drumbeat)
- 00:00:07.167 --> 00:00:12.025
- (plaintive violin solo playing)
- 00:00:15.000 --> 00:00:18.183
- (wind whistling)
- 00:00:24.167 --> 00:00:27.025
- (orchestra music swells)
- 00:00:43.033 --> 00:00:43.192
- (weapons clash)
- 00:00:44.000 --> 00:00:44.175
- (gasps)
- 00:00:44.183 --> 00:00:45.158
- (grunts)
- 00:00:45.167 --> 00:00:47.058
- (groaning)
- 00:00:54.192 --> 00:00:55.150
- (blade rings)
- 00:00:55.158 --> 00:00:57.008
- (bellowing)
- 00:00:57.017 --> 00:00:58.067
- (grunting)
- 00:00:59.075 --> 00:01:00.133
- (panting)
- 00:01:05.108 --> 00:01:06.125
- (cries out in agony)
- 00:01:08.050 --> 00:01:09.058
- (panting)
- 00:01:12.092 --> 00:01:13.142
- (panting)
- 00:01:14.017 --> 00:01:18.125
- (orchestra plays ominous low notes)
- 00:01:31.058 --> 00:01:35.133
- (plaintive violin solo returns)
- 00:01:46.158 --> 00:01:49.058
- This blade has a dark past.
- 00:01:51.092 --> 00:01:54.108
- It has shed much innocent blood.
- 00:01:57.083 --> 00:02:00.000
- You're a fool for traveling alone
- so completely unprepared.
- 00:02:01.100 --> 00:02:03.033
- You're lucky your blood's still flowing.
- 00:02:04.183 --> 00:02:06.075
- Thank you.
This format is rather simple, but we still recommend reading this excellent article from Mozilla Developer Network that explains in details all the different options.Each "element" in this file has a starting and ending time, plus a value (the text that will be displayed), followed by a blank line (blank lines are separators between elements).Each element is called "a cue", and may optionally have an ID that will be useful when using the track element JavaScript API, in particular the getCueById() method of TextTrack objects. How to use these will be taught in the "advanced HTML5" course, soon on W3CxExample of numeric IDs:- 9
- 00:00:21.000 --> 00:00:22.000
- to hear from <u>you</u>
- 10
- 00:00:22.500 --> 00:00:25.000
- We want to hear what inspires you as a developer
IDs may be also defined as strings, and values can use HTML as well:- Opening
- 00:00:00.000 --> 00:00:30.000
- Welcome to our <i>nice film</i>
The displayed text can span over multiple lines, but blank lines are not allowed, as they would be interpreted as a separator:- 00:01:57.083 --> 00:02:00.000
- <p>You're a fool for traveling alone</p>
- <p>so completely unprepared.</p>
Practical example: adding subtitles to a video
INTRODUCTION
We will look at a simple example. First, you need to have a video on one of the formats/codecs supported by the browsers you target. A recommended codec is H264, but other formats, such as webm, may have some advantages if the browser supports them. For example, webm allows to start playing the video after a much shorter buffering time. In other words, try to provide the video encoded with more than one codec, if possible.
For this, do use any sort of open source, free or commercial video encoding software, such as Handbrake (free, open source) or Super (free). There are also online video encoding services, and you can even upload your video to YouTube, let it encode your video in several resolutions and codecs, and use a browser extension like VideoDownloadHelper (for Firefox) to download the video in the formats you like.
So, let's suppose you have a video like this one below (we included it on YouTube for practical reasons). This video does have subtitles (you can activate them in the YouTube player), but the goal of this lesson is to explain how we made them without using the YouTube embedded tools, that do not allow to export the subtitle file in the webVTT format.
And you've got it also in mp4/H264 and in webm formats. Here is how you can embed it in your page using the video element:
- <video id="myVideo" width=500 controls>
- <source
- src="videos/SameOldSongAndDanceRogerLathaudPart1MidRes.mp4"
- type="video/mp4">
- <source
- src="videos/SameOldSongAndDanceRogerLathaudPart1MidRes.webm"
- type="video/webm">
-
- <track src="videos/subtitles.vtt"
- kind="subtitles" srclang="en" default>
- </video>
At line 9, we added a <track> element to add english subtitles, as the guitar teacher there is speaking in French. We will now explain how we created this subtitle track.
- <video id="myVideo" width=500 controls>
- <source
- src="videos/SameOldSongAndDanceRogerLathaudPart1MidRes.mp4"
- type="video/mp4">
- <source
- src="videos/SameOldSongAndDanceRogerLathaudPart1MidRes.webm"
- type="video/webm">
- <track src="videos/subtitles.vtt"
- kind="subtitles" srclang="en" default>
- </video>
ADDING SUBTITLES TO THE VIDEO
Now, we need to create a WebVTT file for this video. How can we synchronize an English translation of what the guitar teacher says in French?
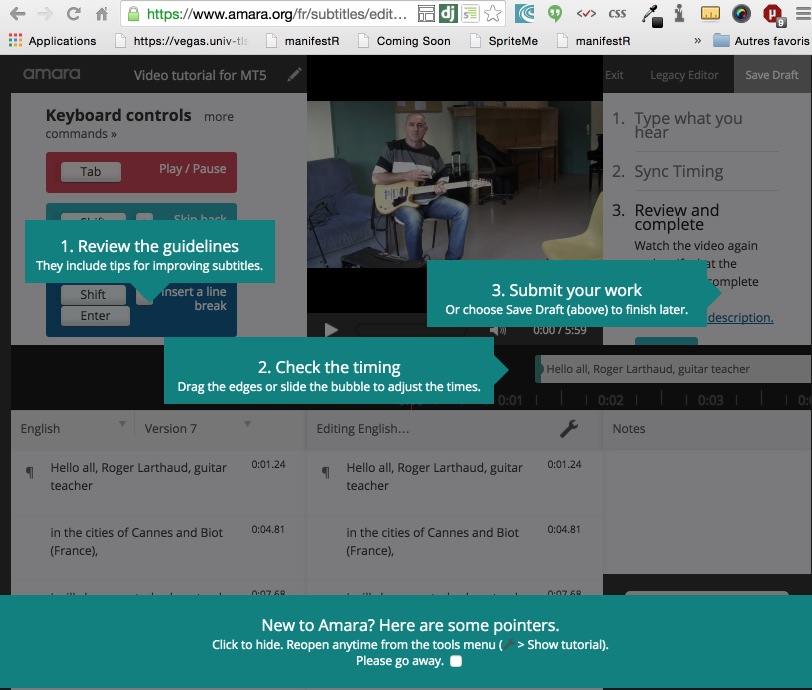
There are many tools available to add subtitles to a video, free and commercial ones. Most of them are native applications you need to install on your computer. However, it exists a free and very practical tool for doing this 100% in a Web browser: http://www.universalsubtitles.org, also known as http://www.amara.org.
Go to this Web site, click on the "subtitle a video" link, then follow the different tutorials/instructions. It will ask for a YouTube URL, so it's better to first upload your video to YouTube (even in private mode). Once you entered in the URL of your video, you will have an online subtitles/caption editor. Enter your subtitles and sync them until you are happy with the results.
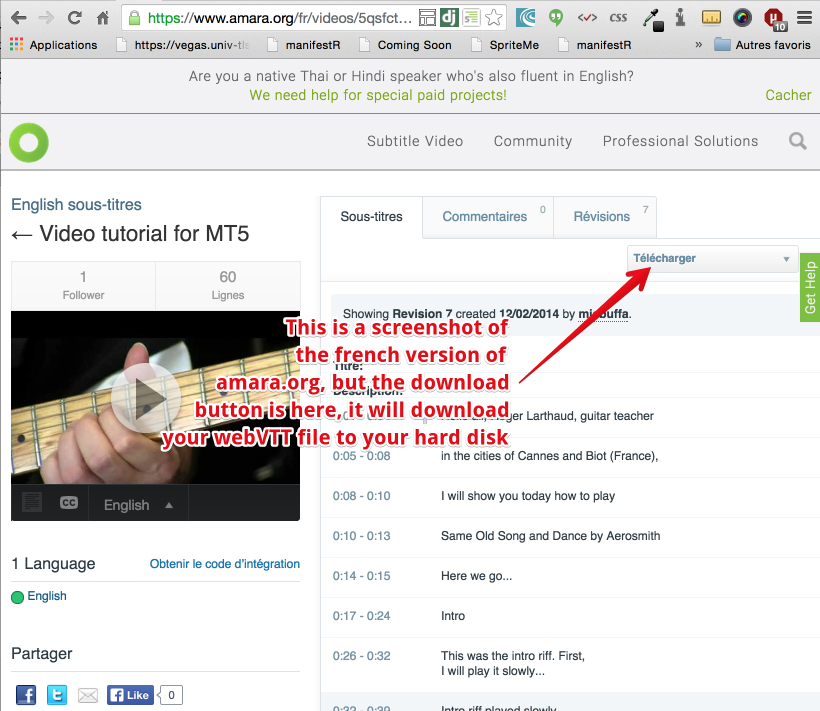
 Once your subtitles/captions are ok, you will be able to upload them to YouTube, or -this is what we wanted first- download them as WebVTT format:
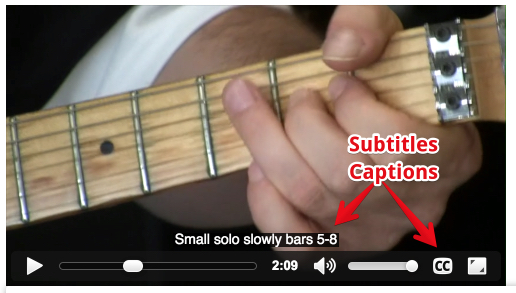
TRY YOUR SUBTITLED/CAPTIONED VIDEO
Styling and positioning the captions/subtitles
ONLINE EXAMPLE USED IN THIS SECTION
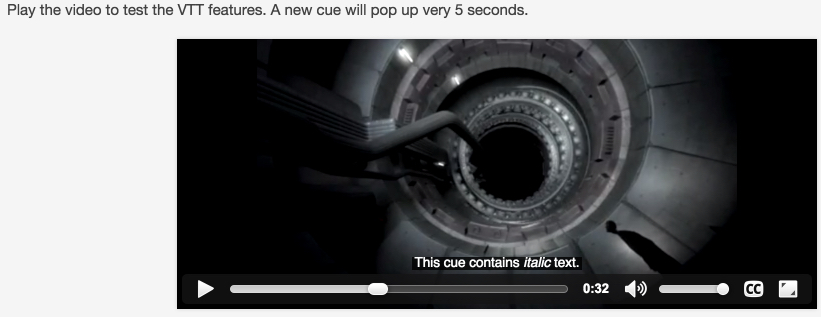
In this section, we will look at different possibilities for positioning and styling the text displayed as captions/subtitles while playing a video.
This video example shows each use case. We also "cooked" an easier version to study on JS Bin (look at the HTML in JS Bin).
The screenshots below are taken from this video.
 And here is the WebVTT file. Notice the new attributes that have been added on the right end of the duration values:
- WEBVTT
- 00:00:01.000 --> 00:00:05.000
- These captions test some features of the WebVTT formats
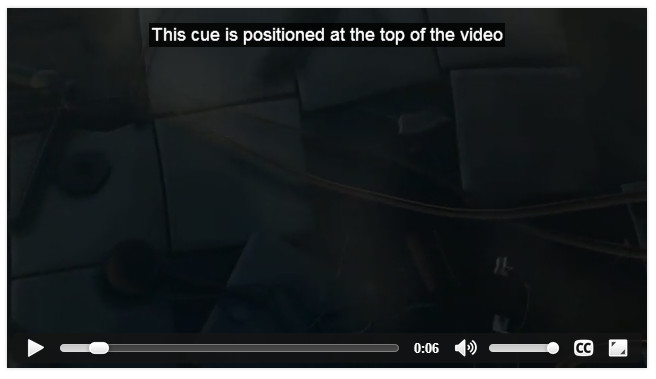
- 00:00:06.000 --> 00:00:10.000 line:5%
- This cue is positioned at the top of the video
- 00:00:11.000 --> 00:00:15.000 position:5% align:start
- This cue is positioned at the left side of the video.
- 00:00:16.000 --> 00:00:20.000 position:95% align:end
- And this one ate the right side.
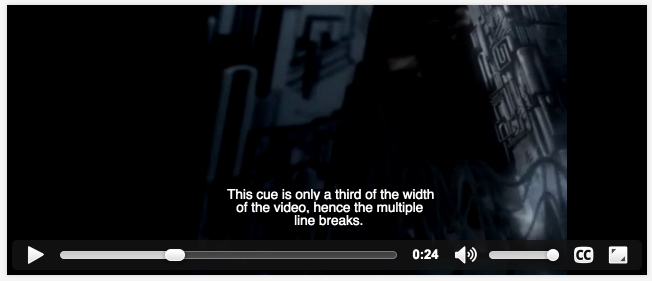
- 00:00:21.000 --> 00:00:25.000 size:33%
- This cue is only a third of the width of the video, hence the multiple line breaks.
- 00:00:26.000 --> 00:00:30.000
- This cue contains <b>bold</b> text.
- 00:00:31.000 --> 00:00:35.000
- This cue contains <i>italic</i> text.
- 00:00:36.000 --> 00:00:40.000
- This cue contains <u>underlined</u> text.
- 00:00:41.000 --> 00:00:45.000
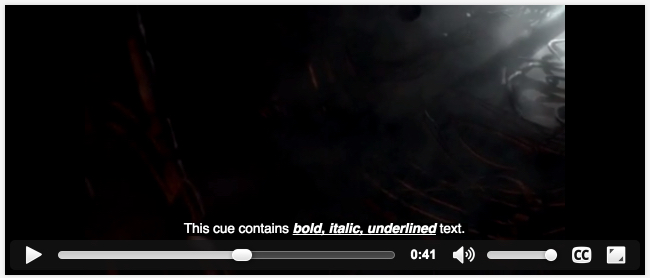
- This cue contains <b><i><u>bold, italic, underlined</u></i></b> text.
- 00:00:46.000 --> 00:00:50.000
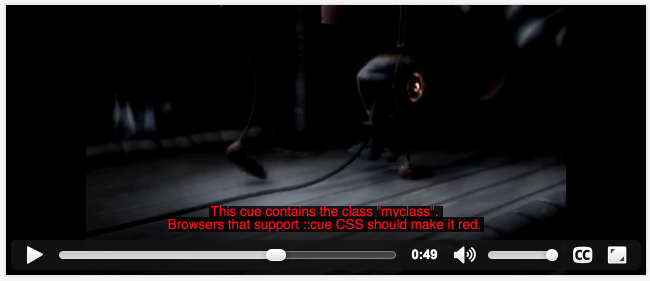
- <c.myclass>This cue contains the class "myclass".
- Browsers that support ::cue CSS should make it red.</c>
- 00:00:51.000 --> 00:00:55.000
- The following cue contains two voices.
- Tarzan should be blue and Jane green.
- 00:00:56.000 --> 00:01:00.000
- <v Tarzan>Me Tarzan...
- <v Jane>That would make me Jane!
- bigtext
- 00:01:01.000 --> 00:01:05.000
- This cue has a unique id.
- Using CSS, its font size should be 150%.
- 00:01:06.000 --> 00:01:10.000
- The <00:01:06.333>text <00:01:06.666>in <00:01:07.000>this <00:01:07.333>cue<00:01:07.666>should <00:01:08.000>grow
- <00:01:08.333>one <00:01:08.666>word <00:01:09.000>at <00:01:09.333>a<00:01:09.666>time
- 00:01:11.000 --> 00:01:15.000
- That's it! For now...
- WEBVTT
- 00:00:01.000 --> 00:00:05.000
- These captions test some features of the WebVTT formats
- 00:00:06.000 --> 00:00:10.000 line:5%
- This cue is positioned at the top of the video
- 00:00:11.000 --> 00:00:15.000 position:5% align:start
- This cue is positioned at the left side of the video.
- 00:00:16.000 --> 00:00:20.000 position:95% align:end
- And this one ate the right side.
- 00:00:21.000 --> 00:00:25.000 size:33%
- This cue is only a third of the width of the video, hence the multiple line breaks.
- 00:00:26.000 --> 00:00:30.000
- This cue contains <b>bold</b> text.
- 00:00:31.000 --> 00:00:35.000
- This cue contains <i>italic</i> text.
- 00:00:36.000 --> 00:00:40.000
- This cue contains <u>underlined</u> text.
- 00:00:41.000 --> 00:00:45.000
- This cue contains <b><i><u>bold, italic, underlined</u></i></b> text.
- 00:00:46.000 --> 00:00:50.000
- <c.myclass>This cue contains the class "myclass".
- Browsers that support ::cue CSS should make it red.</c>
- 00:00:51.000 --> 00:00:55.000
- The following cue contains two voices.
- Tarzan should be blue and Jane green.
- 00:00:56.000 --> 00:01:00.000
- <v Tarzan>Me Tarzan...
- <v Jane>That would make me Jane!
- bigtext
- 00:01:01.000 --> 00:01:05.000
- This cue has a unique id.
- Using CSS, its font size should be 150%.
- 00:01:06.000 --> 00:01:10.000
- The <00:01:06.333>text <00:01:06.666>in <00:01:07.000>this <00:01:07.333>cue<00:01:07.666>should <00:01:08.000>grow
- <00:01:08.333>one <00:01:08.666>word <00:01:09.000>at <00:01:09.333>a<00:01:09.666>time
- 00:01:11.000 --> 00:01:15.000
- That's it! For now...
HOW TO POSITION THE SUBTITLES
 The video example tests nearly all the possibilities for positioning subtitles/captions, styling (using HTML element wrapping with <b>, <i>, etc.), voicing (subtitles corresponding to different characters will be displayed in different colors) and CSS styling.
It is possible to locate the cues in the video viewport using absolute or relative values. The attributes that position the text are located on the same line as the cue definition, like at line 9 of the previous WebVTT example file:
The video example tests nearly all the possibilities for positioning subtitles/captions, styling (using HTML element wrapping with <b>, <i>, etc.), voicing (subtitles corresponding to different characters will be displayed in different colors) and CSS styling.
It is possible to locate the cues in the video viewport using absolute or relative values. The attributes that position the text are located on the same line as the cue definition, like at line 9 of the previous WebVTT example file:
- 00:00:11.000 --> 00:00:15.000 position:5% align:start
- This cue is positioned at the left side of the video.
There are several possible values:
- line:5% means "vertical position at a line 5% of the height of the video viewport (it will be located at the top of the video, proportional to its vertical size).
- position:5% align:start means "regular location at the bottom of the video, the start of the sentence will be located at 5% of the width of the video", i.e., near the left side.
- position:95% align:end means "regular location at the bottom of the video, the end of the sentence will be at 95% of the horizontal width of the video".
- size:33% The size of each line will be one third of the size of the video. Since the sentence won't fit, it will be displayed in multiple lines.
And so on. Please look at the video as it is self-explanatory.
- 00:00:11.000 --> 00:00:15.000 position:5% align:start
- This cue is positioned at the left side of the video.
- line:5% means "vertical position at a line 5% of the height of the video viewport (it will be located at the top of the video, proportional to its vertical size).
- position:5% align:start means "regular location at the bottom of the video, the start of the sentence will be located at 5% of the width of the video", i.e., near the left side.
- position:95% align:end means "regular location at the bottom of the video, the end of the sentence will be at 95% of the horizontal width of the video".
- size:33% The size of each line will be one third of the size of the video. Since the sentence won't fit, it will be displayed in multiple lines.
USE OF <B>, <I>, <U> FOR STYLING SUBTITLES / CAPTIONS
USING CSS CLASSES FOR STYLING
It is possible to style using CSS classes as part of a cue value, using the <c> element. You can specify the CSS class that should be applied by adding "." followed by the name of your CSS class. Here is an example:
- <c.myclass>This cue contains the class "myclass".
- Browsers that support ::cue CSS should make it red.</c>
 CSS rules used in this example:
- <style type="text/css">
- ::cue(.myclass) { color: red; }
- ::cue(v[voice="Tarzan"]) { color: blue; }
- ::cue(v[voice="Jane"]) { color: green; }
- ::cue(#bigtext) { font-size: 150%; }
- </style>
The ::cue pseudo element selector is used to match "cues" in the webVTT file. You add parenthesis and a secondary CSS selector to match cues that have a particular id, or a particular CSS class, etc. Look at the CSS above and at the extract from the webVTT file, play the video, you will understand how this works...
Support differs from one browser to another, see this compatibility table for more infos. Notice that most of the enhanced players presented further on in the course will provide full support.
- <c.myclass>This cue contains the class "myclass".
- Browsers that support ::cue CSS should make it red.</c>
- <style type="text/css">
- ::cue(.myclass) { color: red; }
- ::cue(v[voice="Tarzan"]) { color: blue; }
- ::cue(v[voice="Jane"]) { color: green; }
- ::cue(#bigtext) { font-size: 150%; }
- </style>
USING VOICING FOR STYLING: THE <V> ELEMENT
Screenshot taken at 1:02 of this example online:
 Using the <v> tag, you will distinguish different voices that should be displayed in different colors (depending on the HTML5 video player implementation). See the CSS presented in the previous section to see how to specify the colors for the different voices.
Extract from the source code:
Using the <v> tag, you will distinguish different voices that should be displayed in different colors (depending on the HTML5 video player implementation). See the CSS presented in the previous section to see how to specify the colors for the different voices.
Extract from the source code:
- 00:00:56.000 --> 00:01:04.000
- <v Tarzan>Me Tarzan...
- <v Jane>That would make me Jane!
- 00:00:56.000 --> 00:01:04.000
- <v Tarzan>Me Tarzan...
- <v Jane>That would make me Jane!
Chapters: use another specific <track>
Ading chapters is very similar to adding subtitles/captions. Look at line 5, where we use an extra <track>element with a kind="chapters" attribute.
- <video poster="webvtt_talk.png" style="width:100%" preload="metadata">
- <source src="webvtt_talk.webm">
- <source src="webvtt_talk.mp4">
- <source src="webvtt_talk.ogv">
- <track id="nav" src="webvtt_talk_navigation.vtt" kind="chapters"srclang="en"></track>
- <track id="cc" src="webvtt_talk_captions.vtt" kind="captions"
- label="captions" srclang="en" default>
- </track>
- </video>
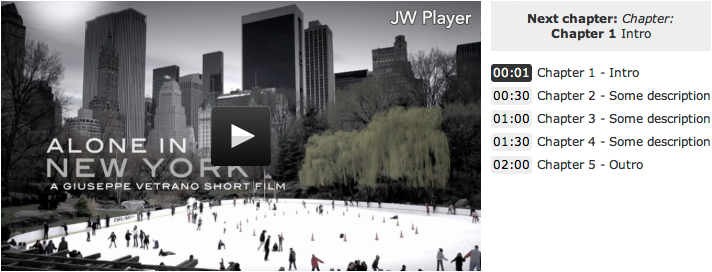
Here is an example of WebVTT files with defined chapters. Each "CUE" at line 3, 7, 11 etc. can bear any name. We used "Chapter 1, Chapter 2, Ending, etc..." but you are free to give them the name you like best.
What make them special is the fact that the track has an attribute kind="chapters". In 2015, the <video>elements rendered in standard browsers do ignore chapters, but enhanced HTML5 players such asSublimeVideo Player or JW Player take them into account.
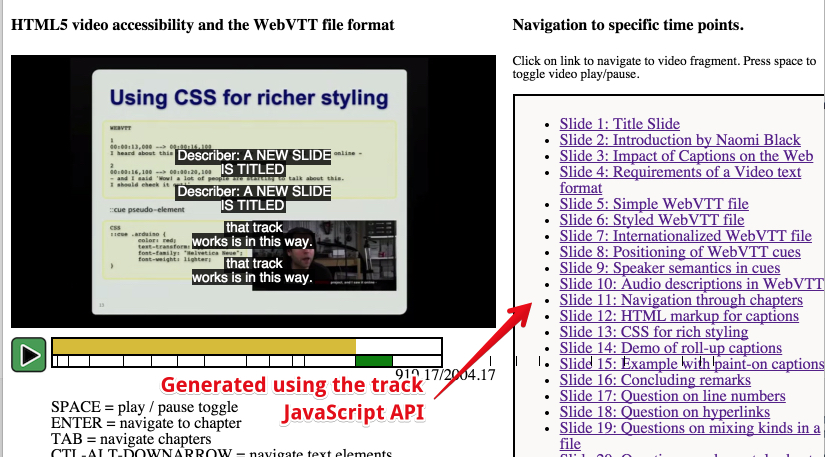
It's also easy to process them, and for example, to generate a custom navigation menu, using the <track>JavaScript API (which will be covered in an "advanced HTML5" course, soon on W3Cx).
Example of a WebVTT file that defines chapters:
- WEBVTT FILE
-
- Chapter 1
- 00:00:00.000 --> 00:00:10.700
- Title Slide
-
- Chapter 2
- 00:00:10.700 --> 00:00:47.600
- Introduction by Naomi Black
-
- Chapter 3
- 00:00:47.600 --> 00:01:50.100
- Impact of Captions on the Web
-
- Chapter 4
- 00:01:50.100 --> 00:03:33.000
- Requirements of a Video text format
-
- Ending
- 00:03:33.000 --> 00:04:57.766
- Simple WebVTT file
-
- Greetings 6
- 00:04:57.766 --> 00:06:16.666
- Styled WebVTT file
JW Player displays chapters:
 SublimeVideo's player takes into account chapters:
- <video poster="webvtt_talk.png" style="width:100%" preload="metadata">
- <source src="webvtt_talk.webm">
- <source src="webvtt_talk.mp4">
- <source src="webvtt_talk.ogv">
- <track id="nav" src="webvtt_talk_navigation.vtt" kind="chapters"srclang="en"></track>
- <track id="cc" src="webvtt_talk_captions.vtt" kind="captions"
- label="captions" srclang="en" default>
- </track>
- </video>
- WEBVTT FILE
- Chapter 1
- 00:00:00.000 --> 00:00:10.700
- Title Slide
- Chapter 2
- 00:00:10.700 --> 00:00:47.600
- Introduction by Naomi Black
- Chapter 3
- 00:00:47.600 --> 00:01:50.100
- Impact of Captions on the Web
- Chapter 4
- 00:01:50.100 --> 00:03:33.000
- Requirements of a Video text format
- Ending
- 00:03:33.000 --> 00:04:57.766
- Simple WebVTT file
- Greetings 6
- 00:04:57.766 --> 00:06:16.666
- Styled WebVTT file
Tools for creating WebVTT subtitles and for reusing existing subtitles
Many tools are available to make and edit HTML5 video and caption/subtitles:
- Tools for converting existing file formats to WebVTT files, such as the .srt format, which is popular in the DivX/AVI/Mkv scene. This article reviews 3 of them, but there are many more. Do a quick Web search and you will get plenty of results.
- Tools for creating subtitles/captions from scratch. Use these to generate a WebVTT file. You can embed the <track> element in your own videos, on your own Web pages, or upload the WebVTT file to YouTube. We recommend Universal Subtitles. It's a free online tool, very easy to use. Check the "add subtitles/captions to your video" unit of this course.
- Enhanced HTML5 video players that use the <video>, <source> and <track> elements under the hood. They also provide many extra features, including support for subtitle/caption formats other than WebVTT (by converting on the fly).
- JavaScript libraries for converting to the WebVTT format on the fly, such as JS_videosub
The <track> JavaScript API
INTRODUCTION
-
The <track> element comes with a powerful API that is used to develop a lot of interesting features such as:
- Dynamically building a navigation menu that shows the different chapters of the video,
- Synchronizing page content with timestamps in the WebVTT file (for example: show a map next to the video, that shows the location corresponding to the video content),
- Displaying all the subtitles/captions at once as HTML in the page,
- Making an app for creating on the fly subtitles/captions,
- Etc.
How to do this will be taught in the "advanced HTML5" course, soon on W3Cx.
EXAMPLES OF USE
Add a navigation menu to start playing the video at given chapters
-
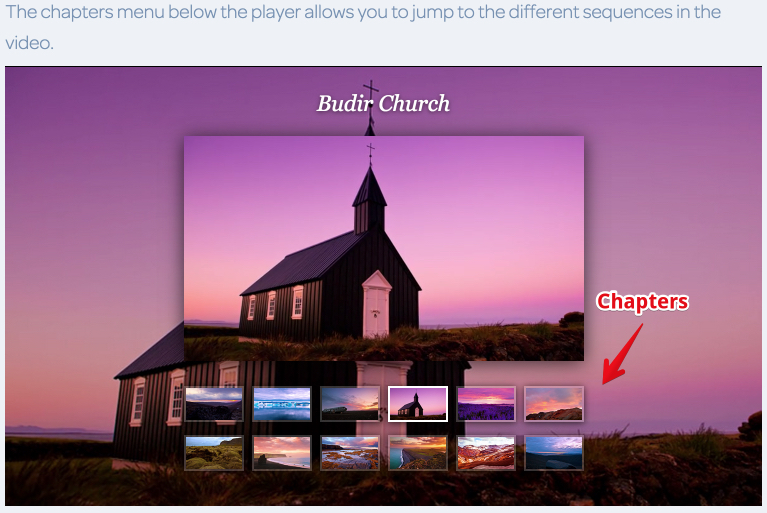
This example shows a video with an enhanced progress bar that displays the different chapters as small "clickable" squares. Furthermore, using the JavaScript API of the <track> element, this Web site builds a navigation menu (on the right of the video):
This example shows a video with an enhanced progress bar that displays the different chapters as small "clickable" squares. Furthermore, using the JavaScript API of the <track> element, this Web site builds a navigation menu (on the right of the video):
Sync video with Google Map and Google Street View
-
Check this demo by Sam Dutton: it shows a video that comes with a WebVTT file that contains longitudes and latitudes. When the video plays, JavaScript functions are called at given times and get the longitude and latitude. A Google Map and a Google Street views are updated in real time.
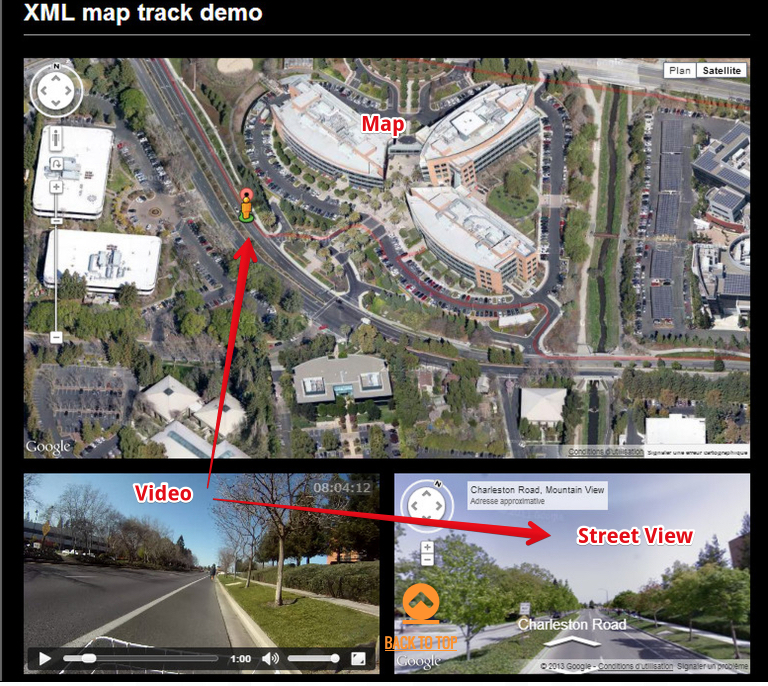
Check this demo by Sam Dutton: it shows a video that comes with a WebVTT file that contains longitudes and latitudes. When the video plays, JavaScript functions are called at given times and get the longitude and latitude. A Google Map and a Google Street views are updated in real time.
SYNC GUITAR TABLATURES AND MUSIC SCORE WITH A VIDEO
-
This example shows how we manage to render music scores in real time as the video plays.
Some JavaScript code listens to the ontimeupdate event while the video is playing. We use the currentTimeproperty of the video to know exactly where we are in the video. Finally, we also rely on an external library to render in an HTML5 canvas the bars corresponding to the current video explanations. We render in real time guitar pro tablatures using the alphatab.net library.
EXTERNAL RESOURCES (OPTIONAL, IF YOU WISH TO LEARN MORE)
- The W3C specification for the <track> element
- The living W3C standard for the WebVTT format
- Examples of text tracks with JavaScript scripting
- HTML5 video with SRT subtitles
- Creating and validating WebVTT subtitles
- Silvia Pfeiffer's HTML5 Video Accessibility slides give more examples of working with markup, as well as showing how to build chapter tracks for navigation and description tracks for screen readers.
This course is a FULL copy-paste of the W3Cx HTML5 Coding Essentials and Best Practices course... https://www.edx.org/course/html5-part-1-html5-coding-essentials-w3cx-html5-1x
ReplyDeletehtml code examples to learning
ReplyDeleteP paragraph tag first-letter font-size
Hi Dear,
ReplyDeletei Like Your Blog Very Much..I see Daily Your Blog ,is A Very Useful For me.
Hairfibril offer wide range or subtitlesLooking for subtitles for your favorite movie or the latest TV series? Check out our guide about top 15 subtitles websites and choose the one that works best for you!
Visit Now - https://www.movavi.com/learning-portal/best-subtitle-download-sites.html
Happy to find this content. Now I need to talk this out with my subtitle translator
ReplyDeletecaptions for facebook
ReplyDelete