NTRODUCTION
In the previous sections, we learned how to draw filled or wireframe rectangles.
As soon as the ctx.strokeRect(x, y, width, height) or the ctx.fillRect(x, y, width, height) method is called, a rectangle is indeed drawn immediately in the canvas.
While drawing rectangles with strokeRect or fillRect, drawing text or drawing images, all these shapes will be drawn in immediate mode.
Another mode called "path mode" or "buffered mode" will be seen later in this course, which will be useful for drawing lines, curves, arcs, and also rectangles. Rectangles are the only shapes that have methods for drawing them immediately and also other methods for drawing them in "path/buffered mode".
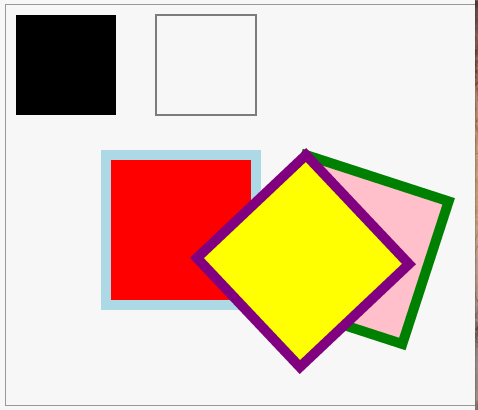
EXAMPLE THAT DRAWS RECTANGLES IN IMMEDIATE MODE AND ALSO SHOWS GOOD PRACTICE
We'll just give an example here that draws several rectangles, filled or wireframe, with different colors and line widths.
Source code:
- <!DOCTYPE HTML>
- <html>
- <head>
- <title>Some rectangles drawn in immediate mode</title>
- <style>
- #myCanvas {
- border: 1px solid #9C9898;
- }
- </style>
- <script>
- var canvas, ctx;
- window.onload = function () {
- canvas = document.getElementById('myCanvas');
- ctx = canvas.getContext('2d');
- // black rectangle, default color (black)
- ctx.fillRect(10, 10, 100, 100);
- // outlined rectangle, default color
- ctx.strokeRect(150, 10, 100, 100);
- // outlined rectangle filled in red, outline blue
- ctx.fillStyle = 'red';
- ctx.strokeStyle = 'lightBlue';
- ctx.lineWidth = 10;
- ctx.fillRect(100, 150, 150, 150);
- ctx.strokeRect(100, 150, 150, 150);
- // A function that automatizes previous drawing
- var angle = Math.PI / 10;
- drawFilledRectangle(300, 150, 150, 150, 'pink', 'green', 10, angle);
- drawFilledRectangle(300, 150, 150, 150, 'yellow', 'purple', 10, angle +0.5);
- };
- function drawFilledRectangle(x, y, w, h, fillColor, strokeColor, lw, angle) {
- // GOOD PRACTICE : save if the function change the context
- // or coordinate
- // system
- ctx.save();
- // position coordinate system
- ctx.translate(x, y);
- ctx.rotate(angle);
- // set colors, line width...
- ctx.lineWidth = lw;
- ctx.fillStyle = fillColor;
- ctx.strokeStyle = strokeColor;
- // draw at 0, 0 as we translated the coordinate
- // system already
- ctx.fillRect(0, 0, w, h);
- ctx.strokeRect(0, 0, w, h);
- // GOOD PRACTICE : a restore for a save!
- ctx.restore();
- }
- </script>
- </head>
- <body>
- <canvas id="myCanvas" width="578" height="400">
- </canvas>
- </body>
- </html>
Drawing text
INTRODUCTION
The canvas API provides two main methods for drawing text: ctx.strokeText(message, x, y) andctx.fillText(message, x, y).
It also provides a set of context properties for setting the character font and style, for laying out the text, etc.
TYPICAL USE
Try this example online: http://jsbin.com/cutoja/2/edit

Source code extract:
- context.font = "60pt Calibri";
- // .. set color, lineWidth, shadow etc.
- // 10, 10 is the start of the baseline, bottom of left leg of the "H" in the
- // "Hello World" example.
- context.fillText("Hello World!", 10, 10);
- // Or
- context.strokeText("Hello World!", 10, 10);
Look at the code from the example provided: http://jsbin.com/cutoja/2/edit - change the position where the text is drawn, change font attributes, etc.
THE CONTEXT.FONT PROPERTY:
It is possible to draw text in a canvas using the font property of the context to specify the font style (plain, bold, italic), the size, and the font name. Other properties such as strokeStyle or fillStyle, as well as other properties detailed in the next subchapters, will also be taken into account.
The font property is CSS-compliant, and accepts values like:
[font style][font weight][font size][font face]
Accepted values are:
- font style: normal, italic, oblique, inherit
- font weight: normal, bold, bolder, lighter, auto, inherit, 100, 200, 300, 400, 500, 600, 700, 800, 900
- font size: a size in pixels or in points, such as 60pt, 20px, 36px, etc.
- font face: Arial, Calibri, Times, Courier, etc. Some font faces may not work in all browsers.
Examples:
- context.font = "60pt Calibri";
- context.font = "normal normal 20px Verdana";
- context.font = "normal 36px Arial";
- context.font = "italic bold 36px Arial";
THE FILLTEXT() OR STROKETEXT() METHODS
The fillText(message, x, y) or strokeText(message, x, y) methods from the context will actually draw a text message at the origin of the baseline position. In the "Hello World" example, this is located at the bottom of the left leg of the "H".
There is a fourth optional parameter maxWidth that forces the text to fit into the given width, distorting it if necessary:
- context.strokeText("Hello World!", x, y [, maxWidth]);
- context.fillText("Hello World!", x, y [, maxWidth]);
EXAMPLE THAT USES THE MAXWIDTH PARAMETER OF THE STROKETEXT() ORFILLTEXT() METHODS:
Try it online: http://jsbin.com/zixeve/2/edit

Source code extract:
- ...
- context.font = "60pt Calibri";
- context.lineWidth = 3;
- context.strokeStyle = "blue";
- context.fillStyle = "red";
- context.fillText("Hello World!", 10, 100);
- context.strokeText("Hello World!", 10, 100);
- // Draw text with constrained width of 250 pixels
- context.fillText("Hello World!", 10, 160, 250);
- context.strokeText("Hello World!", 10, 160, 250);
- // Constrain width to 150 pixels
- context.fillText("Hello World!", 10, 220, 150);
- context.strokeText("Hello World!", 10, 220, 150);
MEASURING THE WIDTH OF A GIVEN TEXT (BOUNDING BOX)
Try this example online: http://jsbin.com/texigo/1/edit

The ctx.measureText() method can be used to get the current width in pixels of a given text, taking into account the diverse properties involved such as font, size, shadow, lineWidth, etc.
Source code extract from this example:
- context.font = "60pt Calibri";
- context.lineWidth = 3;
- context.strokeStyle = "blue";
- context.fillStyle = "red";
- context.fillText("Hello World!", 10, 100);
- context.strokeText("Hello World!", 10, 100);
- var textMetrics = context.measureText("Hello World!");
- var width = textMetrics.width;
- // Draw a text that displays the width of the previous drawn text
- context.font = "20pt Arial";
- context.fillText("Width of previous text: " + width + "pixels", 10, 150);
- // Draw the baseline of the given width
- context.moveTo(10, 100);
- context.lineTo(width+10, 100);
- context.stroke();
THE CTX.TEXTBASELINE PROPERTY: CHANGE THE WAY THE TEXT IS HORIZONTALLY DRAWN
Try this example at JS Bin (borrowed and adapted from http://tutorials.jenkov.com/html5-canvas/text.html)

The text baseline is important as it tells how the y parameter of the fillText("some text", x, y) andstrokeText("some text", x, y) methods is interpreted.
The textBaseline property of the context is used to specify the different ways one can position the baseline of a given text. The example above shows the different possible values for this property and the corresponding results. The default value is "alphabetic" and corresponds to what has been used in the previous "Hello World" example.
Possible values:
| Possible values for the textBaseline property | |
| top | The text is aligned based on the top of the tallest glyph in the text. |
| hanging | The text is aligned based on the line the text seems to hang from. This is almost identical to top, and in many cases, you cannot see the difference. |
| middle | The text is aligned according to the middle of the text. |
| alphabetic | The bottom of vertically oriented glyphs, e.g. western alphabet like the latin. |
| ideographic | The bottom of horizontally oriented glyphs. |
| bottom | The text is aligned based on the bottom of the glyph in the text, that extends furthest down in the text. |
Typical use (taken from the example above):
- context.textBaseline = "top";
- context.fillText("top", 0, 75);
- context.textBaseline = "hanging";
- context.fillText("hanging", 40, 75);
- context.textBaseline = "middle";
- context.fillText("middle", 120, 75);
HORIZONTAL TEXT ALIGNMENT
Try this example online: http://jsbin.com/acudif/3/edit
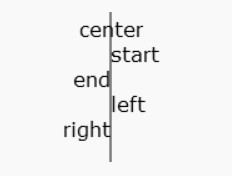
The textAlign property of the context tells how the x parameter will be used when callingstrokeText("some text", x, y) and fillText("some text", x, y). For example, withtextAlign="center", the x parameter gives the position of the vertical center of the text, while intextAlign="right", x corresponds to the rightmost position of the text.
Typical use (source code taken from the above example):
- context.textAlign = "center";
- context.fillText("center", 250, 20);
- context.textAlign = "start";
- context.fillText("start", 250, 40);
- context.textAlign = "end";
- context.fillText("end", 250, 60);
- context.textAlign = "left";
- context.fillText("left", 250, 80);
- context.textAlign = "right";
- context.fillText("right", 250, 100);
Drawing images
INTRODUCTION
Load images in the background, wait for them to be loaded before drawing!
Working with images is rather simple, except that we need the images to be fully loaded into memory before drawing them. Loading images is an asynchronous process we need to take care of. Working with multiple images might also be difficult for beginners. Later on in this course, we will present a multiple image loader.
It is also possible to draw images from a video stream, images corresponding to another canvas content, or images that are defined by <img> HTML elements in the page. We will see that as well in the following parts of this chapter.
But let's start with a basic example!
EXAMPLE 1: DRAWING AN IMAGE
Try this example online: http://jsbin.com/wifeka/1/edit

Source code:
- <!DOCTYPE HTML>
- <html>
- <head>
- <script>
- window.onload = function() {
- // Necessity to run this code only after the web page has been loaded.
- var canvas = document.getElementById("myCanvas");
- var context = canvas.getContext("2d");
- var imageObj = new Image();
- // Callback function called by the imageObj.src = .... line
- //located after this function
- imageObj.onload = function() {
- // Draw the image only when we have the guarantee
- // that it has been loaded
- context.drawImage(imageObj, 0, 0);
- };
- // Calls the imageObj.onload function asynchronously
- imageObj.src =
- "http://www.w3.org/html/logo/downloads/HTML5_Logo_512.png";
- };
- </script>
- </head>
- <body>
- <canvas id="myCanvas" width="512" height="512"></canvas>
- </body>
- </html>
Several things need to be explained here:
- We have to create a JavaScript Image object (line 10),
- When we set the src attribute of this object with the URL of the image file, then an asynchronous request is sent in the background by the browser. Loading a big image may take some time, so the rest of the JavaScript code continues running. This is why we call it "asynchronous".
- When the image file has been loaded, the browser calls the onload callback associated with the image(line 14).
- We draw the image only from inside this callback, otherwise we have no guarantee that the image has been loaded and can be usable. The actual drawing here is done line 17.
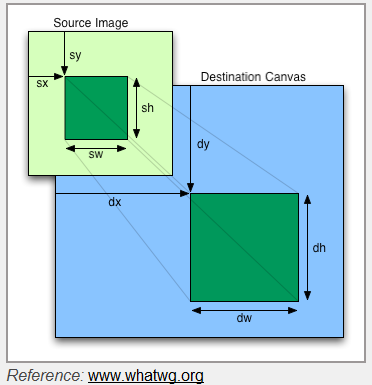
There are numerous variants of the drawImage(...) context method at line 17:
- drawImage(img, x, y): draws the image at position x, y, keeping the original image size.
- drawImage(img, x, y, sizeX, sizeY): same as before except that the image drawn is resized.
- drawImage(img, sx, sy, sw, sh, dx, dy, dw, dh): for drawing sub-images, (sx, sy, sw, sh) define the source rectangle, while dx, dy, dw, sh define the target rectangle. If these rectangles don't have the same size, the source sub-image is resized.
See picture below :
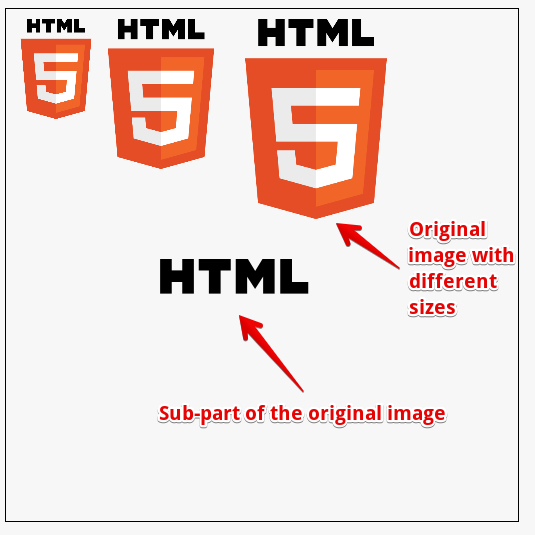
EXAMPLE 2: SHOW THE DIFFERENT VARIANTS OF DRAWIMAGE(...)
Online example: http://jsbin.com/pusafe/2/edit
Source code extract:
- var imageObj = new Image();
- imageObj.onload = function() {
- // Try commenting/uncommenting the following lines to see the
- // effect of the different drawImage variants
- // Original, big image
- // context.drawImage(imageObj, 0, 10);
- // Original image drawn with size = 100x100 pixels
- context.drawImage(imageObj, 0, 10, 100, 100);
- // with size = 150x150
- context.drawImage(imageObj, 80, 10, 150, 150);
- // with size = 200x200
- context.drawImage(imageObj, 210, 10, 200, 200);
- // draw the sub image at 0, 0, width = 512, height = 100
- // at position 100, 250, with a width of 256 and a height of 50
- context.drawImage(imageObj, 0, 0, 512, 100, 100, 250, 256, 50);
- };
- imageObj.src = "http://www.w3.org/html/logo/downloads/HTML5_Logo_512.png";
- };
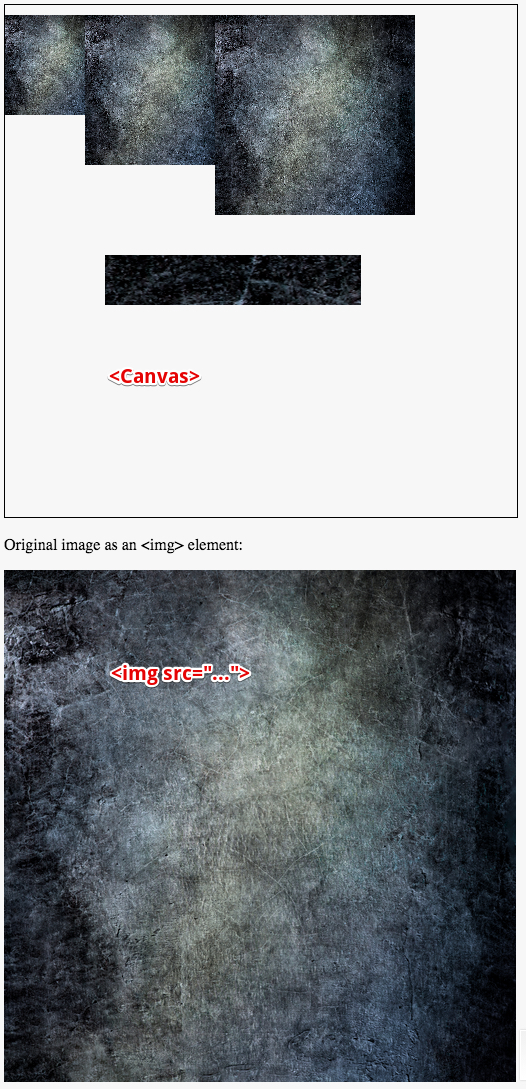
EXAMPLE 3: DRAW AN IMAGE DEFINED IN THE PAGE BY AN <IMG SRC="...">ELEMENT
Sometimes, you may want to draw an image that is already declared in the HTML document as an <img src="..."> element. Remember that when you add an <img> in the document, the browser starts downloading it in background.
WRONG => indeed, you could try drawing it using some code like this:
- <body>
- <canvas id="myCanvas" width="512" height="512"></canvas>
- <p>Original image as an <img> element:</p>
- <img id="logo"
- src="http://fc07.deviantart.net/fs70/f/2013/149/b/8/texture_85_by_voyager168-d670m68.jpg">
- <script>
- canvas = document.getElementById("myCanvas");
- var ctx = canvas.getContext("2d");
- var logo = document.querySelector("#logo");
- ctx.drawImage(logo, 0, 0, 100, 100);
- </script>
- </body>
Although you will find many examples on the Web that do it this way, they will only work most of the time with small images, or with images that are in the browser's cache. Remember that you cannot draw an image that has not been fully loaded!
If you try to draw an image that is not loaded or partially loaded, you will have unexpected results!
Best practice: only draw an image that is fully loaded, use
the onload callback!
the onload callback!
GOOD => the right way to do that is shown in this example: http://jsbin.com/faqedu/4/edit, that starts drawing only from the onload callback function:
- <!DOCTYPE HTML>
- <html>
- <head>
- <script>
- var canvas, context;
- window.onload = function() {
- canvas = document.getElementById("myCanvas");
- context = canvas.getContext("2d");
- draw();
- };
- function draw() {
- var imageObj = document.querySelector("#logo");
- console.log("image is already loaded, we draw it!");
- context.drawImage(imageObj, 0, 10, 100, 100);
- }
- </script>
- </head>
- <body>
- <canvas id="myCanvas" width="512" height="512"></canvas>
- </p>
- <img id="logo" src="http://www.w3.org/html/logo/downloads/HTML5_Logo_512.png">
- </body>
- </html>
With large image files, this will not break nor produce unexpected results: http://jsbin.com/mayoma/5/edit.
The DOM Level 2 Events specs say :
The load event occurs when the DOM implementation finishes loading all content within a document, all frames within a FRAMESET, or an OBJECT element.
Results with a very large image (5160x3270 pixels):
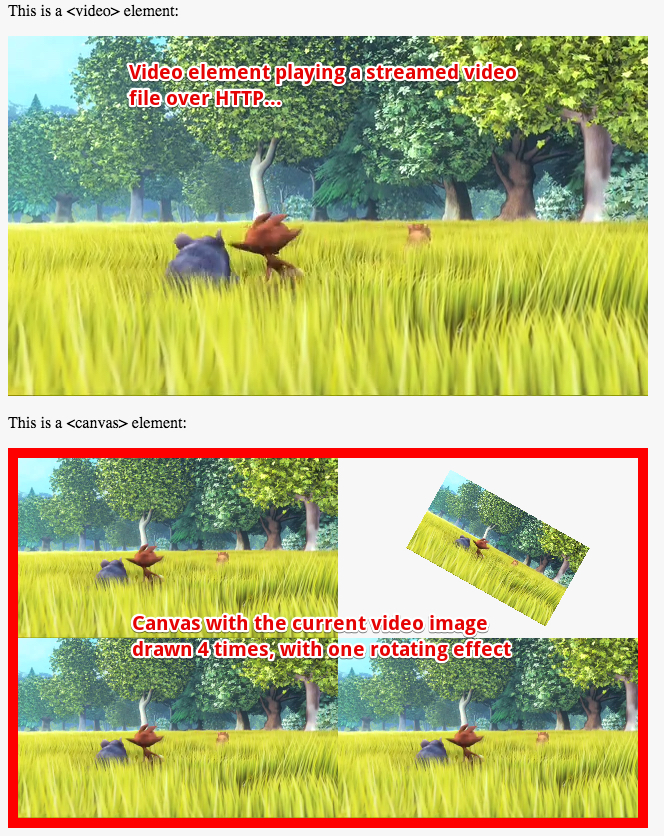
Drawing images from a video stream
The drawImage(...) function can take a video element as its first parameter. The image that will be drawn is the one currently played by the video stream. This can be done at video frequency on most modern computers or mobile devices.
Online example at http://jsbin.com/dajena/3/edit
This example shows:
- a <video> element on top, and four images drawn in a canvas below.
- The images are drawn every XXX milliseconds using the setInterval(function, delay) method.
Source code extract:
- <script>
- var video;
- var canvas, ctx;
- var angle = 0;
- function init() {
- video = document.getElementById('sourcevid');
- canvas = document.getElementById('myCanvas');
- ctx = canvas.getContext('2d');
- setInterval("processFrame()", 25); // call processFrame each 25ms
- }
- function processFrame() {
- ctx.drawImage(video, 0, 0, 320, 180);
- drawRotatingVideo(480, 90);
- ctx.drawImage(video, 0, 180, 320, 180);
- ctx.drawImage(video, 320, 180, 320, 180);
- }
- function drawRotatingVideo(x, y) {
- // Clear thze zone at the top right quarter of the canvas
- ctx.clearRect(320, 0, 320, 180);
- // We are going to change the coordinate system, save the context !
- ctx.save();
- // translate, rotate and recenter the image at its "real" center,
- //not the top left corner
- ctx.translate(x, y);
- ctx.rotate(angle += 0.01); // rotate and increment the current angle
- ctx.translate(-80, -45);
- ctx.drawImage(video, 0, 0, 160, 90);
- // restore the context
- ctx.restore();
- }
- </script>
- </head>
- <body onload="init()" >
- <p>This is a <video> element: </p>
- <video id="sourcevid" autoplay="true" loop="true">
- <sourcesrc="http://www.craftymind.com/factory/html5video/BigBuckBunny_640x360.mp4"
- type="video/mp4" />
- <sourcesrc="http://www.craftymind.com/factory/html5video/BigBuckBunny_640x360.ogv"
- type="video/ogg"/>
- </video>
- <p>This is a <canvas> element: </p>
- <canvas id="myCanvas" width="620" height="360"></canvas>
- </body>
- Line 11: the call to setInterval will make the browser execute the processFrame function each 25ms.
- Lines 15, 17 and 18: in processFrame, drawImage(...) is called 3 times with the video element passed as first parameter.
- Line 43: the video element declared at line 43 has autoplay=true and loop=true, it starts playing the video as soon as possible and will loop it.
- Line 21: We implemented a rotating video effect in the drawRotatingVideo. The use of context save/restore is primordial as this function changes the coordinate system at each call, translating and rotating it. Notice the extra translation at line 31 that translates backwards the coordinate system with half of the size of the image that is drawn. We did that in order to make the image rotate around the center of the rectangle, instead of around the top left corner at (0, 0) by default. Try commenting out this line in the running example and you will see what we mean.
Hi, Great.. Tutorial is just awesome..It is really helpful for a newbie like me.. I am a regular follower of your blog. Really very informative post you shared here. Kindly keep blogging. If anyone wants to become a Front end developer learn from Javascript Online Training from India . or learn thru ES6 Training in Chennai. Nowadays JavaScript has tons of job opportunities on various vertical industry. HTML5 CSS3 Javascript Online Training from India
ReplyDelete"Very nice blog”
ReplyDeleteWeb Designing Course in Delhi
The blog is unique that’s providing the nice material. Please post more interesting articles here.urgent care clinic near me
ReplyDeleteThis comment has been removed by the author.
ReplyDeleteHi, Great.. Tutorial is just awesome..It is really helpful for a newbie like me..
ReplyDeleteI am a regular follower of your blog. Really very informative post you shared here. Kindly keep blogging
aws training in chennai | aws training in annanagar | aws training in omr | aws training in porur | aws training in tambaram | aws training in velachery
Your site is amazing and your blogs are informative and knowledgeable to my websites.This is one of the best tips in my life. I have in quite some time.Nicely written and great info.Thanks to share the more information's.
ReplyDeleteSalesforce Training in Chennai | Certification | Online Course | Salesforce Training in Bangalore | Certification | Online Course | Salesforce Training in Hyderabad | Certification | Online Course | Salesforce Training in Pune | Certification | Online Course | Salesforce Certification Online Training Courses
I always like and such a super contents of these post. Education is the extreme motivation that open the new doors of data and material. So we need to update ourself day by day. this articles drives me to travel in an informative path. Thanks for this amazing work.
ReplyDeleteAws Training in Chennai
Aws Training in Velachery
Aws Training in Tambaram
Aws Training in Porur
Aws Training in Omr
Aws Training in Annanagar
This post is so interactive and informative.keep update more information...
ReplyDeleteSEO Training in Tambarama
SEO Training in Chennai
smm panel
ReplyDeleteSmm Panel
İş İlanları
instagram takipçi satın al
hirdavatciburada.com
beyazesyateknikservisi.com.tr
servis
tiktok hile
Thanks for sharing this information. I'm planning to switch careers, and Full Stack Web Development Course in Rohini seems like a great path. How are the job placement opportunities after completing this course in Rohini?
ReplyDeletedssd
ReplyDeleteThanks for sharing this information
ReplyDeleteSAP ABAP Training in Hyderabad
digital marketing course in rohini offers aspiring professionals the opportunity to dive deep into various aspects of online marketing, such as SEO (Search Engine Optimization), SEM (Search Engine Marketing), content marketing, social media marketing, email marketing, and more. The best part about enrolling in such a course is the practical exposure you gain through live projects and industry-driven case studies, which can significantly enhance your skills and boost employability.
ReplyDelete