The File API
INTRODUCTION
The objective of this chapter is to provide an overview of the File API.
 Before HTML5, file management was limited to multipart forms and to Ajax for sending/requesting files to/from a remote Web server.
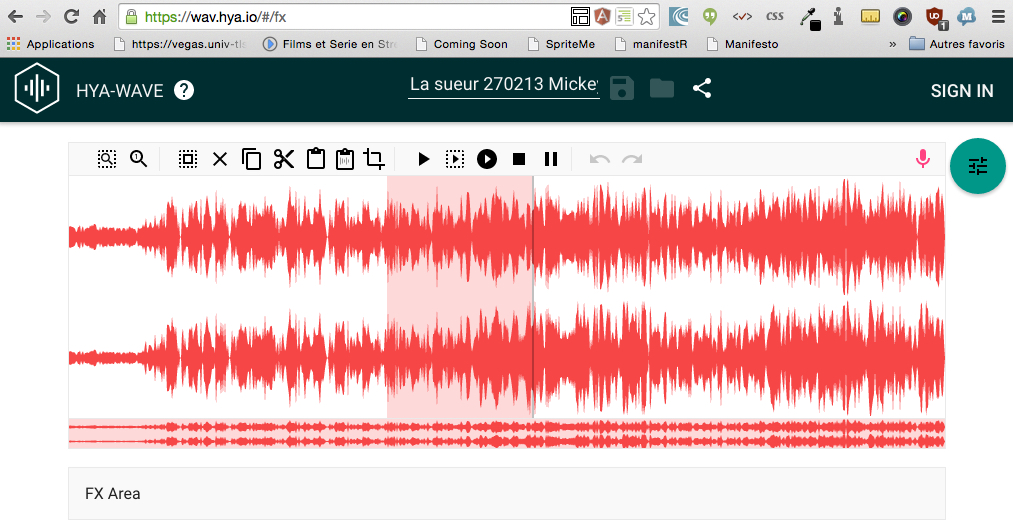
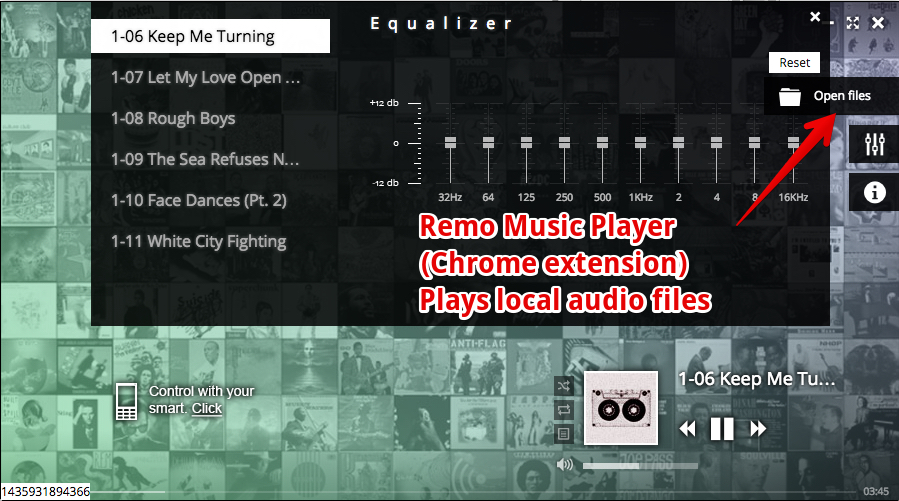
Possible actions were limited, both for the developer and for the user. However, HTML5 now comes with an API called "File" that holds features for accessing file metadata (name, size, type) from client-side JavaScript. The API has also methods for reading file contents directly in the browser. This is particularly interesting for displaying preview of images before uploading them, or - and this is much more interesting - for developing Web applications that work with local files without the need for a server. Imagine a multimedia player that accesses (in read-only) your file system, read your audio and video files, etc., such as the Remo Audio player below (Google Chrome extension written in HTML5), or an application that edits the audio content of local mp3 files, for example, such as the HYA-WAVE sound editor (screenshot above).
Getting details about a file: reading metadata
Imagine you have an input field like this:
- Select one or more files: <input type="file" id="input"/>
T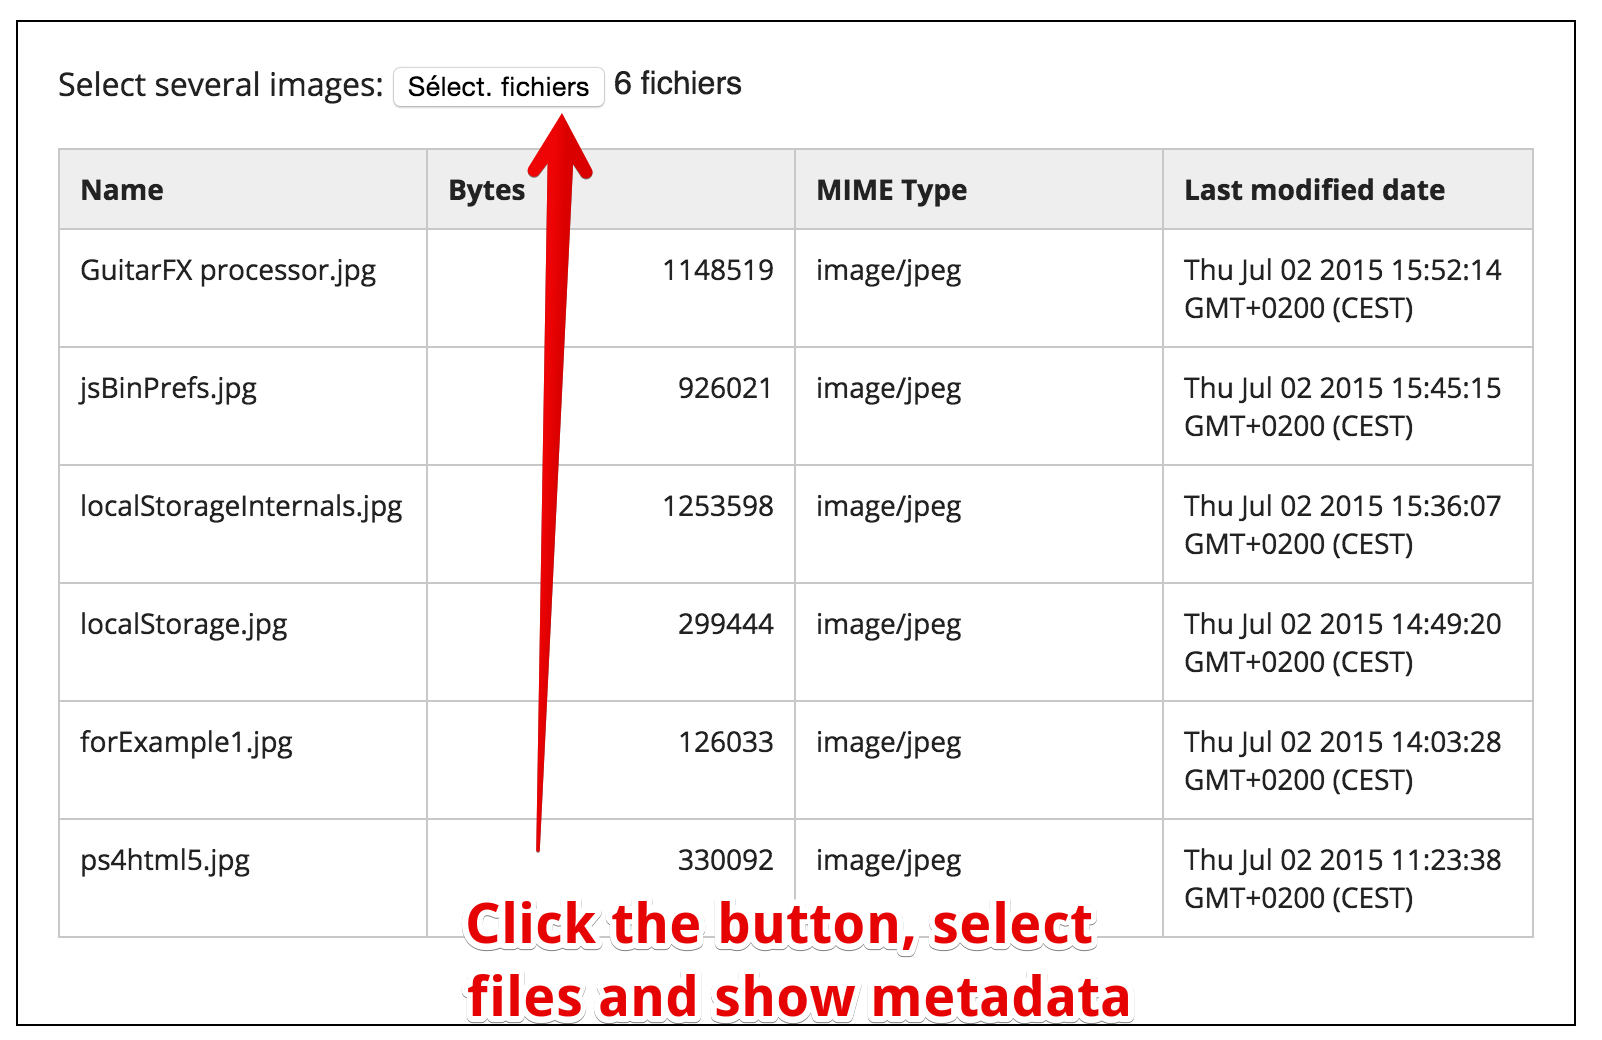 his will render as a "select files" or "browse files" button. If you select one file in the file chooser dialog that has popped up, before HTML5 you couldn't do anything with it in the client-side: no access from JavaScript. With the File API, you can read what we call "file metadata": name, size, type and last modification date.
Look at the the code below: the file API defines a files property on the DOM node corresponding to the <input type="file".../> input field. This property is an array.
In the example below, we get in the selectedFile variable the metadata related to the first selected file:
his will render as a "select files" or "browse files" button. If you select one file in the file chooser dialog that has popped up, before HTML5 you couldn't do anything with it in the client-side: no access from JavaScript. With the File API, you can read what we call "file metadata": name, size, type and last modification date.
Look at the the code below: the file API defines a files property on the DOM node corresponding to the <input type="file".../> input field. This property is an array.
In the example below, we get in the selectedFile variable the metadata related to the first selected file:
- var selectedFile = document.getElementById('input').files[0];
- // do something with selectedFile.name, selectedFile.size, selectedFile.type
- // selectedFile.lastModifiedDate
- ...
- Select one or more files: <input type="file" id="input"/>
his will render as a "select files" or "browse files" button. If you select one file in the file chooser dialog that has popped up, before HTML5 you couldn't do anything with it in the client-side: no access from JavaScript. With the File API, you can read what we call "file metadata": name, size, type and last modification date.- var selectedFile = document.getElementById('input').files[0];
- // do something with selectedFile.name, selectedFile.size, selectedFile.type
- // selectedFile.lastModifiedDate
- ...
EXAMPLE 1: READ METADATA OF THE FIRST SELECTED FILE
Here is a complete example on JS Bin that uses the code above to get details about the first selected file. Please try it below on your browser (click on the button and choose one file):
Select one or more files:
- File name:
- File size:
- File type:
- File last modification date:
Complete source code:
- <!DOCTYPE html>
- <html lang="en">
- <head>
- <meta charset=utf-8 />
- <title>Reading file metadata</title>
- <script>
- function displayFirstSelectedFileMetadata() {
- var selectedFile = document.getElementById('input').files[0];
- document.querySelector("#singleName").innerHTML = selectedFile.name;
- document.querySelector("#singleSize").innerHTML = selectedFile.size +" bytes";
- document.querySelector("#singleType").innerHTML = selectedFile.type;
- document.querySelector("#singleDate").innerHTML= selectedFile.lastModifiedDate;
- }
- </script>
- </head>
- <body>
- Select one or more files: <input type="file" id="input"
- onchange="displayFirstSelectedFileMetadata();"/>
- <p>
- <ul>
- <li>File name: <span id="singleName"></span></li>
- <li>File size: <span id="singleSize"></span></li>
- <li>File type: <span id="singleType"></span></li>
- <li>File last modification date: <span id="singleDate"></span></li>
- </ul>
- </body>
- </html>
- File name:
- File size:
- File type:
- File last modification date:
- <!DOCTYPE html>
- <html lang="en">
- <head>
- <meta charset=utf-8 />
- <title>Reading file metadata</title>
- <script>
- function displayFirstSelectedFileMetadata() {
- var selectedFile = document.getElementById('input').files[0];
- document.querySelector("#singleName").innerHTML = selectedFile.name;
- document.querySelector("#singleSize").innerHTML = selectedFile.size +" bytes";
- document.querySelector("#singleType").innerHTML = selectedFile.type;
- document.querySelector("#singleDate").innerHTML= selectedFile.lastModifiedDate;
- }
- </script>
- </head>
- <body>
- Select one or more files: <input type="file" id="input"
- onchange="displayFirstSelectedFileMetadata();"/>
- <p>
- <ul>
- <li>File name: <span id="singleName"></span></li>
- <li>File size: <span id="singleSize"></span></li>
- <li>File type: <span id="singleType"></span></li>
- <li>File last modification date: <span id="singleDate"></span></li>
- </ul>
- </body>
- </html>
EXAMPLE 2: DISPLAY METADATA OF MULTIPLE FILES, USE A FILTER ON THE FILE TYPE
This example is a bit more complicated, as it will display details about all files selected (not only the first) and allows only images to be selected, using the accept attribute of the input field: <input type="file" accept="image/*".../>.
Example on JS Bin, or try it in your browser: click on the button, and select multiple image files. Notice that in the file selector, files that are not images will be greyed and non selectable.
Select several images:
...
Source code extract:
- Select several images: <input type="file" accept="image/*" multipleonchange="filesProcess(this.files)" name="selection"/>
- <p>
- <div id="result">...</div>
- <script>
- function filesProcess(files) {
- var selection = "<table><tr><th>Name</th><th>Bytes</th><th>MIME Type</th>
- <th>Last modified date</th></tr>";
- for(i=0; i<files.length ;i++){
- file = files[i];
- selection += "<tr><td>"+file.name+"</td><td style=\"text-align:right\">"
- +file.size+"</td><td>"
- +file.type+"</td><td> "+file.lastModifiedDate+"</td></tr>";
- }
- selection += "</table>";
-
- document.getElementById("result").innerHTML = selection;
- }
- </script>
Explanations:
- Line1: we used the multiple attribute to allow the selection of multiple files in the file chooser (using shift or control keys). The accept="image/*" attribute is a filter that makes selection possible only for images. Finally, the onchange listener will call the fileProcess(...) function, passing as parameter the list of selected files for the current element (this.files).
- Lines 7 and 12: we prepare the HTML code for building a <table> with the results.
- Line 10: this for loop builds all the rows that compose the table, adding HTML code to the selectionstring variable. At the end of the loop, this variable contains all the HTML code that corresponds to the table of results.
- Line 18: the table is added to the page. We use the innerHTML attribute of the DOM element corresponding to the <div id="result"> in order to insert the table as its child in the DOM tree. As such, the table appears on the page dynamically.
...
- Select several images: <input type="file" accept="image/*" multipleonchange="filesProcess(this.files)" name="selection"/>
- <p>
- <div id="result">...</div>
- <script>
- function filesProcess(files) {
- var selection = "<table><tr><th>Name</th><th>Bytes</th><th>MIME Type</th>
- <th>Last modified date</th></tr>";
- for(i=0; i<files.length ;i++){
- file = files[i];
- selection += "<tr><td>"+file.name+"</td><td style=\"text-align:right\">"
- +file.size+"</td><td>"
- +file.type+"</td><td> "+file.lastModifiedDate+"</td></tr>";
- }
- selection += "</table>";
- document.getElementById("result").innerHTML = selection;
- }
- </script>
- Line1: we used the multiple attribute to allow the selection of multiple files in the file chooser (using shift or control keys). The accept="image/*" attribute is a filter that makes selection possible only for images. Finally, the onchange listener will call the fileProcess(...) function, passing as parameter the list of selected files for the current element (this.files).
- Lines 7 and 12: we prepare the HTML code for building a <table> with the results.
- Line 10: this for loop builds all the rows that compose the table, adding HTML code to the selectionstring variable. At the end of the loop, this variable contains all the HTML code that corresponds to the table of results.
- Line 18: the table is added to the page. We use the innerHTML attribute of the DOM element corresponding to the <div id="result"> in order to insert the table as its child in the DOM tree. As such, the table appears on the page dynamically.
Blob and File, what is that?
THE HTML5 FILE API SPECIFICATION INTRODUCES SEVERAL NEW INTERFACES
-

- The FileList interface (we already met it: the files property is aFileList),
- the File interface (the file variable in the for loop of the last example is of that type) that is useful for getting details about a file,
- the Blob interface helps read binary data (only) that is accessed slice by slice (as chunks of data, each one is a "Blob"),
- and a FileReader interface for reading file content (we will see how to use it in the next section of the course),
We will not use all of these new interfaces, but let's explain the difference between Blob and File, as most of the methods exposed by theFileReader interface take indifferently a Blob or a File as parameter.
THE BLOB OBJECT
-
An object of type Blob is a structure that represents binary data available as read-only. Most of the time, you will encounter these objects only when you handle files.
Blob objects have two properties named size and type which respectively retrieve the size in bytes of the data handled by the Blob and their MIME type.
There is also a method called slice(), but this is not used in common applications. If you are curious, check the "slicing a file" section of this "Reading files in JavaScript using the File APIs" article.
THE FILE OBJECT
-
 File objects are useful for manipulating... files! They inherit the properties and methods of Blob objects, and have two additional properties that are name, for the file name, and lastModifiedDate to get the date of the last modification of the file (in the form of a JavaScript Date object, obviously) .
Most of the time, we will work with File objects. Blobobjects will have real interest when the Filesystem API is widely available (at the moment there is only an experimental version in Chrome), or when you download binary files using Ajax (see example below). This last API will be covered in the HTML5 part-2 course.
[Advanced] Just for those of you that would like to see how Blob objects can be used, here is an example "as is" that shows how to download an image using Xhr2 (Xml Http Request version 2), the examples uses a<progress> element to show the download progress, and uses xhr.responseType = 'blob'; to indicate that the file we are going to download is a binary file (a blob). Try the example, then comment the line withresponseType='blob'. In that case, you will notice that the image file is not properly decoded by the browser and is not displayed in the page. Xhr2 will be covered in the HTML5 part-2 course.
File objects are useful for manipulating... files! They inherit the properties and methods of Blob objects, and have two additional properties that are name, for the file name, and lastModifiedDate to get the date of the last modification of the file (in the form of a JavaScript Date object, obviously) .
Most of the time, we will work with File objects. Blobobjects will have real interest when the Filesystem API is widely available (at the moment there is only an experimental version in Chrome), or when you download binary files using Ajax (see example below). This last API will be covered in the HTML5 part-2 course.
[Advanced] Just for those of you that would like to see how Blob objects can be used, here is an example "as is" that shows how to download an image using Xhr2 (Xml Http Request version 2), the examples uses a<progress> element to show the download progress, and uses xhr.responseType = 'blob'; to indicate that the file we are going to download is a binary file (a blob). Try the example, then comment the line withresponseType='blob'. In that case, you will notice that the image file is not properly decoded by the browser and is not displayed in the page. Xhr2 will be covered in the HTML5 part-2 course.
Reading file content
INTRODUCTION / TYPICAL USE

Step1: create a FileReader object
The file API proposes several methods for reading a file content, each taken from theFileReader interface. Here is how you create a FileReader object:
- var reader = new FileReader();
- var reader = new FileReader();
Steps 2 & 3: first call a method of the FileReader object for reading the file content, then get the file content in an onload callback
There are three different methods available for reading a file content: readAsText, readAsArrayBuffer for binary data and also as readAsDataURL (the content will be a URL you will use to set the src field of an <img src=...>, <audio>, <video>, and also with all existing methods/properties that accept a URL).
All these methods take as a unique parameter a File object (for example, a file chosen by a user after clicking on a <input type=file> input field). Below, we use, as an example, the readAsText method:
- function readFileContent(f) {
- // Executed last: called only when the file content is loaded, e.target.result is
- // The content
- reader.onload = function(e) {
- var content = e.target.result;
- // do something with the file content
- console.log("File " + f.name + " content is: " + content);
- };
- // Executed first: start reading asynchronously the file, will call the
- // reader.onload callback only when the file is read entirely
- reader.readAsText(f);
- }
The above code shows how a file can be read as text. The function is called, for example by clicking on the button corresponding to a <input type="file" id="file" onchange="readFileContent(this.files)"/>, and by choosing a file.
- Line 12 is executed first, and asks the Reader object to read the file f as text. As this takes some time, it's an asynchronous operation that will be executed by the browser in background. When the file is read, then the reader.onload callback function is called.
- Line 4 is executed after line 12, and is called only when the file content is available. This callback takes an event e as a unique parameter, and e.target.result is the file content.
Try a variation of the the above code in your browser, that displays the file content in a text area. This example is detailed further in the course. Click and select a text file below:
In the next course sections, we will look at different examples that read file contents as text, dataURL and binary.
- function readFileContent(f) {
- // Executed last: called only when the file content is loaded, e.target.result is
- // The content
- reader.onload = function(e) {
- var content = e.target.result;
- // do something with the file content
- console.log("File " + f.name + " content is: " + content);
- };
- // Executed first: start reading asynchronously the file, will call the
- // reader.onload callback only when the file is read entirely
- reader.readAsText(f);
- }
- Line 12 is executed first, and asks the Reader object to read the file f as text. As this takes some time, it's an asynchronous operation that will be executed by the browser in background. When the file is read, then the reader.onload callback function is called.
- Line 4 is executed after line 12, and is called only when the file content is available. This callback takes an event e as a unique parameter, and e.target.result is the file content.
Practical examples: reading file content as text
EXAMPLE 1: READ A SINGLE FILE CONTENT
Example at JS Bin, or try it here in your browser
Choose a text file :
Complete source code:
- <!DOCTYPE html>
- <html lang="en">
- <head>
- <meta charset="utf-8">
- <title>Example of use of FileReader with a text file</title>
- </head>
- <body>
- <label for="files">Choose a text file:</label><input type="file" id="file"
- onchange="readFileContent(this.files)"/><br/>
- <p>
- <textarea rows=15 cols=50 id="fileContent"></textarea>
- <script>
- function readFileContent(files) {
- console.log("In readFileContent");
- var reader = new FileReader();
- // Executed last: called when the file content is loaded, e.target.resultis
- // The content
- reader.onload = function(e) {
- // display content in the textarea with id="fileContent"
- document.getElementById("fileContent").value= e.target.result;
- };
- // Read in the tfile as text
- console.log("Reading file:" + files[0].name);
- // Executed first: start reading asynchronously the file, will call the onload
- // callback when the file is read
- reader.readAsText(files[0]);
- }
- </script>
- </body>
- </html>
This example is the one at the end of the previous page. This time, we show the complete source code above. Remember that the instruction at line 30 is executed first, then when the file is read, the browser will call asynchronously the onload callback at line 20.
EXAMPLE 2: A VARIATION OF THE PREVIOUS ONE, USING MULTIPLE FILES
Example on JS Bin, or try it below in your browser. This time, please select multiple text files (using shift for multiple selection):
Source code:
- <!DOCTYPE html>
- <html lang="en">
- <head>
- <meta charset="utf-8">
- <title>Example of use of FileReader with a text file</title>
- </head>
- <body>
- <label for="files">Choose multiple text files:</label>
- <input type="file" id="files"
- multiple onchange="readFilesAndDisplayAsText(this.files);"/><br/>
- <p>
- <textarea rows=30 cols=50 id="filesContent"></textarea>
- <script>
- var filesContent = document.getElementById("filesContent");
- function readFilesAndDisplayAsText(files) {
- console.log("dans read files");
- // Loop through the FileList
- for (var i = 0, f; f = files[i]; i++) {
- var reader = new FileReader();
- // Add an onload listener to the reader
- addOnLoadListener(reader, f.name);
- // start reading, will call the listener later, when the file f is read
- reader.readAsText(f);
- }
- }
- function addOnLoadListener(reader, name) {
- // Add an onload listener that will be able to print the name of the
- // file...
- reader.onload = function(e) {
- filesContent.value += "###### READING FILE " + name + " ######";
- filesContent.value += e.target.result;
- };
- }
- </script>
- </body>
- </html>
Explanations:
This example is similar to the previous one except that this time we read multiple files.
- Line 20: this is the for loop that will iterate on the files object passed as parameter by the onchangelistener declaration at line 10
- Line 25: instead of declaring the onload listener with a reader.onload =... directly in the loop, we preferred this time to write a separate function that will do that. This technique is useful when you want the listener to work with extra variables computed in the loop (in our case the name of the file).
SOME COMPLEMENTS ABOUT ENCODING
Note that you can optionally indicate the encoding of the file you are going to read (default is UTF-8):
- reader.readAsText(file, 'UTF-8');
- reader.readAsText(file, 'ISO-8859-1');
- ..
Note that you can optionally indicate the encoding of the file you are going to read (default is UTF-8):
- reader.readAsText(file, 'UTF-8');
- reader.readAsText(file, 'ISO-8859-1');
- ..
Read file content as binary
INTRODUCTION
This method is rarely used except for loading "raw" binary data. For images you would like to see in your HTML page using the <img src= tag> or for drawing in a canvas, or for audio and video files that you would like to play using the <audio> or <video> elements, you would preferably use the readAsDataURL method presented in the next page of the course.
readAsArrayBuffer is often used for reading audio samples that should be loaded in memory and played using the WebAudio API, for loading textures that you will use width WebGL for 3D animations, etc.
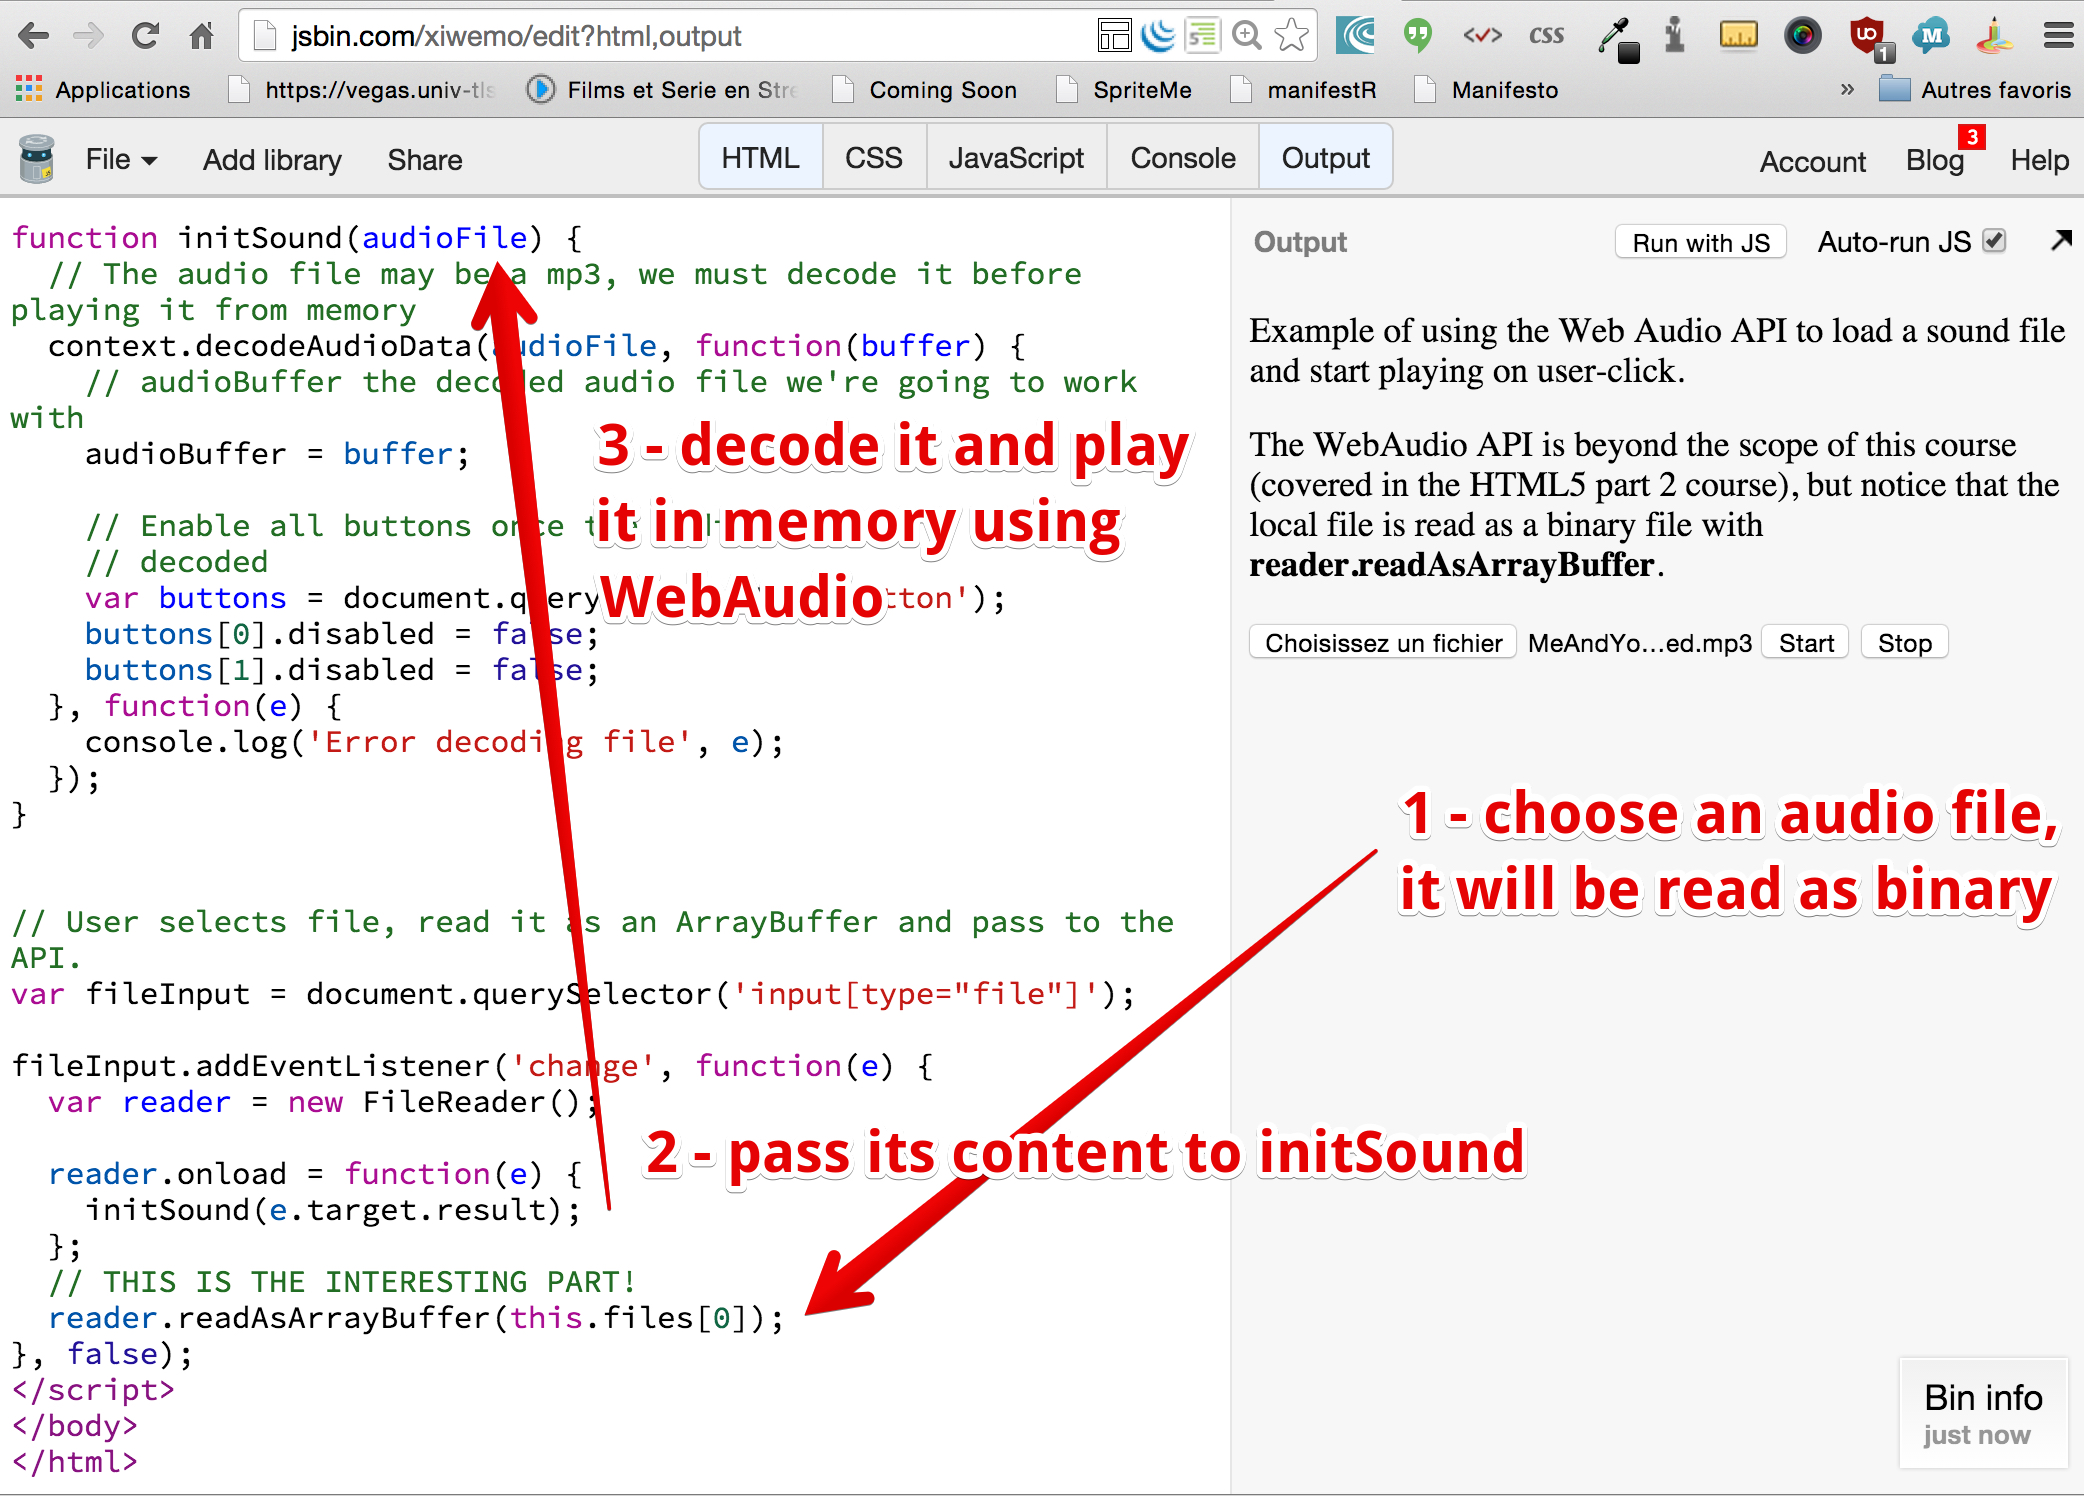
EXAMPLE 1: READ A LOCAL AUDIO FILE AND PLAY IT WITH THE WEBAUDIO API
The WebAudio API is useful for reading audio sound sample from memory (no streaming), and has been designed for music application and games. This example shows how a local audio file can be read and played directly in the browser, without the need for a server!
Example on JS Bin (does not work on IE, as it does not support the WebAudio API). We could not embed it here on the edX platform as it prevents code that uses Ajax to run in its pages.
 Source code extract:
- // User selects file, read it as an ArrayBuffer and pass to the API.
- var fileInput = document.querySelector('input[type="file"]');
- fileInput.addEventListener('change', function(e) {
- var reader = new FileReader();
- reader.onload = function(e) {
- initSound(e.target.result);
- };
- // THIS IS THE INTERESTING PART!
- reader.readAsArrayBuffer(this.files[0]);
- }, false);
Explanations:
- Line 1: we get a pointer to the file selector, the variable fileInput.
- Line 4: we define a change listener. In this example, we use an anonymous function directly included in the listener definition (the listener is the function(e) {...}).
- Line 11: when a user chooses a file, the listener will be executed. Line 11 will start the reading of the file content, as a binary file (this is what readAsArrayBuffer means: read as binary!). Once the file will be entirely read, the onload callback will be asynchronously called by the browser.
- Line 7 is the onload callback, executed when the file content is loaded in memory. We pass the file content to the initSound function (see JS Bin example for complete source code) that uses WebAudio to decode it (it may be a compressed file, a mp3 for example, and WebAudio works only with uncompressed audio formats in memory), and to play it.
- // User selects file, read it as an ArrayBuffer and pass to the API.
- var fileInput = document.querySelector('input[type="file"]');
- fileInput.addEventListener('change', function(e) {
- var reader = new FileReader();
- reader.onload = function(e) {
- initSound(e.target.result);
- };
- // THIS IS THE INTERESTING PART!
- reader.readAsArrayBuffer(this.files[0]);
- }, false);
- Line 1: we get a pointer to the file selector, the variable fileInput.
- Line 4: we define a change listener. In this example, we use an anonymous function directly included in the listener definition (the listener is the function(e) {...}).
- Line 11: when a user chooses a file, the listener will be executed. Line 11 will start the reading of the file content, as a binary file (this is what readAsArrayBuffer means: read as binary!). Once the file will be entirely read, the onload callback will be asynchronously called by the browser.
- Line 7 is the onload callback, executed when the file content is loaded in memory. We pass the file content to the initSound function (see JS Bin example for complete source code) that uses WebAudio to decode it (it may be a compressed file, a mp3 for example, and WebAudio works only with uncompressed audio formats in memory), and to play it.
Read file content as data URL
INTRODUCTION TO A DATA URL
-
 What is a data URL?
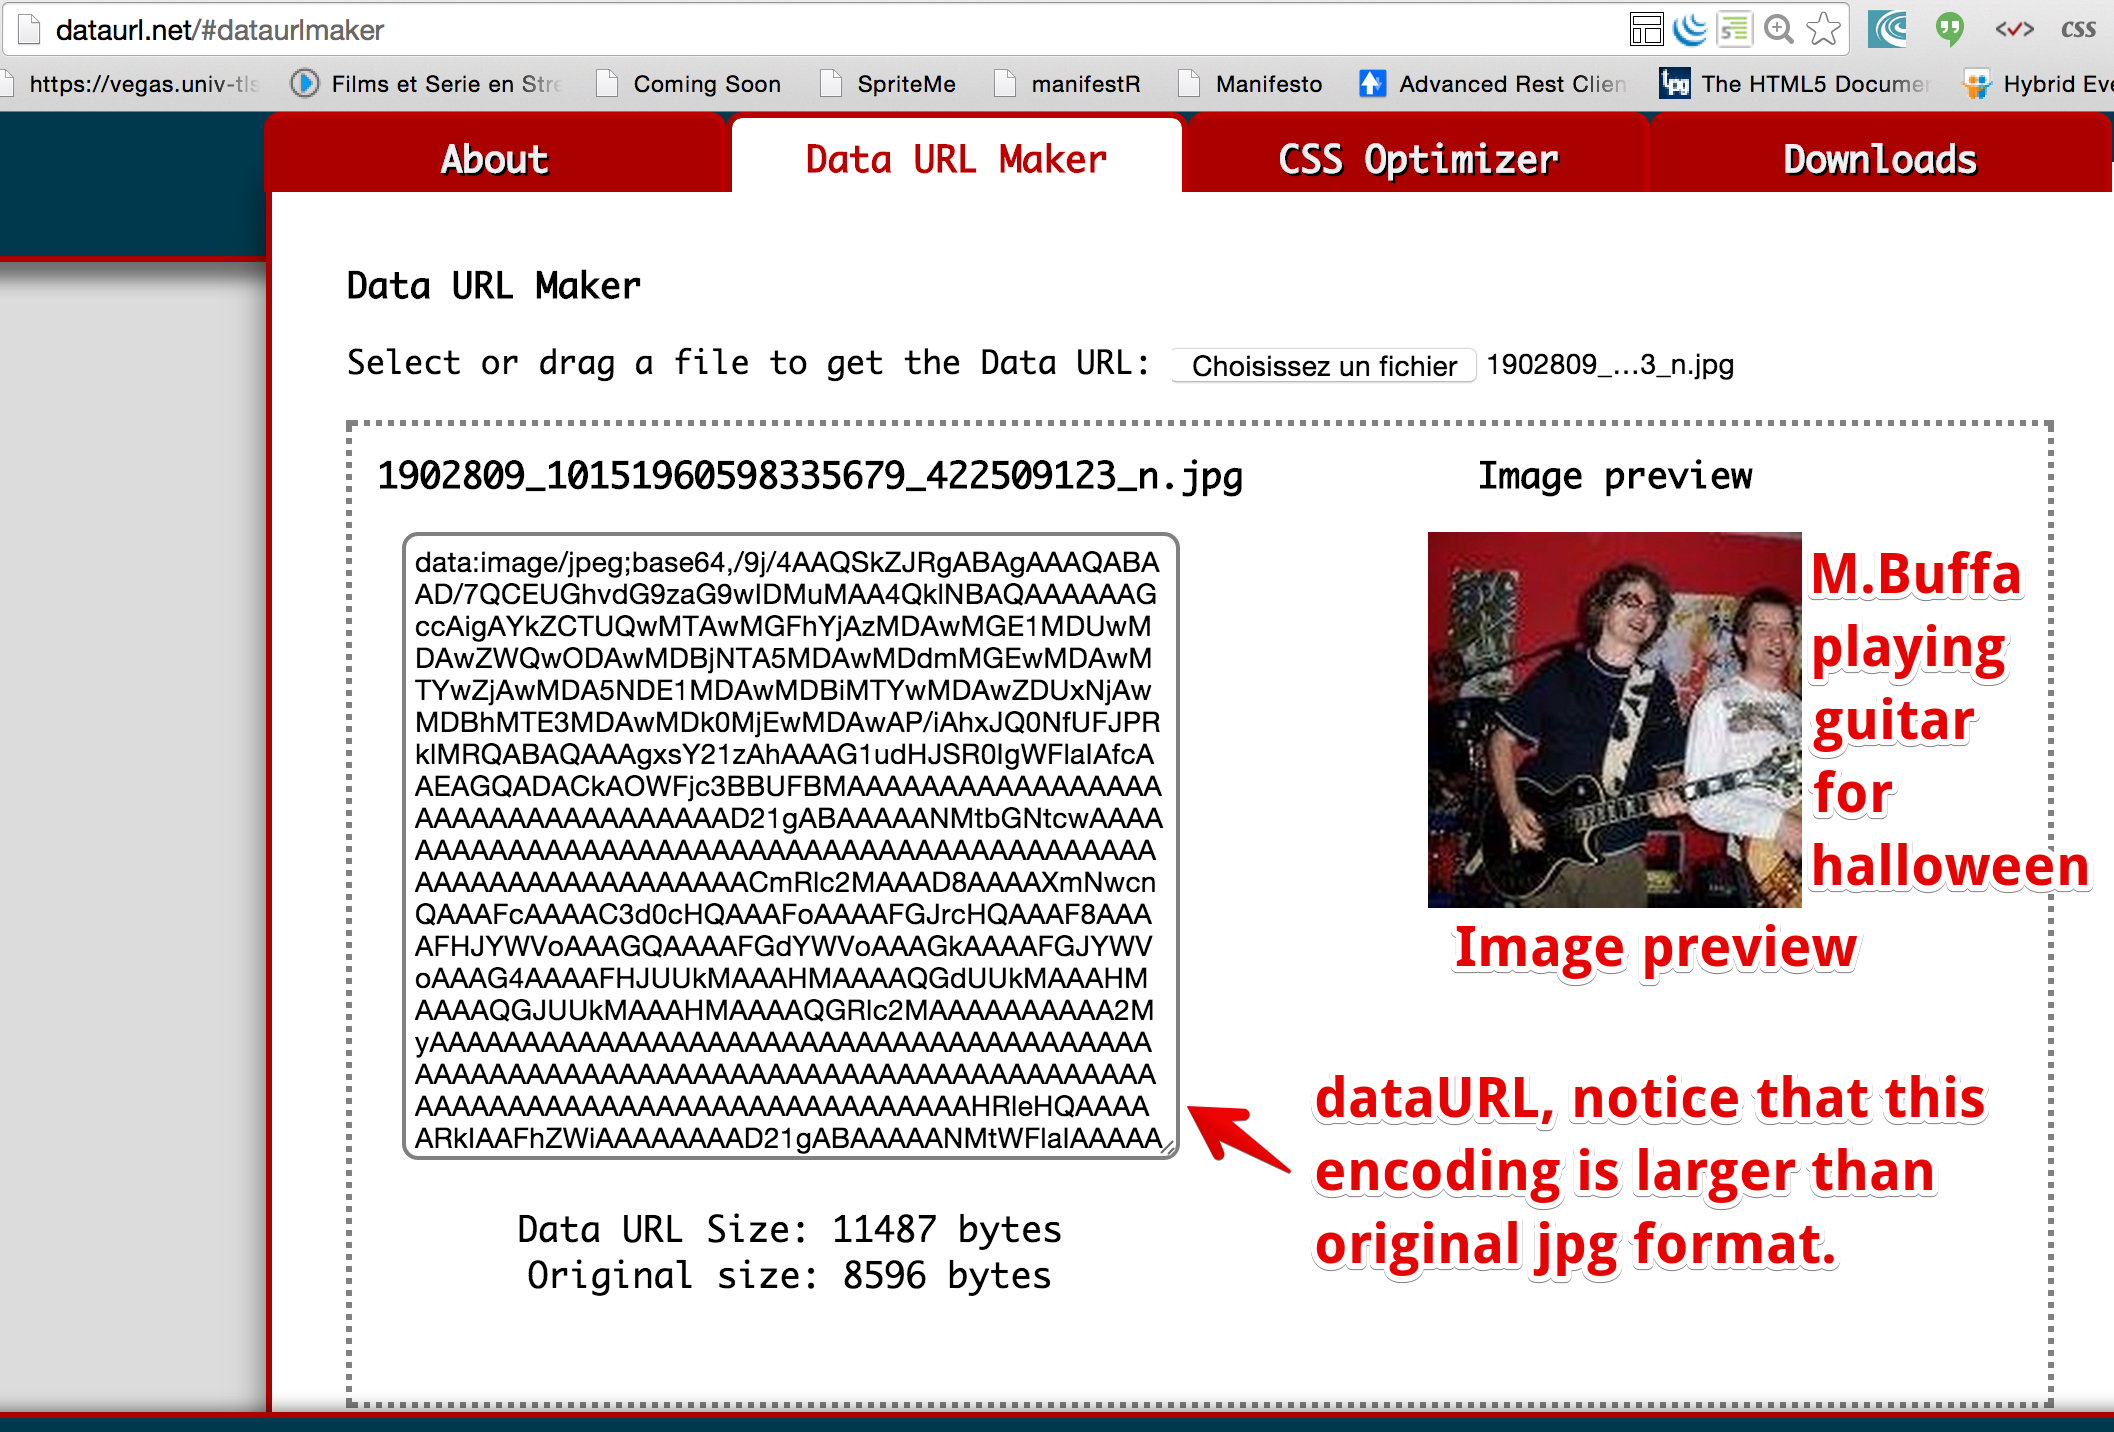
A data URL is a URL that includes type and content at the same time. It is useful, for example, for inlining images or videos in the HTML of a Web page (on mobile devices, this may speed up the loading of the page by reducing the number of HTTP requests).
Here is an example of a red square, as a data URL. Copy and paste it in the address bar of your browser, and you should see the red square:
What is a data URL?
A data URL is a URL that includes type and content at the same time. It is useful, for example, for inlining images or videos in the HTML of a Web page (on mobile devices, this may speed up the loading of the page by reducing the number of HTTP requests).
Here is an example of a red square, as a data URL. Copy and paste it in the address bar of your browser, and you should see the red square:
- data:image/png;base64,iVBORw0KGgoAAAANSUhEUgAAAAUAAAAFCAYAAACNbyblAAAAHElEQVQI12P4//8/w38GIAXDIBKE0DHxgljNBAAO9TXL0Y4OHwAAAABJRU5ErkJggg==
This data URL in a browser address bar should look like that:
 If we set the src attribute of an image element <img src="data:image/png...."> with the data URL of the above screenshot, it will work. Exactly as if you used a URL that started with http://
In your browser, you will see a small red circle rendered by this source code:
If we set the src attribute of an image element <img src="data:image/png...."> with the data URL of the above screenshot, it will work. Exactly as if you used a URL that started with http://
In your browser, you will see a small red circle rendered by this source code:
- <img src="data:image/png;base64,iVBORw0KGgoAAAANSUhEUgAAAAUA
- AAAFCAYAAACNbyblAAAAHElEQVQI12P4//8/w38GIAXDIBKE0DHxgljNBAAO
- 9TXL0Y4OHwAAAABJRU5ErkJggg==" alt="Red square" width=50 height=50/>
And here is the result:
 This dataURL format enables storing a file content in a base64 format (as a string), and adds the MIME type specification of the content. The dataURL can therefore store a file as a URL readable with modern browsers. Its use is becoming more common on the Web, especially for mobile applications, as inlining images reduces the number of HTTP requests and makes Web page load faster.
You will find lots of Web sites and tools for generating dataURL from files, such as the DataURL maker Web site (screenshot below):
This dataURL format enables storing a file content in a base64 format (as a string), and adds the MIME type specification of the content. The dataURL can therefore store a file as a URL readable with modern browsers. Its use is becoming more common on the Web, especially for mobile applications, as inlining images reduces the number of HTTP requests and makes Web page load faster.
You will find lots of Web sites and tools for generating dataURL from files, such as the DataURL maker Web site (screenshot below):
 With the above example, you can copy and paste the characters on the left and use them with an <img src="...">. Just set the src attribute with it!
Notice that you can encode as dataURL any type of file, but the most frequent usage comes with media files (images, audio, video).
With the above example, you can copy and paste the characters on the left and use them with an <img src="...">. Just set the src attribute with it!
Notice that you can encode as dataURL any type of file, but the most frequent usage comes with media files (images, audio, video).
What is a data URL?
A data URL is a URL that includes type and content at the same time. It is useful, for example, for inlining images or videos in the HTML of a Web page (on mobile devices, this may speed up the loading of the page by reducing the number of HTTP requests).
Here is an example of a red square, as a data URL. Copy and paste it in the address bar of your browser, and you should see the red square:
- data:image/png;base64,iVBORw0KGgoAAAANSUhEUgAAAAUAAAAFCAYAAACNbyblAAAAHElEQVQI12P4//8/w38GIAXDIBKE0DHxgljNBAAO9TXL0Y4OHwAAAABJRU5ErkJggg==
This data URL in a browser address bar should look like that:
If we set the src attribute of an image element <img src="data:image/png...."> with the data URL of the above screenshot, it will work. Exactly as if you used a URL that started with http://
In your browser, you will see a small red circle rendered by this source code:
- <img src="data:image/png;base64,iVBORw0KGgoAAAANSUhEUgAAAAUA
- AAAFCAYAAACNbyblAAAAHElEQVQI12P4//8/w38GIAXDIBKE0DHxgljNBAAO
- 9TXL0Y4OHwAAAABJRU5ErkJggg==" alt="Red square" width=50 height=50/>
And here is the result:
This dataURL format enables storing a file content in a base64 format (as a string), and adds the MIME type specification of the content. The dataURL can therefore store a file as a URL readable with modern browsers. Its use is becoming more common on the Web, especially for mobile applications, as inlining images reduces the number of HTTP requests and makes Web page load faster.
You will find lots of Web sites and tools for generating dataURL from files, such as the DataURL maker Web site (screenshot below):
With the above example, you can copy and paste the characters on the left and use them with an <img src="...">. Just set the src attribute with it!
Notice that you can encode as dataURL any type of file, but the most frequent usage comes with media files (images, audio, video).
EXAMPLE 1: READ IMAGES AS DATA URL AND DISPLAY PREVIEWS IN THE PAGE
-
Example 1 is useful for forms that allow the user to select one or more pictures. Before sending the form, you might want to get a preview of the pictures in the HTML page. The reader.readAsDataUrl method is used for that.
Example on JS Bin or try it below in your browser:
Preview of selected images:
Source code extract:
- <label for="files">Choose multiple files:</label>
- <input type="file" id="files" multiple
- onchange="readFilesAndDisplayPreview(this.files);"/><br/>
- <p>Preview of selected images:</p>
- <output id="list"></output>
-
- <script>
- function readFilesAndDisplayPreview(files) {
- // Loop through the FileList and render image files as thumbnails.
- for (var i = 0, f; f = files[i]; i++) {
-
- // Only process image files.
- if (!f.type.match('image.*')) {
- continue;
- }
-
- var reader = new FileReader();
-
- //capture the file information.
- reader.onload = function(e) {
- // Render thumbnail. e.target.result = the image content
- // as a data URL
- // create a span with CSS class="thumb", for nicer layout
- var span = document.createElement('span');
- // Add an img src=... in the span, with src= the dataURL of
- // the image
- span.innerHTML = "<img class='thumb' src='" +
- e.target.result + "' alt='a picture'/>";
- // Insert the span in the output id=list
- document.getElementById('list').insertBefore(span, null);
- };
- // Read in the image file as a data URL.
- reader.readAsDataURL(f);
- }
- }
Explanations:
- Line 35: starts the reading of the file f. When f is read the onload callback will be called.
- Lines 25-31: we build, using the DOM API, a <span class="thumb">...</span> and inside we add an<img src=the data url> element with its src attribute equal to the url of the image that has been read (the image content as dataURL is in e.target.result). Finally, at line 31 we insert the span in the document before the current children of the <output id="list"> element (declared at line 5).
Example 1 is useful for forms that allow the user to select one or more pictures. Before sending the form, you might want to get a preview of the pictures in the HTML page. The reader.readAsDataUrl method is used for that.
Example on JS Bin or try it below in your browser:
Preview of selected images:
Source code extract:
- <label for="files">Choose multiple files:</label>
- <input type="file" id="files" multiple
- onchange="readFilesAndDisplayPreview(this.files);"/><br/>
- <p>Preview of selected images:</p>
- <output id="list"></output>
- <script>
- function readFilesAndDisplayPreview(files) {
- // Loop through the FileList and render image files as thumbnails.
- for (var i = 0, f; f = files[i]; i++) {
- // Only process image files.
- if (!f.type.match('image.*')) {
- continue;
- }
- var reader = new FileReader();
- //capture the file information.
- reader.onload = function(e) {
- // Render thumbnail. e.target.result = the image content
- // as a data URL
- // create a span with CSS class="thumb", for nicer layout
- var span = document.createElement('span');
- // Add an img src=... in the span, with src= the dataURL of
- // the image
- span.innerHTML = "<img class='thumb' src='" +
- e.target.result + "' alt='a picture'/>";
- // Insert the span in the output id=list
- document.getElementById('list').insertBefore(span, null);
- };
- // Read in the image file as a data URL.
- reader.readAsDataURL(f);
- }
- }
Explanations:
- Line 35: starts the reading of the file f. When f is read the onload callback will be called.
- Lines 25-31: we build, using the DOM API, a <span class="thumb">...</span> and inside we add an<img src=the data url> element with its src attribute equal to the url of the image that has been read (the image content as dataURL is in e.target.result). Finally, at line 31 we insert the span in the document before the current children of the <output id="list"> element (declared at line 5).
EXAMPLE 2: READ A SINGLE LOCAL IMAGE FILE AND USE IT WITH DRAWIMAGE IN A CANVAS
-
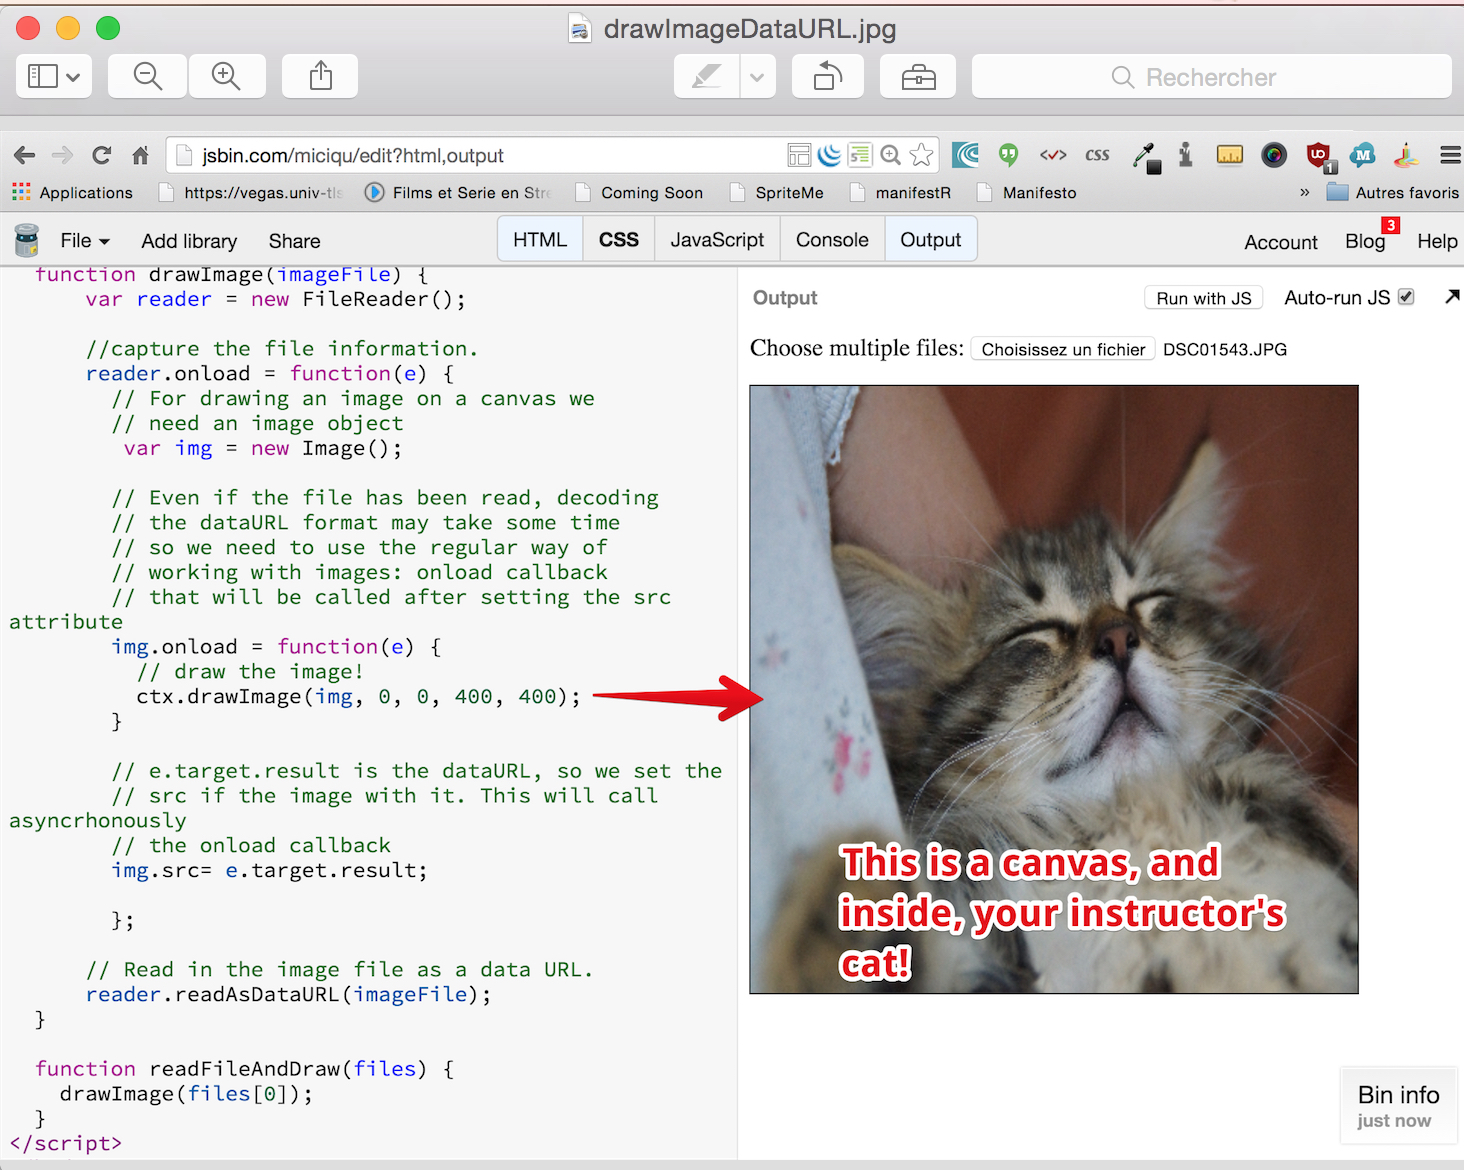 Errata: the above screenshot says "choose multiple files", but the example works only with a single file.
Source code extract:
Errata: the above screenshot says "choose multiple files", but the example works only with a single file.
Source code extract:
- function drawImage(imageFile) {
- var reader = new FileReader();
-
- //capture the file information.
- reader.onload = function(e) {
- // For drawing an image on a canvas we
- // need an image object
- var img = new Image();
- // Even if the file has been read, decoding
- // the dataURL format may take some time
- // so we need to use the regular way of
- // working with images: onload callback
- // that will be called after setting the src attribute
- img.onload = function(e) {
- // draw the image!
- ctx.drawImage(img, 0, 0, 400, 400);
- }
- // e.target.result is the dataURL, so we set the
- // src if the image with it. This will call
- // asynchonously the onload callback
- img.src= e.target.result;
- };
- // Read in the image file as a data URL.
- reader.readAsDataURL(imageFile);
- }
- function readFileAndDraw(files) {
- drawImage(files[0]);
- }
Explanations:
Remember how we worked with images on a canvas. We had to create an empty image object (line 8), set thesrc attribute of the image object (line 23), then use an image.onload callback (line 15), and we could only draw from inside the callback (line 17). This time, it's exactly the same, except that the URL comes frome.target.result in the reader.onload callback (line 23).
Errata: the above screenshot says "choose multiple files", but the example works only with a single file.
Source code extract:
- function drawImage(imageFile) {
- var reader = new FileReader();
- //capture the file information.
- reader.onload = function(e) {
- // For drawing an image on a canvas we
- // need an image object
- var img = new Image();
- // Even if the file has been read, decoding
- // the dataURL format may take some time
- // so we need to use the regular way of
- // working with images: onload callback
- // that will be called after setting the src attribute
- img.onload = function(e) {
- // draw the image!
- ctx.drawImage(img, 0, 0, 400, 400);
- }
- // e.target.result is the dataURL, so we set the
- // src if the image with it. This will call
- // asynchonously the onload callback
- img.src= e.target.result;
- };
- // Read in the image file as a data URL.
- reader.readAsDataURL(imageFile);
- }
- function readFileAndDraw(files) {
- drawImage(files[0]);
- }
Explanations:
Remember how we worked with images on a canvas. We had to create an empty image object (line 8), set thesrc attribute of the image object (line 23), then use an image.onload callback (line 15), and we could only draw from inside the callback (line 17). This time, it's exactly the same, except that the URL comes frome.target.result in the reader.onload callback (line 23).
EXAMPLE 3 (ADVANCED): AN INSTAGRAM-LIKE PHOTO FILTER APPLICATION
-
Another very impressive example, has been developed by @GeorgianaB, a student of the first iteration of this course. This Web applications reads local image files, draws them into a canvas element and proposes different filters. This example is given "as is" for those of you who would like to go further. Just click on the link (or on the image below) and look at the source code.
Try this example online on gitHub (or click the screenshot below)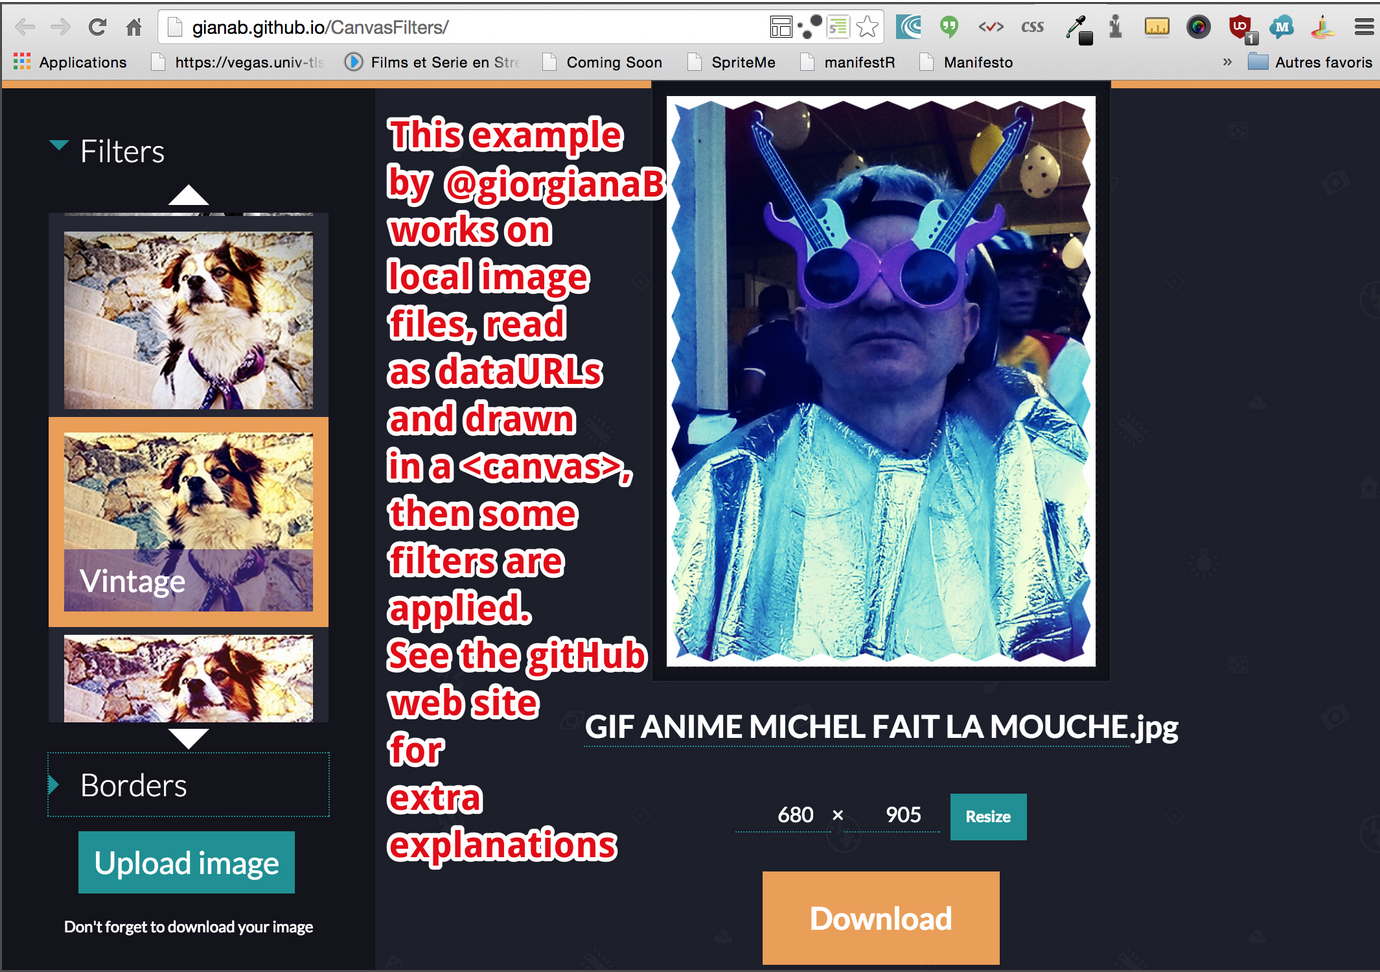
Hi, Great.. Tutorial is just awesome..It is really helpful for a newbie like me.. I am a regular follower of your blog. Really very informative post you shared here. Kindly keep blogging. If anyone wants to become a Front end developer learn from Javascript Online Training from India . or learn thru JavaScript Online Training from India.
ReplyDelete