The most useful filter nodes
All definitions come from the the Mozilla Developer Network pages that describe in detail the Web Audio API.
GAIN NODE
Useful for setting volume....
Definition: "The GainNode interface represents a change in volume. It is an AudioNode audio-processing module that causes a given gain to be applied to the input data before its propagation to the output. A GainNode always has exactly one input and one output, both with the same number of channels."
Example at JSBin, or try it in your browser:
Source code extract:
- /* Gain Node */
- var gainExample = document.querySelector('#gainExample');
- var gainSlider = document.querySelector('#gainSlider');
- var gainMediaElementSource =audioContext.createMediaElementSource(gainExample);
- var gainNode = audioContext.createGain();
- gainMediaElementSource.connect(gainNode);
- gainNode.connect(audioContext.destination);
- gainSlider.oninput = function(evt){
- gainNode.gain.value = evt.target.value;
- };
The gain property (line 13 in the above code) corresponds to the multiplication we apply to the input signal volume. A value of 1 will keep the volume unchanged. A value < 1 will lower the volume (0 will mute the signal), and a value > 1 will increase the global volume, with a risk of clipping. With gain values > 1, we usually add a compressor node to the signal chain to prevent clipping. You will see an example of this when we discuss the compressor node.
STEREO PANNER
Definition: "The StereoPannerNode interface of the Web Audio API represents a simple stereo panner node that can be used to pan an audio stream left or right. The pan property takes a value between -1 (full left pan) and 1 (full right pan)."
Example at JSBin, or try it in your browser:
Source code extract:
- // the audio element
- playerPanner = document.querySelector('#pannerPlayer');
- pannerSlider = document.querySelector('#pannerSlider');
- // create nodes
- var source = audioContext.createMediaElementSource(playerPanner);
- pannerNode = audioContext.createStereoPanner();
- // connect nodes together
- source.connect(pannerNode);
- pannerNode.connect(audioContext.destination);
- // input listener on the gain slider
- pannerSlider.oninput = function(evt){
- pannerNode.pan.value = evt.target.value;
- };
BIQUAD FILTER
Definition: "The BiquadFilterNode interface represents a simple low-order filter, and is created using theAudioContext.createBiquadFilter() method. It is an AudioNode that can represent different kinds of filters, tone control devices, and graphic equalizers. A BiquadFilterNode always has exactly one input and one output."
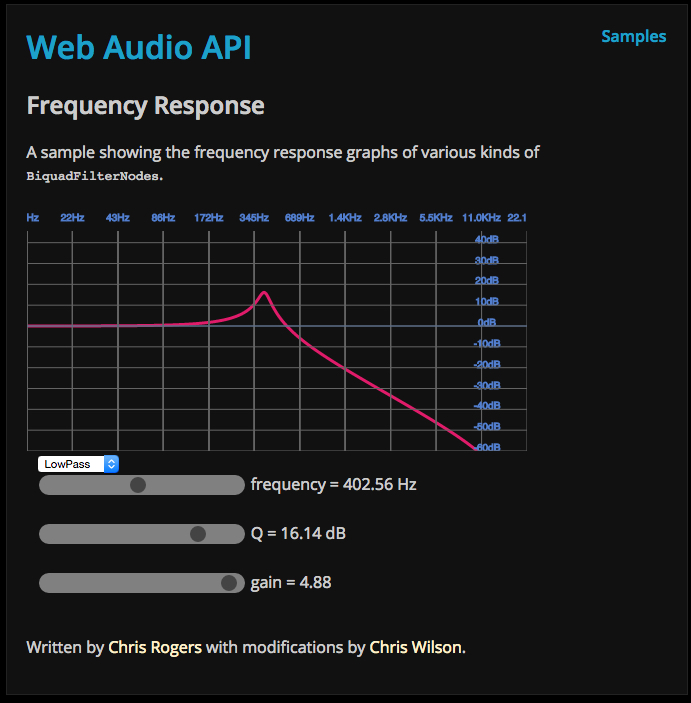
Example at JSBin, or try it in your browser, with a lowpass filter, only the frequency slider will have a noticeable effect:
The most useful slider is the frequency slider (that changes the frequency value property of the node). The meaning of the different properties (frequency, detune and Q) differs depending on the type of the filter you use (click on the dropdown menu to see the different types available). Look at this documentation for details on the different filters and how the frequency, detune and Q properties are used with each of these filter types.
Here is a nice graphic application that shows the frequency responses to the various filters, you can choose the type of filters and play with the different property values using sliders:
Multiple filters are often used together. We will make a multi band equalizer in a next lesson, and use six filters with type=peaking.
Source code extract:
- var ctx = window.AudioContext || window.webkitAudioContext;
- var audioContext = new ctx();
- /* BiquadFilterNode */
- var biquadExample = document.querySelector('#biquadExample');
- var biquadFilterFrequencySlider =
- document.querySelector('#biquadFilterFrequencySlider');
- var biquadFilterDetuneSlider =
- document.querySelector('#biquadFilterDetuneSlider');
- var biquadFilterQSlider =
- document.querySelector('#biquadFilterQSlider');
- var biquadFilterTypeSelector =
- document.querySelector('#biquadFilterTypeSelector');
- var biquadExampleMediaElementSource =
- audioContext.createMediaElementSource(biquadExample);
- var filterNode = audioContext.createBiquadFilter();
- biquadExampleMediaElementSource.connect(filterNode);
- filterNode.connect(audioContext.destination);
- biquadFilterFrequencySlider.oninput = function(evt){
- filterNode.frequency.value = parseFloat(evt.target.value);
- };
- biquadFilterDetuneSlider.oninput = function(evt){
- filterNode.detune.value = parseFloat(evt.target.value);
- };
- biquadFilterQSlider.oninput = function(evt){
- filterNode.Q.value = parseFloat(evt.target.value);
- };
- biquadFilterTypeSelector.onchange = function(evt){
- filterNode.type = evt.target.value;
- };
CONVOLVER NODE: USEFUL FOR CONVOLUTION EFFECTS SUCH AS REVERBERATION
Definition: "The ConvolverNode interface is an AudioNode that performs a Linear Convolution on a given AudioBuffer, often used to achieve a reverb effect. A ConvolverNode always has exactly one input and one output."
Example at JSBin, THIS EXAMPLE DOES NOT WORK IN YOUR BROWSER as the edX platforms disables Ajax loading in its HTML pages. Try it at JSBin!
From Wikipedia: a convolution is a mathematical process which can be applied to an audio signal to achieve many interesting high-quality linear effects. Very often, the effect is used to simulate an acoustic space such as a concert hall, cathedral, or outdoor amphitheater. It can also be used for complex filter effects, like a muffled sound coming from inside a closet, sound underwater, sound coming through a telephone, or playing through a vintage speaker cabinet. This technique is very commonly used in major motion picture and music production and is considered to be extremely versatile and of high quality.
Each unique effect is defined by an impulse response. An impulse response can be represented as an audio file and can be recorded from a real acoustic space such as a cave, or can be synthetically generated through a wide variety of techniques. We can find many high quality impulses on the Web (for example here). The impulse used in the example is the one recorded at the opera: La Scala Opera of Milan, in Italy. It's a .wav file.
Try this demo to see the difference between different impulse files!

So before building the audio graph, we need to download the impulse. For this, we use an Ajax request (this will be detailed during Week 3), but for the moment, just take this function as it is... The Web Audio API requires that impulse files should be decoded in memory before use. For this reason, once the requested file has arrived, we call the decodeAudioData method. Once the impulse is decoded, we can build the graph. So the typical use is as follows:
- var impulseURL = "http://mainline.i3s.unice.fr/mooc/Scala-Milan-Opera-Hall.wav";
- var decodedImpulse;
- ...
- loadImpulse(impulseURL, function() {
- // we only get here once the impulse has finished
- // loading and is decoded
- buildAudioGraphConvolver();
- });
- ...
- function loadImpulse(url, callback) {
- ajaxRequest = new XMLHttpRequest();
- ajaxRequest.open('GET', url, true);
- ajaxRequest.responseType = 'arraybuffer'; // for binary transfer
- ajaxRequest.onload = function() {
- // The impulse has been loaded
- var impulseData = ajaxRequest.response;
- // let's decode it.
- audioContext.decodeAudioData(impulseData, function(buffer) {
- // The impulse has been decoded
- decodedImpulse = buffer;
- // Let's call the callback function, we're done!
- callback();
- });
- };
- ajaxRequest.onerror = function(e) {
- console.log("Error with loading audio data" + e.err);
- };
- ajaxRequest.send();
- }
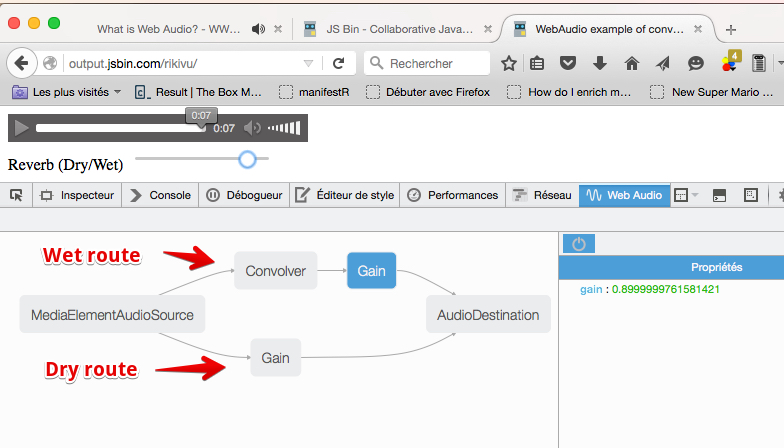
Here is the function that builds the graph. In order to set the quantity of reverb we would like to apply to the signal, we need to have two different routes for the signal:
- One "dry" route where we directly connect the audio source to the destination,
- One "wet" route where we connect the audio source to the convolver node (that will add a reverb effect), then to the destination,
- At the end of both routes, before the destination, we add a gain node, so that we can specify the quantity of dry and wet signal we're going to send to the speakers.
The audio graph will look like this:
And here is the function that builds the graph:
- function buildAudioGraphConvolver() {
- // create the nodes
- var source = audioContext.createMediaElementSource(playerConvolver);
- convolverNode = audioContext.createConvolver();
- // Set the buffer property of the convolver node with the decoded impulse
- convolverNode.buffer = decodedImpulse;
- convolverGain = audioContext.createGain();
- convolverGain.gain.value = 0;
- directGain = audioContext.createGain();
- directGain.gain.value = 1;
- // direct/dry route source -> directGain -> destination
- source.connect(directGain);
- directGain.connect(audioContext.destination);
- // wet route with convolver: source -> convolver
- // -> convolverGain -> destination
- source.connect(convolverNode);
- convolverNode.connect(convolverGain);
- convolverGain.connect(audioContext.destination);
- }
Note that at line 6 we use the decoded impulse. We could not have done this before the impulse was loaded and decoded.
THE DYNAMICS COMPRESSOR NODE
Definition: "The DynamicsCompressorNode interface provides a compression effect, which lowers the volume of the loudest parts of the signal in order to help prevent clipping and distortion that can occur when multiple sounds are played and multiplexed together at once. This is often used in musical production and game audio."
It's usually a good idea to insert a compressor in your audio graph to give a louder, richer and fuller sound, and prevent clipping.
Example you can try on JSBin or try it here in your browser:
In this example we set the gain to a very high value that will make a saturated sound. To prevent clipping, it suffices to add a compressor right at the end of the graph! Here we use the compressor with all default settings. This course does not go into detail about the different properties of the compressor node, as they are largely for musicians with the purpose of enabling the user to set subtle effects such as release, attack, etc.
Audio graph with the compressor activated:

Extract of the HTML code:
- <audio src="http://mainline.i3s.unice.fr/mooc/guitarRiff1.mp3"
- id="compressorExample" controls loop
- crossorigin="anonymous"></audio>
- <br>
- <label for="gainSlider1">Gain</label>
- <input type="range" min="0" max="10" step="0.01"
- value="8" id="gainSlider1" />
- <button id="compressorButton">Turn compressor On</button>
JavaScript source code:
- // This line is a trick to initialize the AudioContext
- // that will work on all recent browsers
- var ctx = window.AudioContext || window.webkitAudioContext;
- var audioContext;
- var compressorExemple, gainSlider1, gainNode1, compressorNode;
- var compressorButton;
- var compressorOn = false;
- window.onload = function() {
- // get the AudioContext
- audioContext = new ctx();
- // the audio element
- compressorExemple = document.querySelector('#compressorExample');
- gainSlider1 = document.querySelector('#gainSlider1');
- // button for turning on/off the compressor
- compressorButton = document.querySelector('#compressorButton');
- buildAudioGraph();
- // input listener on the gain slider
- gainSlider1.oninput = function(evt) {
- gainNode1.gain.value = evt.target.value;
- };
- compressorButton.onclick = function(evt) {
- if(compressorOn) {
- // disconnect the compressor and make a
- // direct route from gain to destination
- compressorNode.disconnect(audioContext.destination);
- gainNode1.disconnect(compressorNode);
- gainNode1.connect(audioContext.destination);
- compressorButton.innerHTML="Turn compressor: On";
- } else {
- // compressor was off, we connect the gain to the compressor
- // and the compressor to the destination
- gainNode1.disconnect(audioContext.destination);
- gainNode1.connect(compressorNode);
- compressorNode.connect(audioContext.destination);
- compressorButton.innerHTML="Turn compressor: Off";
- }
- compressorOn = !compressorOn;
- };
- };
- function buildAudioGraph() {
- // create source and gain node
- var gainMediaElementSource =
- audioContext.createMediaElementSource(compressorExemple);
- gainNode1 = audioContext.createGain();
- gainNode1.gain.value = parseFloat(gainSlider1.value);
- // do not connect it yet
- compressorNode = audioContext.createDynamicsCompressor(); // connect nodes together
- gainMediaElementSource.connect(gainNode1);
- gainNode1.connect(audioContext.destination);
- }
Explanations: There is nothing special here compared to the other examples in this section, except that we have used a new method disconnect (line 32 and line 38), which is available on all types of nodes (exceptctx.destination) to modify the graph on the fly. When the button is clicked, we remove or add a compressor in the audio graph (lines 28-42) and to achieve this, we disconnect and reconnect some of the nodes.
No comments:
Post a Comment